Introduction
On this article, we’re going to try Net Jobs and assist you to perceive what they’re, how they work, and the way they will profit you. We’ll get began by having a look at precisely what a Net Job is. We’re going to try using the WebJobs SDK to each simplify the code that we write and prolong the attain of our Net Jobs code. Then we’ll see what the WebJobs SDK offers when it comes to bindings to providers, issues like Azure Queues, Service Bus, Desk and Blob Storage, the opposite messaging or data-related providers. It should simplify the job we now have of coding and configuring our Net Jobs in order that we do not write a variety of the boilerplate code to connect with and entry these sources.
Highway Map
- What’s an Azure WebJob
- Azure WebJob vs Azure Capabilities
- Putting in WebJob SDK in Visual Studio
- Making a WebJob utilizing Azure WebJob SDK
- Configuring a Queue in Azure Storage to ship message
- Create a brand new storage account
- Create a queue and ship messages
- Working the WebJob
- Sending a message to set off the Job
- Working with Bindings and Triggers
- Use Instances
What’s an Azure WebJob?
Of their easiest type, Azure Net Jobs means that you can write background code that executes within the context of your internet utility or web site. Meaning they are not depending on person interplay, however they’re able to entry the file system and different issues which can be obtainable in your web site. There’s a number of work that should occur behind the scenes when a person is just not interacting with the positioning. And that is the place Net Jobs are available in. A Net Job may run within the background of your utility, and it will possibly then entry issues like your database, the recordsdata, both momentary recordsdata, log recordsdata, or supply recordsdata, on your utility, and since it is operating in there, you can even have entry to the assorted items of your utility again finish.
Azure WebJob vs Azure Capabilities
Azure Capabilities is a service that you need to use to run code in Azure with out provisioning any servers or different infrastructure. As a result of a Operate can run on a schedule or repeatedly, you need to use them as a substitute of WebJobs to execute background duties. You’ll be able to consider Azure Capabilities because the logical successor to WebJobs for many workloads. In truth, Azure Capabilities is constructed on the WebJobs SDK.
For many automated duties, construct Capabilities as a result of they’re extra versatile than WebJobs. For instance, you may develop and check Capabilities completely within the browser, and Capabilities can mechanically scale in response to demand.
Nevertheless, code deployed as a WebJob could be developed and maintained alongside the code for the web site it’s related to. An internet site with its WebJobs could be simply packaged, deployed, and managed collectively, as a single answer. In contrast, Azure Capabilities are separate from the App Service and should be managed individually.
Putting in Azure WebJobs SDK
Write the next command within the NuGet bundle supervisor console in your Visual Studio,
Set up-Bundle Microsoft.Azure.WebJobs –Model 2.2.0
Making a WebJob challenge
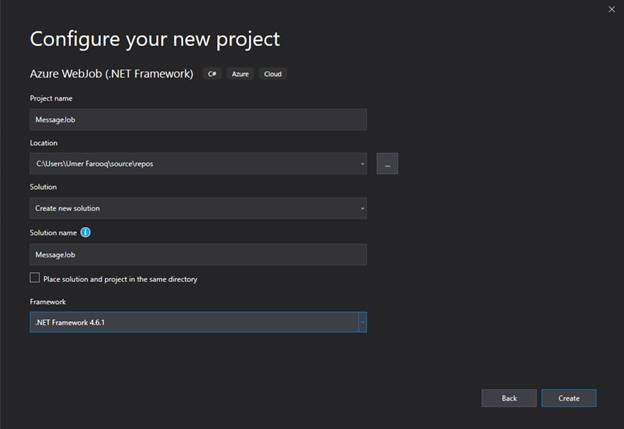
Now create a webjob challenge from Visual Studio as proven. Assume that we’re writing a job simply to print a message it will get.
- Create a brand new challenge and select Azure WebJob
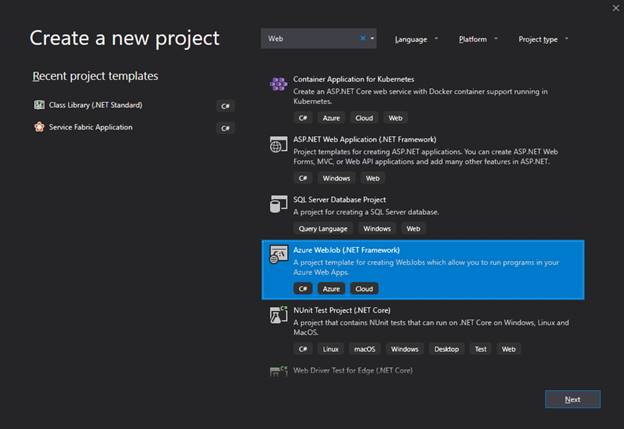
- Select a reputation for it and press Create
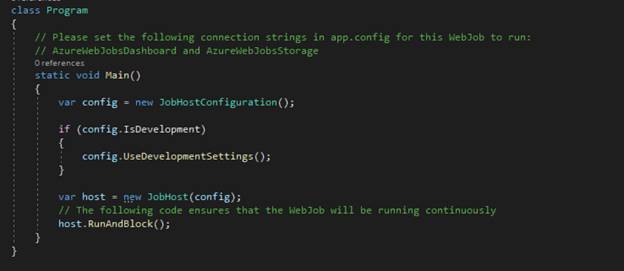
If we take a look at the Program.cs file we are going to see a static void Major, and we now have this config and the JobHost. These are all a part of the WebJobs SDK. That JobHost goes to be answerable for operating and blocking inside my console utility, after which it is going to be internet hosting different features.
The Code under is mechanically generated by the challenge, you don’t have to put in writing it.
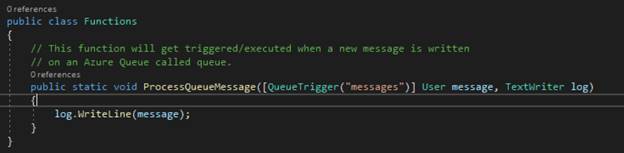
So if we go take a look at our features.cs right here, discover that we now have a selected signature on this methodology, static void methodology, after which the parameters, however there’s this attribute referred to as QueueTrigger on the message.
The Code under is mechanically generated by the challenge, you don’t have to put in writing it.
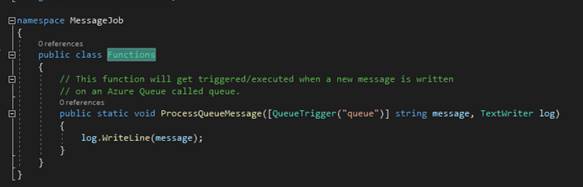
Once more, that is a part of that WebJobs SDK, and what that claims is, go take a look at a queue, on this case, referred to as queue, and when messages arrive, pull them off, pull the string out, and invoke this methodology, passing within the message. Now let’s create a messaging queue within the Azure portal to ship messages. However first, we should create a storage account.
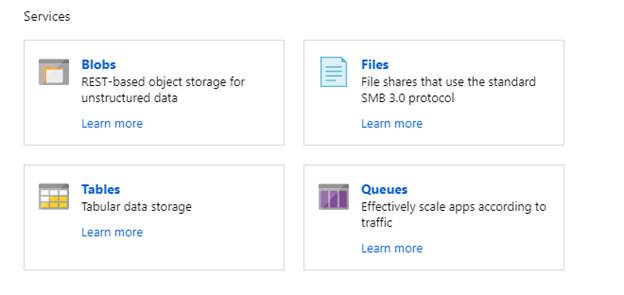
Configuring a Queue in Azure Storage to ship message
For this, we should create a storage account within the Azure portal.
Working the WebJob
Now return to the WebJob challenge and make some adjustments.
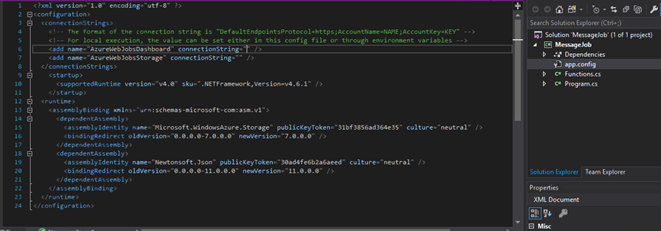
- Go to the app. config file within the challenge listing and paste the connection string within the following,
- AzureWebJobsDashboard
- AzureWebJobsStorage
- The Code under is mechanically generated by the challenge, you don’t have to put in writing it.
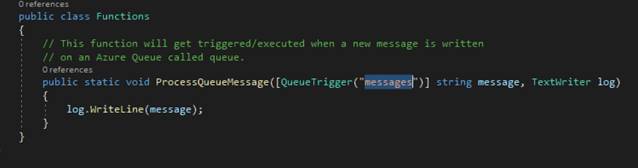
- Change the identify of the queue within the cs file with the identify of your queue.
- public static void ProcessQueueMessage([QueueTrigger(“messages”)] string message, TextWriter log)
- Run the app, you will note the next console

Sending Messages to set off the WebJob
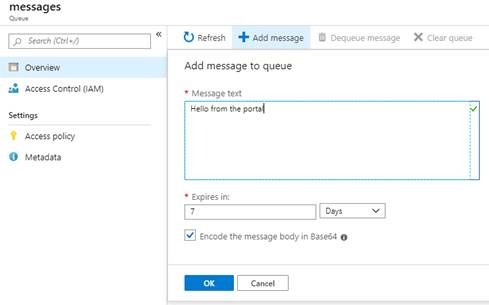
- Now go to the portal, and navigate to the queues.
- Click on on Add Message
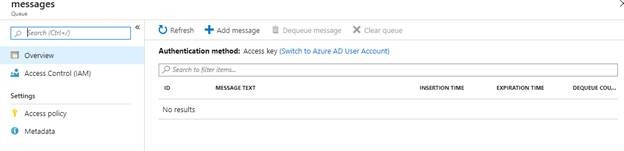
- Sort something a click on OK
- Now return to the console and you will note the brand new Message there.

And that’s how you need to use WebJob SDK to obtain upcoming messages from the storage queue. Equally as a substitute of displaying a easy message you are able to do a heavy background job primarily based on any set off.
Working with Bindings and Triggers
We have seen a primary instance of simply studying a string of the queue and writing it out to the console, however let’s take this a step additional. I’ve created a Consumer class right here in my WebJobs challenge that simply has a Title, an ID, and a Gender. And what I would like to have the ability to do is get that specific person off the queue.
- Create a brand new Consumer class as follows
class Consumer
{
    public int ID { get; set; }
    public string Title { get; set; }
    public string Gender { get; set; }
}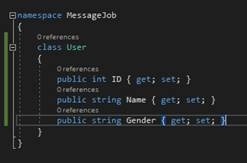
- So if we return to our Operate, we’ll change this from a string message to a Consumer message. And that is going to trigger the WebJobs SDK to attempt to deserialize some JSON that we’ll placed on the queue into this class.
- Change the message from string to Consumer
- The Code under is mechanically generated by the challenge, you don’t have to put in writing it.
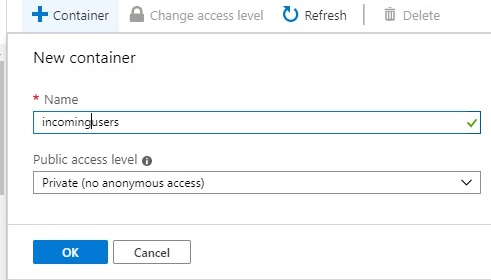
- Create a Blob in the identical manner as a queue within the Azure portal.
- Now I will add one other factor right here as an output, and I will put a Blob output on this. Now for the blob, we now have a wide range of differing kinds we are able to really use right here for the parameter, like several azure storage. It is a binding, a queue is a set off, which implies it should provoke this. It is a binding, that means that we’ll simply have some parameter right here, and this binding goes to maintain connecting that as much as the useful resource.
- Now go to the features. cs and alter the ProcessQueueMessage methodology as follows,
public static void ProcessQueueuMessage([QueueTrigger("messages")] Consumer message, [Blob("incomingusers/userlog.txt", FileAccess.Write)] TextWriter bidWriter, TextWriter log)
{
    bidWriter.WriteLine($"New Consumer added {message.ID} with Title of {message.Title} Having gender {message.Gender}");
    log.WriteLine(message);
}
- And now that we now have that, if we return to our portal, bear in mind, we are able to go to our queue, view that, and create a brand new message.
- Create a brand new message as a JSON person object and click on OK.
{
  "id": 1,
  "identify": "David",
  "gender": "Male"
}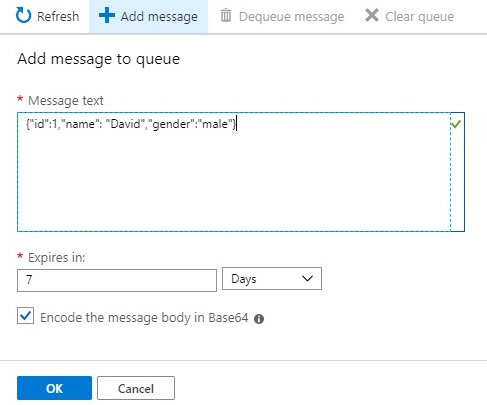
- Now if we go take a look at our container over right here and look at the container, you may see there’s my userlog.txt.
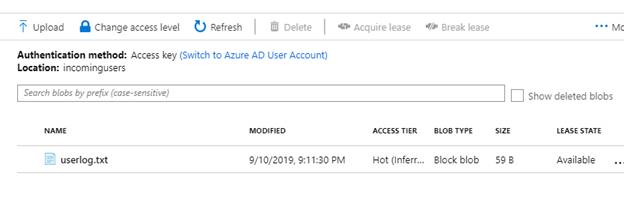
- If I click on that, obtain it, and open it, you will note the info we saved on this.


- If we proceed to ship messages, then we might write these to that log file. So it is a very highly effective mannequin with these triggers and bindings that enables us to put in writing much less code, to make the most of event-based processing.
Equally, as a substitute of Blob storage, we are able to use tables to retailer our information.
Use Instances
- For operating background duties primarily based on some triggers
- Can be utilized with web sites not like Azure Capabilities
- Can be utilized to put in writing information to DB primarily based on an occasion
- Will also be used to run repeatedly within the background
Know extra about our firm at Skrots. Know extra about our providers at Skrots Companies, Additionally checkout all different blogs at Weblog at Skrots