On this article, we are going to discover ways to create and configure a Self-Hosted Agent in Azure DevOps (ADO).
Earlier than, we dive-in, let’s first perceive what an Agent is?
What’s an Agent?
Agent is a server with the suitable Working System and the instruments put in and configured.
Azure DevOps helps the next two kinds of Brokers
- Microsoft Hosted Agent – These brokers are managed by Microsoft
- Self-Hosted Brokers – These are created and managed by the Buyer.
Many of the instances, utilizing the Microsoft hosted Brokers ought to be good. Nevertheless, under are the situations wherein it’s best to take a look at configuring Self-Hosted Brokers
- If 10GB free house within the Digital Machine (Agent) is just not adequate in your construct wants.
- Whenever you desire a Digital Machine, whose capability is bigger than of Commonplace DS2V2
- Whenever you want to use a Software program that’s not obtainable within the Microsoft hosted Construct Brokers
On this article, we are going to give attention to tips on how to configure the Self Hosted Brokers.
Stipulations
- A Legitimate Azure DevOps account. You may create one at dev.azure.com
- Create an ADO Group
- Create a Undertaking.
- A Server that you simply want to make it as an Agent (I’ve created a Home windows Digital Machine in Azure)
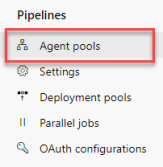
Navigate to the Group Settings and click on on Agent Swimming pools menu merchandise as proven within the under display screen.
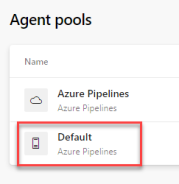
Within the Agent Swimming pools itemizing web page, click on on the Default Agent Pool as proven within the under screenshot. Be happy to create a brand new Agent Pool if you need.
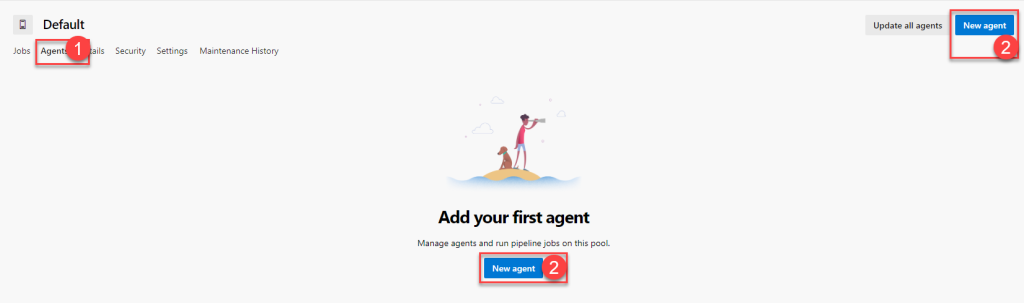
You’ll be taken to the Agent Pool Abstract web page the place you could click on on Brokers tab and click on on New Agent button as proven within the under screenshot.
Clicking on the New Agent button opens a popup which reveals data on tips on how to configure the agent in varied Working Programs and the Architectures (see left hand aspect) as proven under.
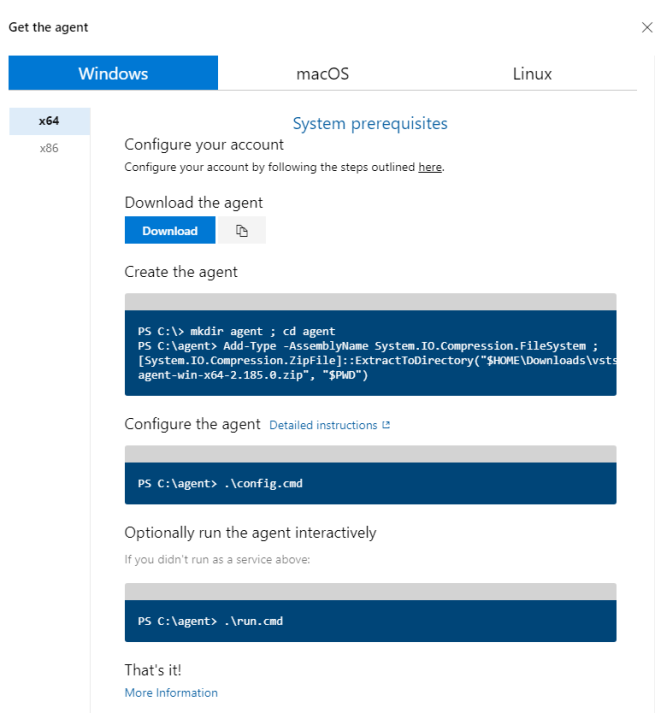
On this article, I’m going to configure a Home windows primarily based Digital Machine as an ADO agent. Earlier than, we begin configuring the agent, we have to create a Private Entry Token which is a crucial step for authenticating the Digital Machine by the ADO server.
Configure PAT in Azure DevOps

Configure PAT in Azure DevOps
- Navigate to Person Settings (within the prime right-hand aspect) and click on on Private entry token
- Private entry token display screen reveals the record of all of the PATs. Click on on New token button.
- You will note a web page the place you configure the main points of the brand new PAT.
- When you present the main points, click on on Create button to create the PAT. As soon as the PAT is generated a hit message is proven and you may copy the PAT by clicking on the Copy button.
Configure Agent
Beneath is the record of steps that we have to carry out to be able to setup a Self-hosted agent.
- Create a Digital machine and guarantee it has the under stipulations.
- Home windows 2008 R2 SP1 or increased
- Set up PowerShell 3.zero or increased
- .NET Framework 4.6.2 or increased
- Obtain the Agent by clicking on the Obtain button within the Get the Agent popup proven earlier and extract the zip file to any folder as proven under.
- Run the config.cmd file which prompts you many questions.
- Enter the Server Url: https://dev.azure.com/{your-organization}
- Enter the authentication sort (press enter for PAT) – Press enter for this step.
- Enter private entry token. – Paste the PAT generated earlier
- Enter Agent Pool – Press Enter if you’re creating an agent within the default Agent pool, in any other case, present the identify of the Agent Pool
- Enter Agent Title – Present the Agent Title (In my case, I supplied CustomAgent because the Agent identify
- Enter run agent as Service – Press Y for this to be able to set up & Run the Agent as a service within the Digital Machine.
That’s it. We have now efficiently configured the Agent. In the event you navigate to the Agent record in ADO, it’s best to be capable of view the agent with the identify CustomAgent as proven under.

Observe
Initially, the standing of the Agent could be offline. It ought to routinely flip into On-line after a couple of minutes.
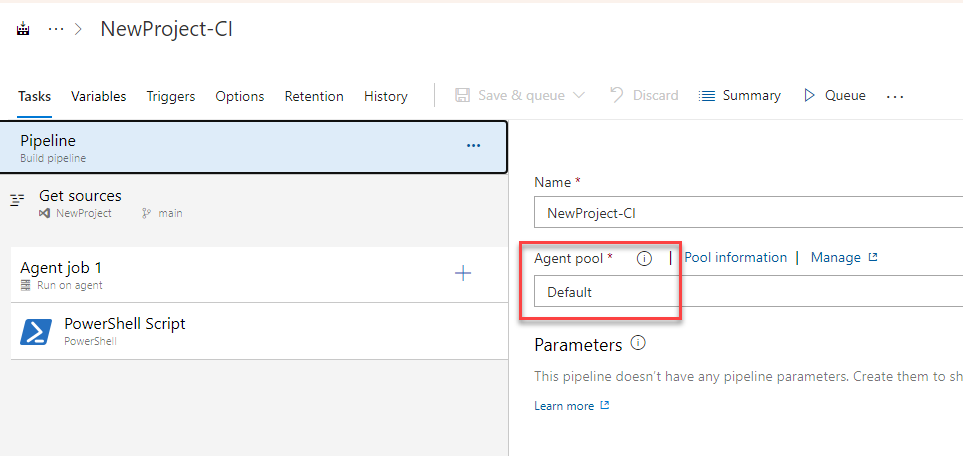
Let’s connect this new Agent Pool to a Pipeline and see the way it works. Go-ahead and create a brand new pipeline with an Empty Job and use the Default because the Agent Pool as proven under.
Observe
You’ll select the Agent Pool within the Pipeline definition. ADO will routinely decide the obtainable agent for executing the pipeline.
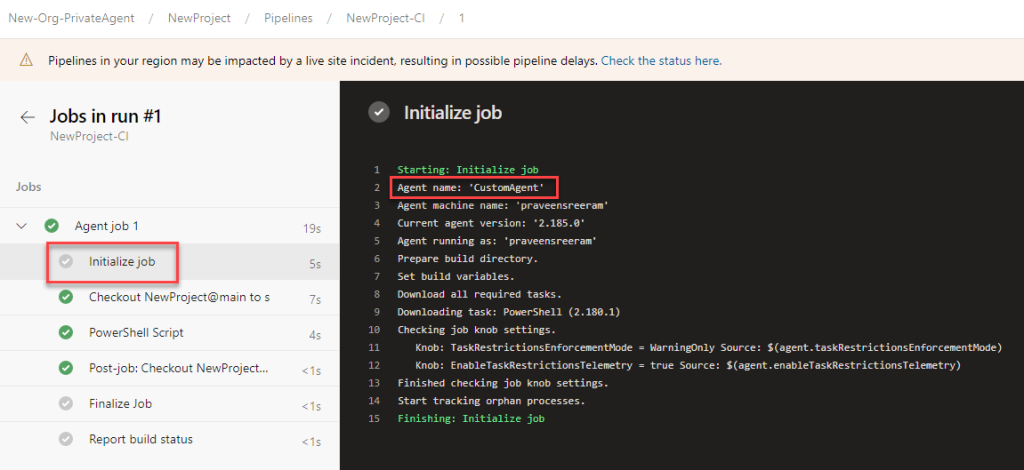
So, Let’s run the pipeline now and click on on Initialize Job step the place you’ll be able to view the Agent wherein the pipeline has run as proven under. In my case the agent’s identify was Customized Agent.
That’s it. We have now learnt tips on how to configure an Agent in Azure DevOps. When you’ve got any questions, be at liberty to remark under. Completely happy Studying.


