Introduction
In SharePoint 2010/2013 On-Premise, we’ve got Timer Jobs, which carry out repetitive, scheduled duties. For instance, you might want a timer job to fetch Sharepoint listing objects and ship them as experiences each day. This timer job might be created as a farm answer and might be deployed in SharePoint 2010/2013 On Premise Server, whereas in SharePoint On-line, you aren’t allowed to deploy the farm options. To beat this, you may create Azure WebJobs, which act as scheduled timer jobs for SharePoint On-line.
On this article, you’ll learn to create Azure WebJobs for SharePoint 2013 On-line.
Stipulations
- Visual Studio 2013 or the most recent variations.
- Workplace 365 Web site. For those who don’t have an Workplace 365 web site, please strive the trial model.
- Entry to Azure Portal. For those who don’t have an Azure account, please strive the trial model.
Create your Console Utility
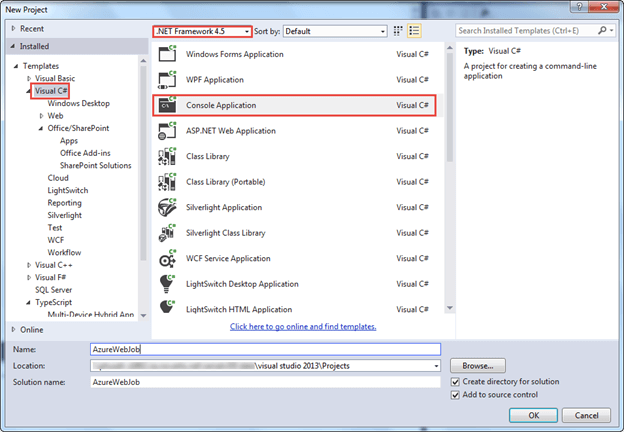
- Open Visual Studio 2013.
- Click on File=> New => Undertaking.
- Choose the Console Utility template, enter your identify, and click on the OK button.
- In Resolution Explorer, right-click References and click on Handle NuGet Packages.
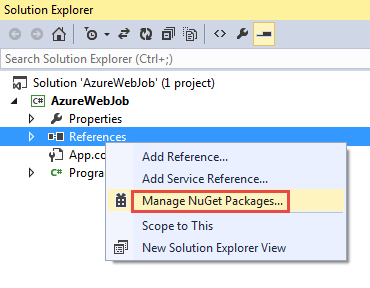
- In Handle NuGet Packages, seek for “App for SharePoint Net Toolkit” and click on Set up.

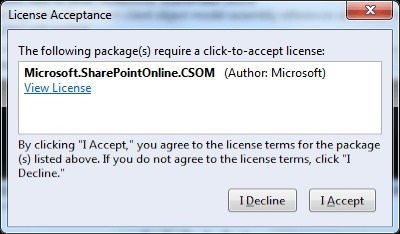
- Within the License Acceptance, click on the I Settle for button.
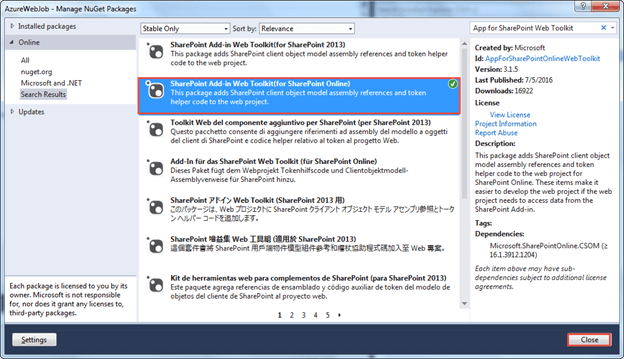
- Putting in the bundle is proven under.
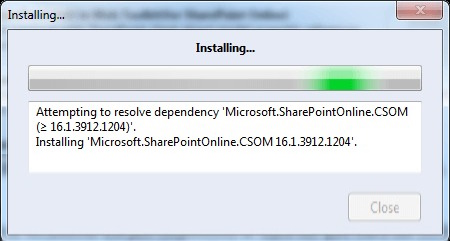
- The bundle was put in efficiently. Click on the Shut button.
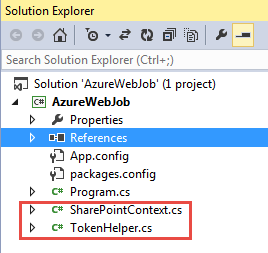
- Ensure that the under highlighted CS recordsdata are added.
- Open App.Config and change the file with XML, given under, the place you may specify the credentials, which lets you execute CSOM code in your websites. Word: I’m utilizing my credentials on this article to execute the code however one of the best observe might be to create a service account and use it. The alternate possibility might be utilizing OAuth and together with authentication tokens in your requests to keep away from specifying the account/password. Please check with this text.
<?xml model="1.0" encoding="utf-8"?> <configuration> <startup> <supportedRuntime model="v4.0" sku=".NETFramework,Model=v4.5" /> </startup> <appSettings> <add key="SPOAccount" worth="[email protected]" /> <add key="SPOPassword" worth="@Macro9876" /> </appSettings> </configuration> - Open Program. cs and change the file with the code, given under. Word: Whenever you execute/run the Azure WebJob, it should create an merchandise in “Azure Net Job Checklist” and the modified by would be the account identify that you’ve got specified within the App.Config.
utilizing System;
utilizing System.Collections.Generic;
utilizing System.Configuration;
utilizing System.Linq;
utilizing System.Textual content;
utilizing System.Safety;
utilizing System.Threading.Duties;
utilizing Microsoft.SharePoint.Consumer;

namespace AzureWebJob
{
    class Program
    {
        static void Primary(string[] args)
        {
            strive
            {
                utilizing (ClientContext context = new ClientContext("https://c986.sharepoint.com"))
                {
                    // Use default authentication mode
                    context.AuthenticationMode = ClientAuthenticationMode.Default;
                    // Specify the credentials for the account that can execute the request
                    context.Credentials = new SharePointOnlineCredentials(GetSPOAccountName(), GetSPOSecureStringPassword());
                    // Create Checklist Gadgets
                    var oList = context.Net.Lists.GetByTitle("Azure Net Job Checklist");
                    ListItemCreationInformation newItemCreateInfo = new ListItemCreationInformation();
                    Microsoft.SharePoint.Consumer.ListItem newItem = oList.AddItem(newItemCreateInfo);
                    newItem["Title"] = "Merchandise added by Azure Net Job at " + DateTime.Now;
                    newItem.Replace();
                    context.ExecuteQuery();
                    Console.WriteLine("Azure Net Job: Efficiently accomplished.");
                }
            }
            catch (Exception ex)
            {
                Console.WriteLine(ex.Message);
                Console.WriteLine(ex.StackTrace);
            }
        }

        non-public static SecureString GetSPOSecureStringPassword()
        {
            strive
            {
                Console.WriteLine(" --> Entered GetSPOSecureStringPassword()");
                var secureString = new SecureString();
                foreach (char c in ConfigurationManager.AppSettings["SPOPassword"])
                {
                    secureString.AppendChar(c);
                }
                Console.WriteLine(" --> Constructed the safe password");
                return secureString;
            }
            catch
            {
                throw;
            }
        }

        non-public static string GetSPOAccountName()
        {
            strive
            {
                Console.WriteLine(" --> Entered GetSPOAccountName()");
                return ConfigurationManager.AppSettings["SPOAccount"];
            }
            catch
            {
                throw;
            }
        }
    }
}
Publish instantly as Azure WebJob from Visual Studio.
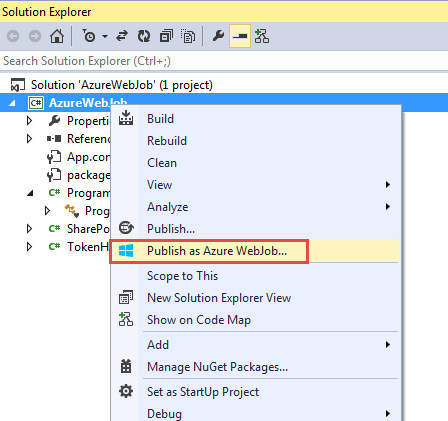
- Within the Resolution Explorer, right-click Publish as Azure WebJob.
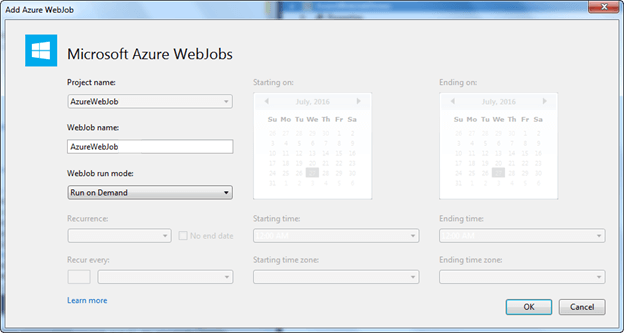
- Choose WebJob run mode as Run on Demand. Click on the OK button.
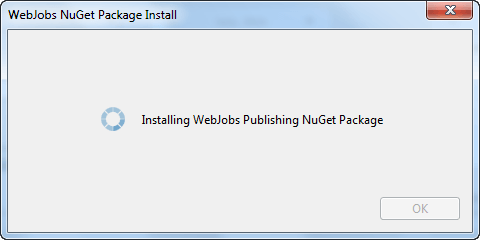
- Visual Studio installs WebJobs publishing the NuGet Bundle.
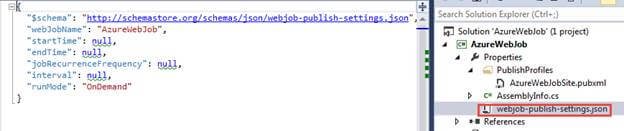
- This provides the below-mentioned file, containing the configuration for the Azure WebJob.
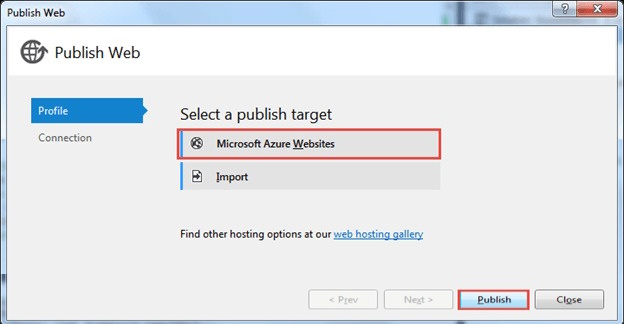
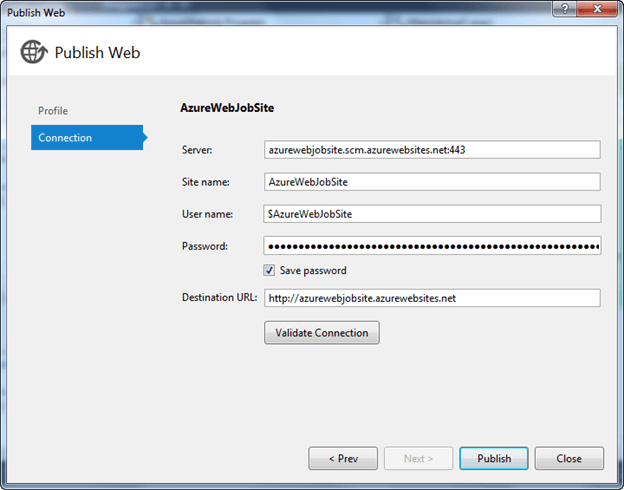
- Choose Microsoft Azure Web sites as a goal to publish and click on the Publish button.
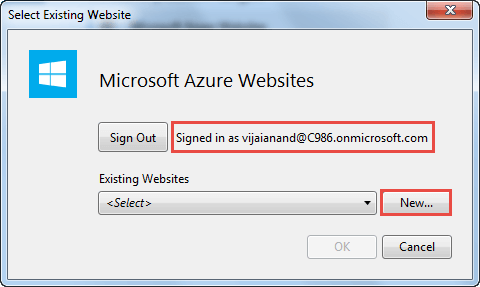
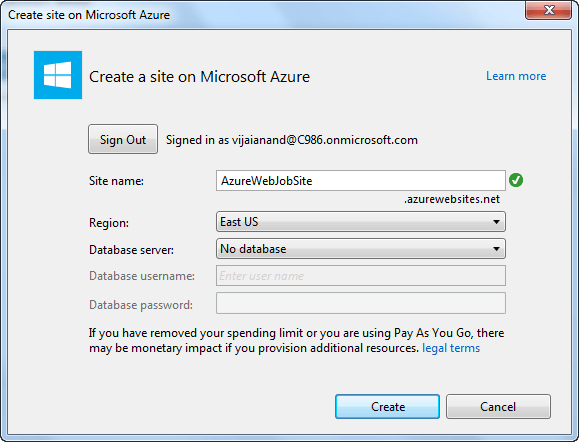
- Enter the credentials for the Azure portal and click on the New button to create a brand new Web site within the Azure portal.
- Enter the main points for creating a brand new web site and click on the Create button.
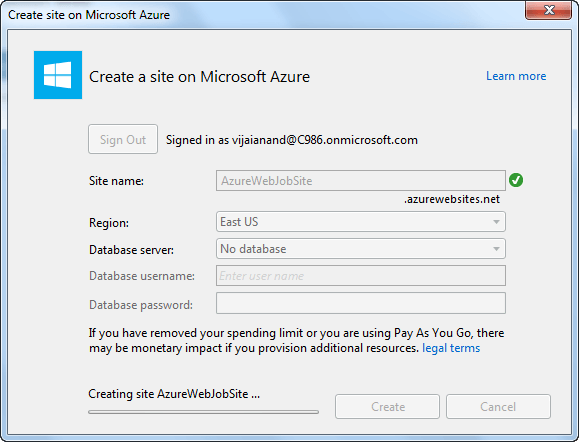
- Making a web site is in progress.
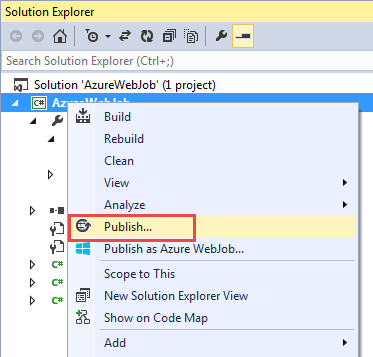
- Within the Resolution Explorer, right-click Publish. Click on the Publish button.
Run/Monitor the Job and Assessment Logs in Azure Outdated Portal.
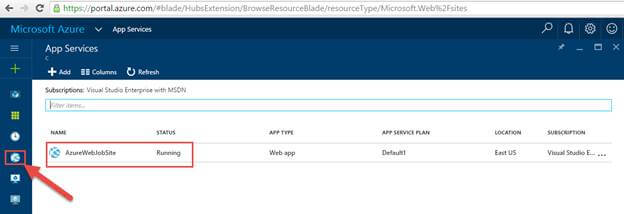
- Navigate to Azure Portal.
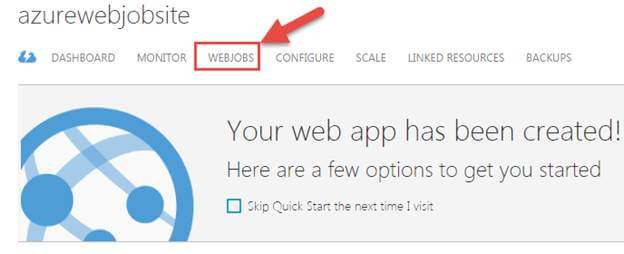
- Within the left navigation, click on Net Apps. Click on AzureWebJobSite net app.

- Click on WEBJOBS.
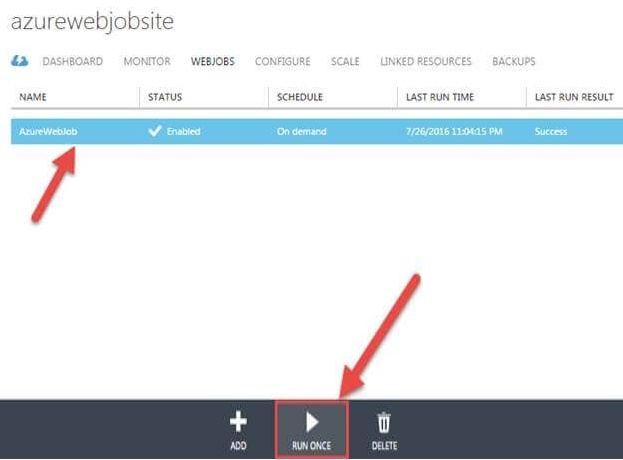
- You may see the Net job which we’ve got created. Choose the job and click on Run As soon as.
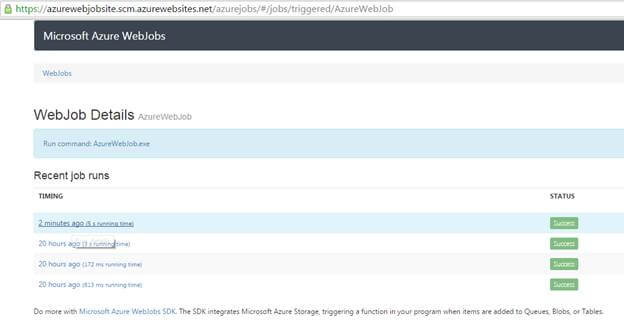
- The job ran efficiently, click on Logs to assessment.

- You may see WebJob particulars and the latest job runs.
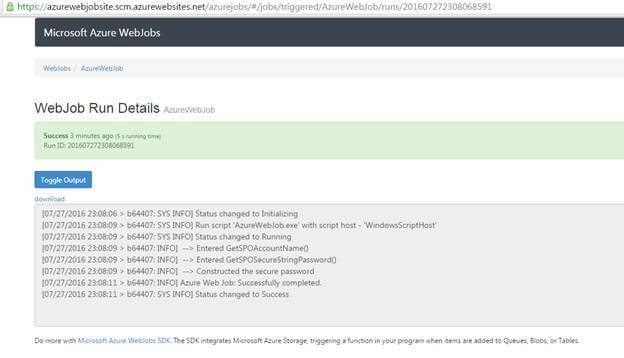
- Click on the final run job and you’ll see the Net job run particulars.
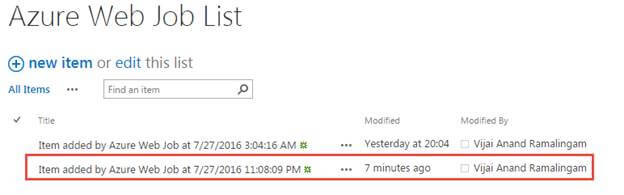
- Navigate to the SharePoint listing “Azure Net Job Checklist” and you’ll see a brand new merchandise added efficiently with the final modification by, as Vijai Anand (the account, that I used to execute the code).
Run/Monitor the Job and Assessment Logs within the Azure New Portal.
- Navigate to Azure Portal.
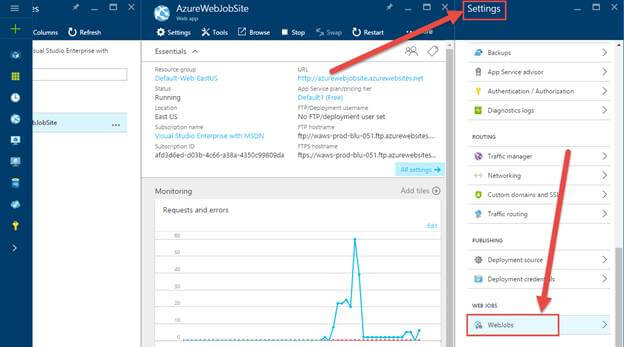
- Within the left navigation, click on App Providers and click on the Web site that we’ve got created.
- Within the Settings part, click on WebJobs.
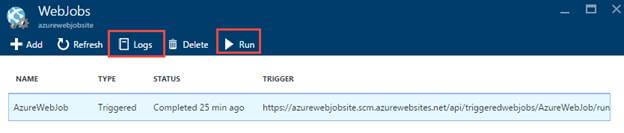
- Choose the Webjob and click on Run. As soon as the job is accomplished, click on Logs to see the job run particulars.
Abstract
Thus on this article, you could have seen, learn how to create Azure WebJob for SharePoint 2013 On-line.
Know extra about our firm at Skrots. Know extra about our companies at Skrots Providers, Additionally checkout all different blogs at Weblog at Skrots


