In Azure, Microsoft gives app providers. The app providers embrace internet apps, logic apps, cell apps, and so forth.
All these providers are coming below PaaS.
As per Microsoft’s definition, a logic app is a cloud service that can be utilized to schedule, automate, and orchestrate duties, enterprise processes, and workflows.
Logic apps can be utilized to combine functions, knowledge, providers, and techniques throughout varied enterprises or organizations.
The enterprise course of mannequin in software program known as Workflow.
We will use the Azure logic app to automate a typical enterprise course of that may be shared by a number of functions or enterprises.
For instance, we will use the logic app to ship e mail notifications to completely different customers when an occasion occurs in varied functions, providers, and techniques, and so forth.
Equally, we will use the logic app to switch/copy a file uploaded to the blob storage to a different location based mostly on particular circumstances.
One other instance is perhaps to create a thumbnail picture when a brand new picture is uploaded to the blob storage.
Within the logic app, we will create a enterprise course of graphically utilizing the workflow engine and visible designer and join them by connectors.
Microsoft already developed connectors to work together with completely different functions.
We’ve got a connector to hook up with MS SQL, a connector for MySQL, a connector for Fb, a connector for Twitter, and so forth.
The fantastic thing about the Azure logic app is we will do that all with out writing a single line of code
In brief, we will say the Azure logic app helps us to automate enterprise processes.
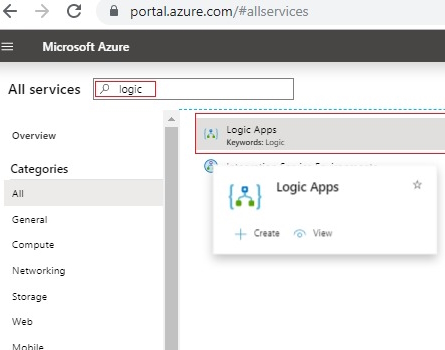
Let’s create an Azure logic app within the Azure portal.
Create an Azure Logic App
On this article, we’re going to create a logic app to learn Azure database information and ship mail to the customers by checking the worth of the e-mail despatched column worth.
I’ve already printed an article about Azure database creation and use.
You will discover the article right here >>Create And Use SQL Database In Microsoft Azure
I’m utilizing the identical database and desk for our logic app.
In our Azure database, we’ve a desk known as tbl_problemTickets.
This desk has 4 columns – ID, prblm_description, person mail, and mailSent.
Let’s talk about our necessities subsequent.
Simply assume we’ve an utility to create consumer points as downside tickets. The consumer can create completely different downside tickets for help.
And, we have to ship an e mail to the consumer once they create a brand new ticket like an acknowledgment mail.
As soon as the e-mail is distributed, we must always replace the e-mail despatched column as 1 (initially will probably be 0)
Let’s talk about how we will accomplish this activity utilizing the Azure logic app.
To create a logic app please observe the beneath steps.
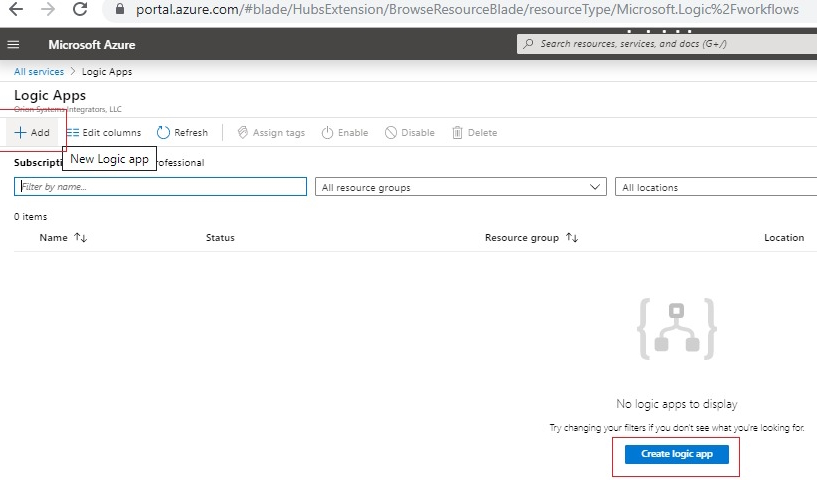
- Open Azure portal
- Seek for Logic App
- We might be navigated to the beneath display screen.
- Click on both the Add button or the Create Logic app button to create the logic app
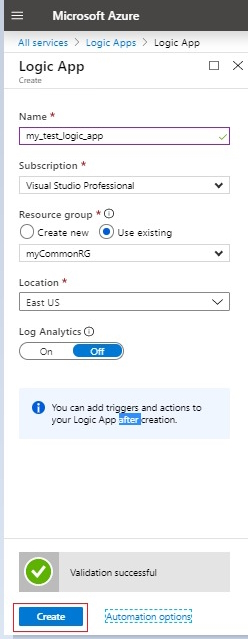
- A brand new part might be seen to supply the fundamental particulars about our logic app like identify, useful resource group, location, and so forth.
- Fill within the particulars and click on the Create button. Please seek advice from the screenshot beneath.
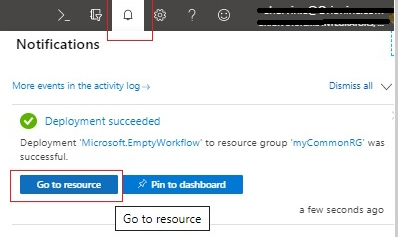
- This can take a couple of minutes to create the Logic app.
- As soon as it has been created, We will see the success notification within the notification part.
- We will enter into the newly created Logic app by clicking the Go to useful resource button within the notification.
- Within the Logic app Designer residence display screen, we will see two sections. Set off choice part and Template choice part.
- Within the set off choice part, we will see just a few generally used triggers. Equally, we will see various kinds of generally used templates below the template choice part.
- Please seek advice from the beneath screenshot to get an concept about various kinds of triggers and templates. From its identify, we will perceive its function.

- I’m going to pick the Recurrence set off for our logic app. As its identify implies, this set off is used to repeat an occasion after a time interval.
- We will set the interval and frequency as beneath screenshot.
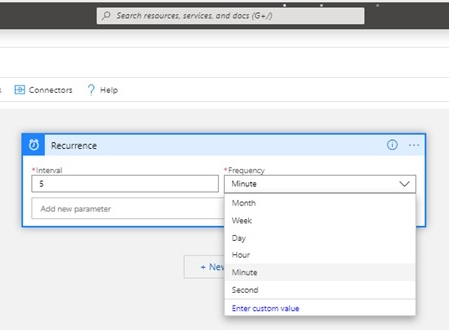
- For this logic app, I’ve chosen 5 minutes because the interval-which means our logic app will set off each 5 minutes.
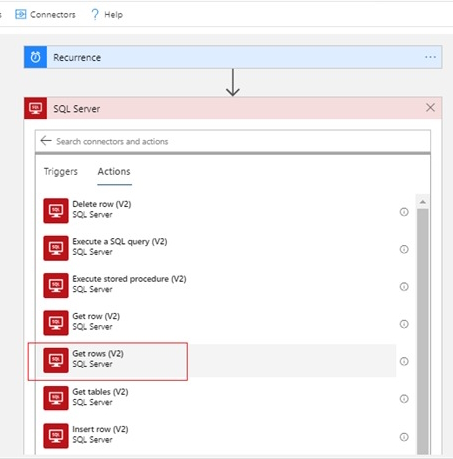
- Click on the New step button so as to add a brand new motion. We have to join the database to learn newly added information with an email-sent column containing 0.
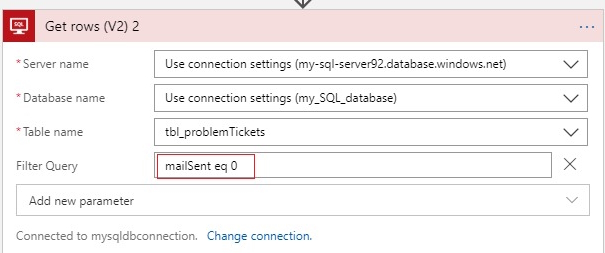
- To do that, we have to add the SQL server. So sort SQL within the search column and choose the SQL server.

- Then select the Getrows(V2) motion from the listing. This motion is used to learn rows from the database tables.
- We are going to get the beneath display screen to fill within the server particulars
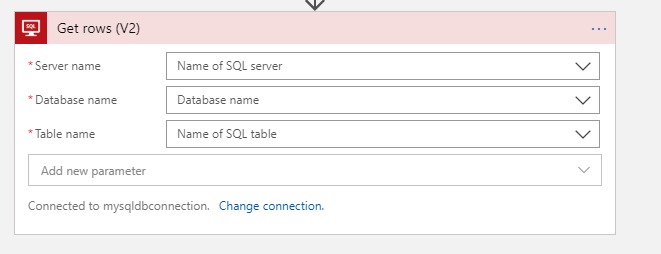
- Choose the SQL server identify from the drop-down field. It’ll present all obtainable SQL servers in our Azure account
- As soon as the server is chosen we will choose the database from the following dropdown field. This can listing all databases current within the chosen SQL server.
- From the third dropdown field, we will choose the desk.
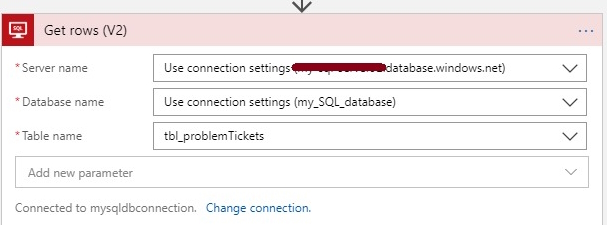
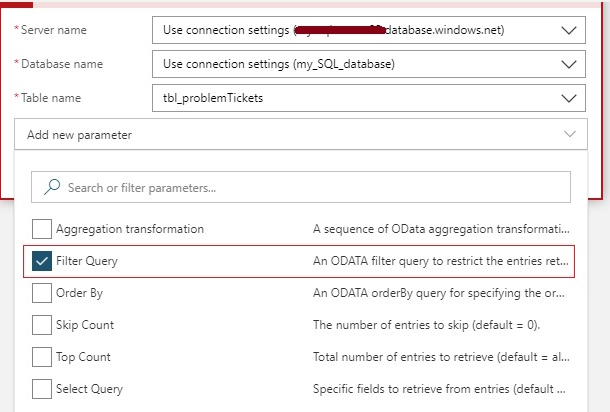
- We solely want to pick the information with the mailSent standing column containing the worth 0 (mail not despatched).
- To filter this knowledge, we will add yet one more parameter by clicking the Add new parameter textual content field within the above screenshot.
- Then choose the Filter Question merchandise from the listing.
- Then present the filter as mailSent eq 0.
- At this level, our logic app is able to fetching the person information from our database each 5 minutes.
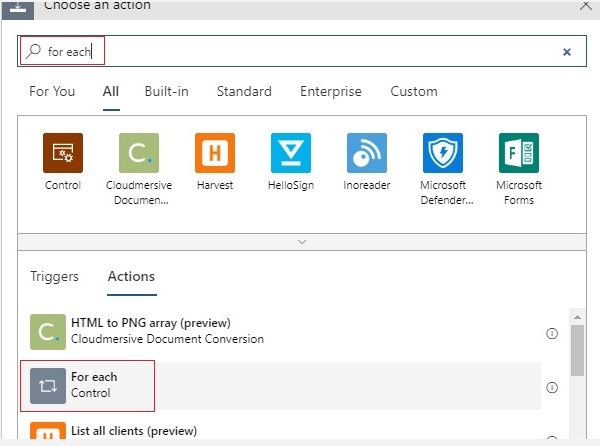
- Subsequent, we have to loop by the information, set and ship mail to every person.
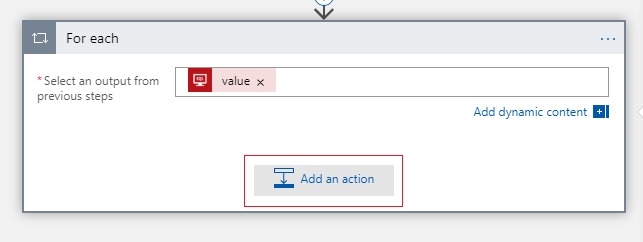
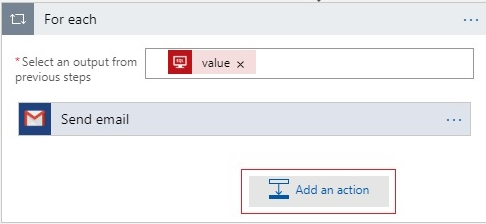
- Add a brand new motion and seek for every loop.
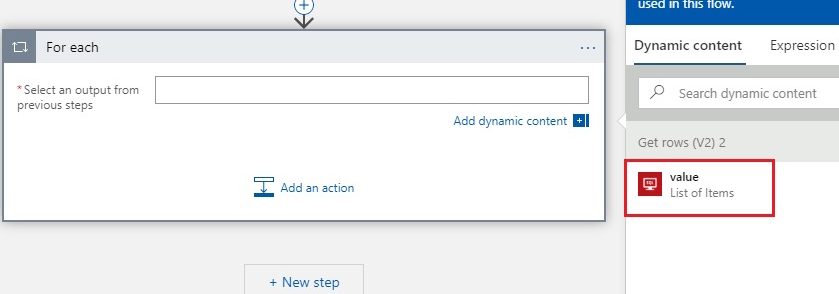
- Click on the Choose an Output from the earlier steps textual content field.
- Now we will see the worth from the earlier step. Choose the worth from the Dynamic content material window.
- Then click on the Add an motion button.
- Subsequent, we have to add a mail service to ship mail. Right here I’m utilizing my gmail account to ship mail.
- Seek for Gmail and choose Gmail motion as beneath.
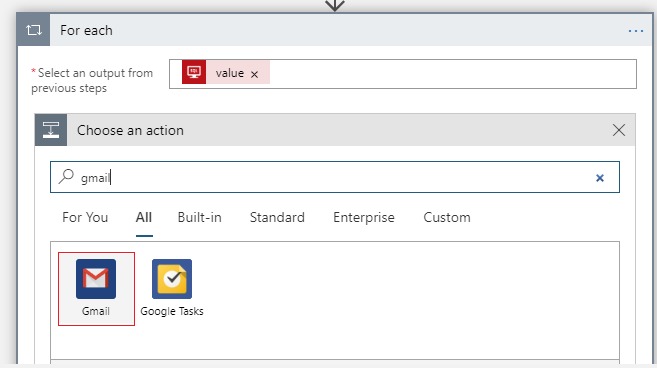
- Then choose the Ship mail motion from the listing.
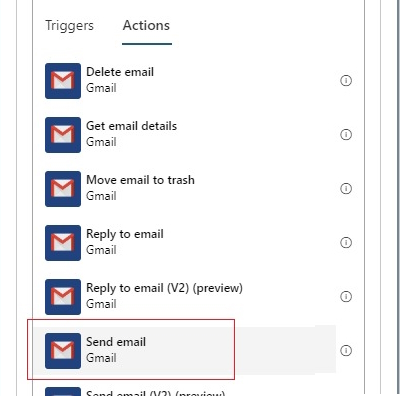
- This can immediate us to supply the Gmail account credential and permission to make use of the Gmail. This might be a one-time activity.
- Subsequent, we have to set the e-mail configuration like To, topic, physique, and so forth.
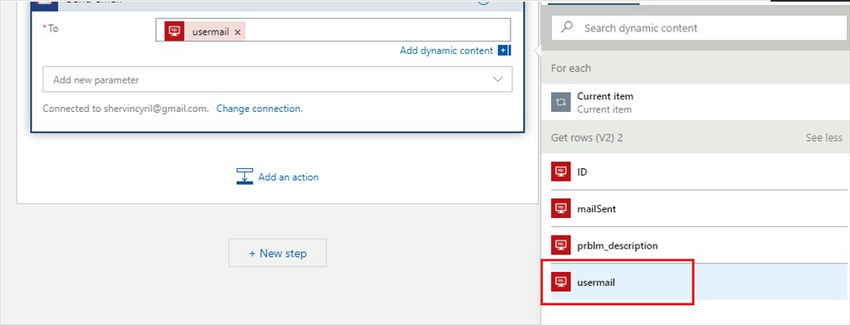
- Click on the To textual content field. It’ll listing all columns within the knowledge set worth within the Dynamic content material window. Click on the see extra hyperlink to see all columns.
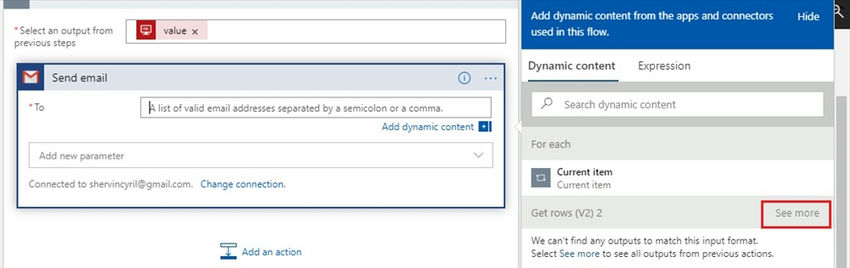
- This can listing all columns obtainable within the knowledge set.
- From the listing choose the person mail column.
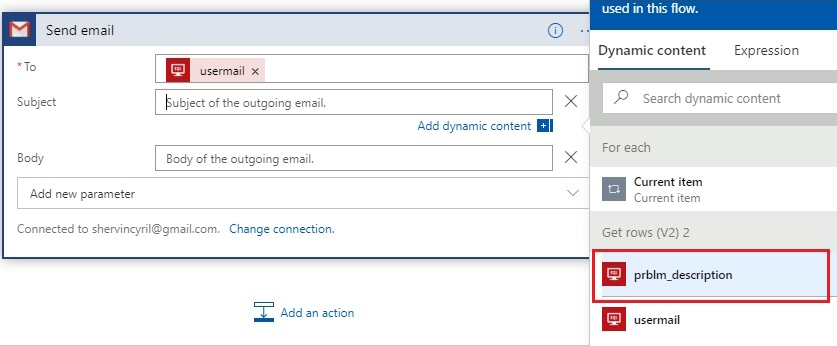
- Then, we have to add the topic and physique for the mail. So as to add these fields, click on the Add new parameter textual content field. Choose the topic and physique objects from the listing.

- Click on the topic textual content field and choose the prblm_description column from the Dynamic content material window.
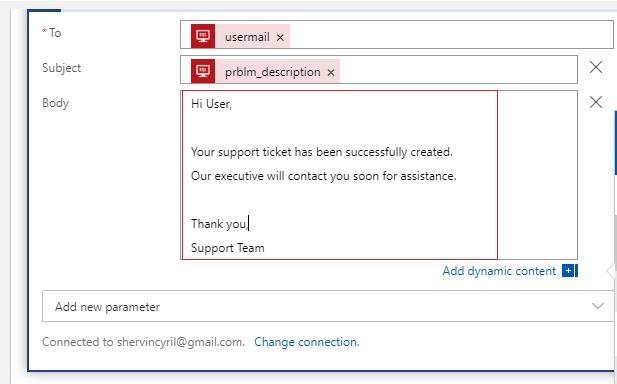
- Present some content material for the physique part as beneath.
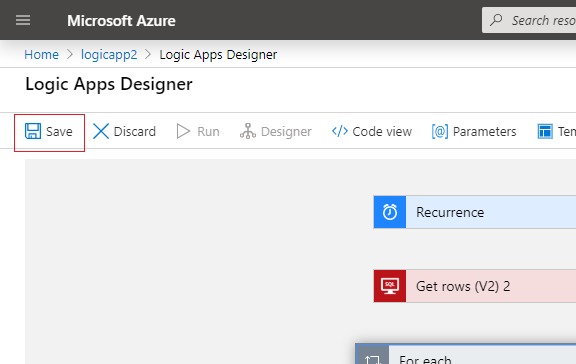
- Save the logic app by clicking the save button.
- Lastly, we created our Azure logic app efficiently.
- Let’s run our logic app by clicking the Run button and checking the mailbox(I supplied my different mail id because the person e mail worth within the database.
- We will see our logic app mail beneath.

- Subsequent, we must always replace the database by altering the mailSent column worth to 1. In any other case similar person particulars might be learn from the database and despatched to mail once more.
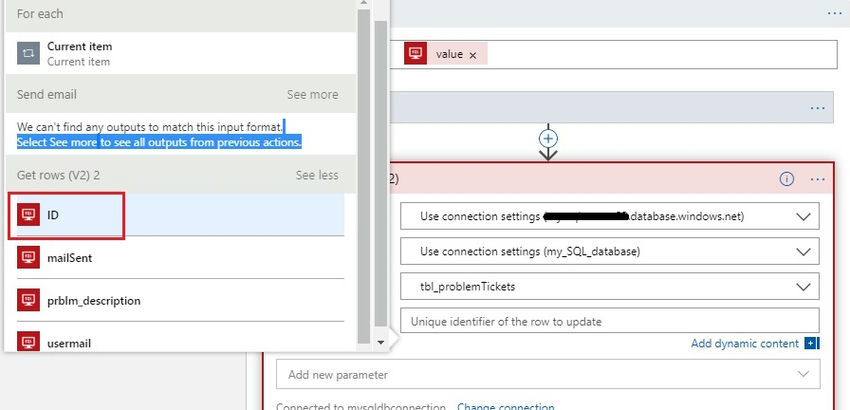
- To replace the database again, we will add yet one more motion by clicking the Add an motion button within the loop motion.
- Then, choose the SQL Replace row(V2) motion

- Choose the SQL server, database, and desk from the corresponding dropdown containers.
- For the Row Id column, choose the first key column identify from the dynamic content material window
- Click on the add parameter textual content field and choose the themailSent column from the listing
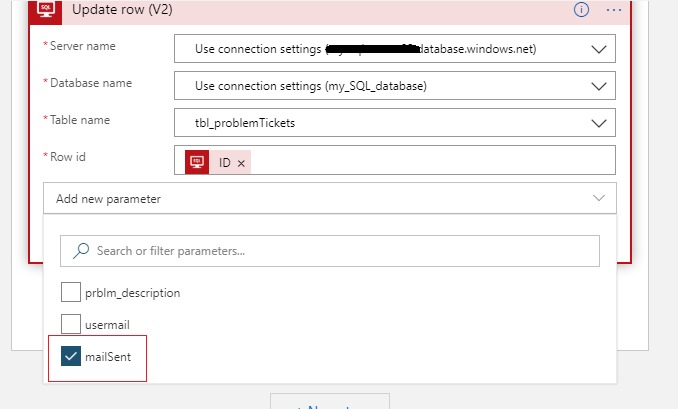
- Give the worth of the e-mail despatched textual content field as 1. This worth might be used to replace the mailSent column within the database desk.

That is All !!
All Accomplished.
Save our logic app and set off it once more. We are going to obtain the identical mail as earlier.
Test the desk within the database. mailSent column might be up to date to 1. Through the subsequent run, these rows is not going to be thought of.
As soon as examined the logic app, disable it by clicking the Disable button within the Logic app residence display screen. In any other case, it would set off each 5 minutes.
Completely happy Studying!
Know extra about our firm at Skrots. Know extra about our providers at Skrots Providers, Additionally checkout all different blogs at Weblog at Skrots


