Introduction
Azure Logic Apps Customary is a cloud-based platform for automating logic app workflows that join our apps, information, companies, and methods. You’ll be able to simply construct extremely scalable integration options in your company and business-to-business (B2B) conditions with this platform. It’s possible you’ll use both the Logic App (Consumption) useful resource kind or the Logic Apps Customary useful resource kind to assemble a logic app.
The Consumption useful resource kind is for multi-tenant Azure Logic Apps or integration companies, whereas the Customary useful resource kind is for single-tenant Azure Logic Apps.
Stateful and Stateless workflows in Customary LogicApp
Stateful Workflow
When you must hold, consider, or confer with information from prior occasions, create a stateful course of. These workflows save and switch all the inputs and outputs for every motion, in addition to their states, to exterior storage, permitting for post-run evaluation of the main points and historical past.
If there are disruptions, stateful workflows give wonderful resiliency. You’ll be able to recreate interrupted runs from the preserved state and repeat the workflows to completion after companies and methods have been restored. Stateful workflows can run for considerably longer durations of time than stateless processes.
Stateless Workflow
Whenever you don’t want to take care of, consider, or confer with information from prior occasions in exterior storage for subsequent overview, create a stateless workflow. These workflows save all the inputs and outputs for every operation, in addition to their states, in reminiscence relatively than on disc. As a result of the run data and historical past aren’t stored in exterior storage, stateless workflows characteristic shorter runs (normally lower than 5 minutes), quicker efficiency (faster response occasions), greater throughput, and decrease working prices. Interrupted runs should not mechanically restored if there are outages, thus the caller should manually resubmit interrupted processes.
Create First Customary Logic-App
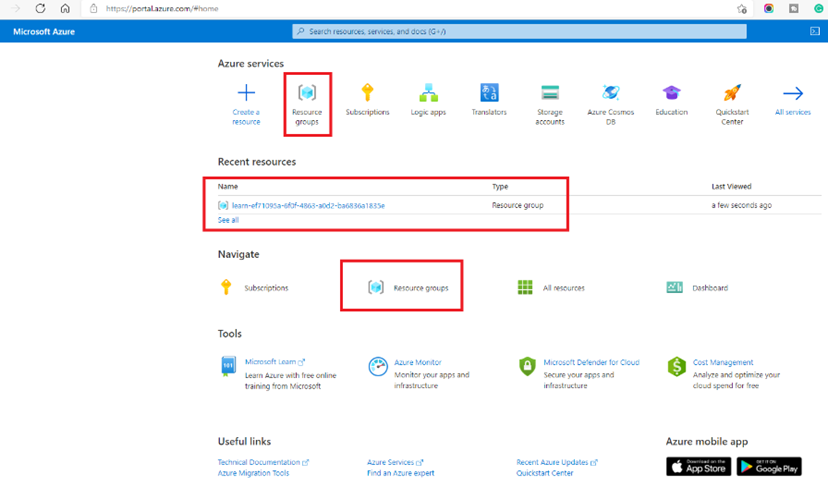
Login to the Azure portal ➜ Search Useful resource Teams ➜ then choose Useful resource Group, underneath which you need to create Customary LogicApp.
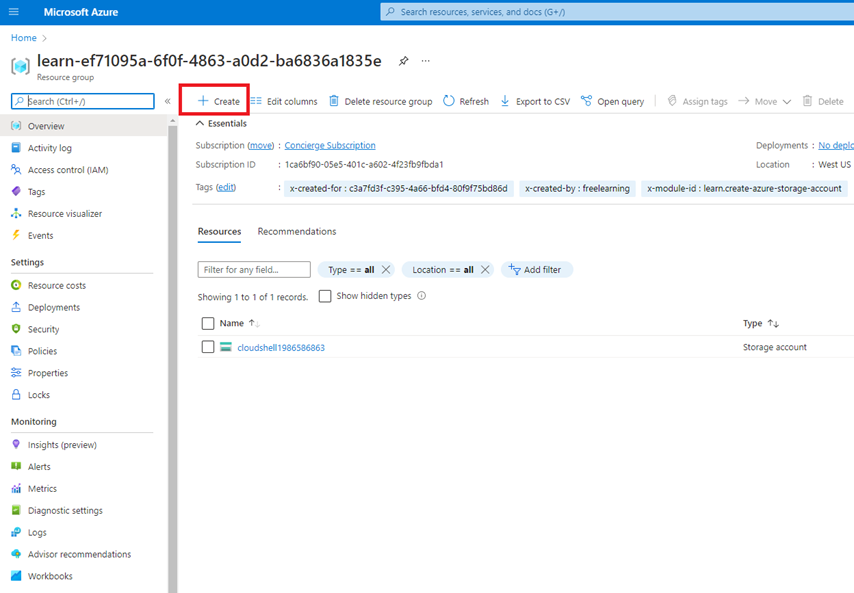
After opening the Useful resource Group, you will note an icon ‘+ Create’ which can assist to create Customary LogicApp. Click on on + Create icon.
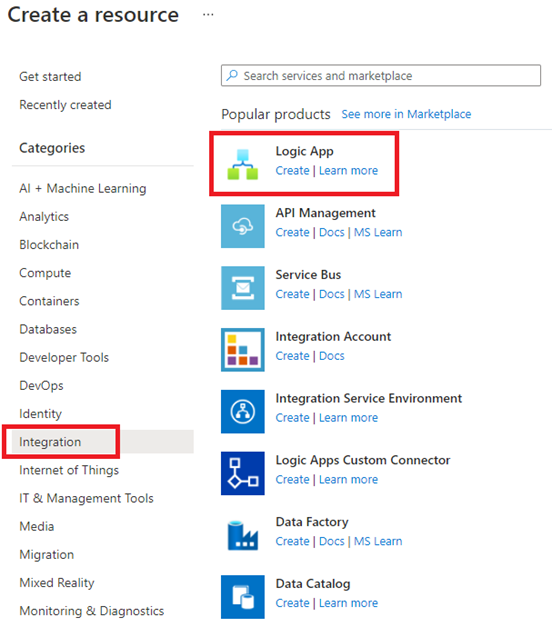
It’ll open a brand new web page the place both you’ll be able to immediately search LogicApp in search field or you’ll be able to click on on Integration from listing of classes. After that LogicApp icon will seem, click on on Create.
It’ll open a brand new window the place we have to fill all of the required particulars. Let’s fill within the fundamental particulars first, like,
- Subscription
- Useful resource Group
- Kind – We’re going to create Customary LogicApp so we now have to decide on ‘Customary’
- Publish – Right here we now have 2 choices, both we are able to publish on Docker container or can use the workflow. On this article, we’ll use workflow.
- Area
Then click on on Subsequent: Internet hosting to configure the internet hosting and different configurations.

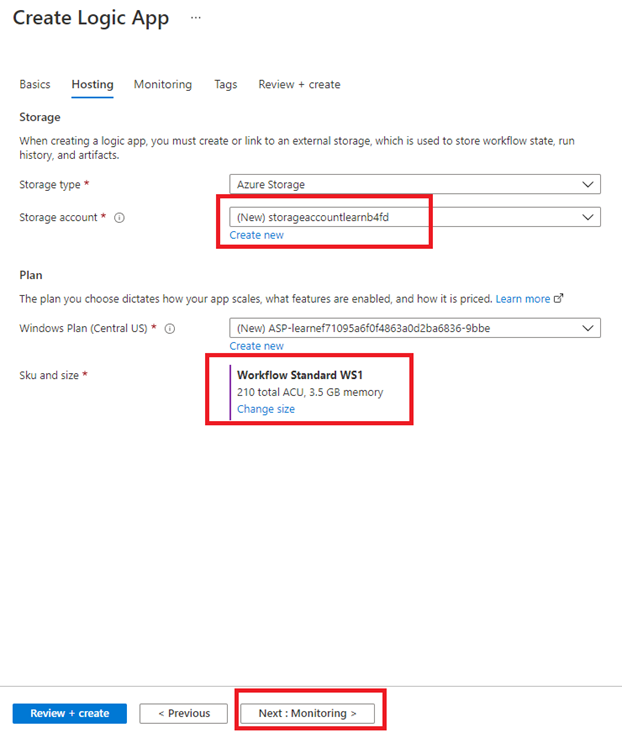
Beneath Internet hosting configuration, we have to present the storage & Plan particulars.
For Storage,
- Storage Kind -> Storage kind might be Azure storage or SQL & Azure storage. On this article we’ll use Azure storage
- Storage Account à You should utilize the prevailing storage account or create new storage account. On this article we’ll create new storage account.
For Plan
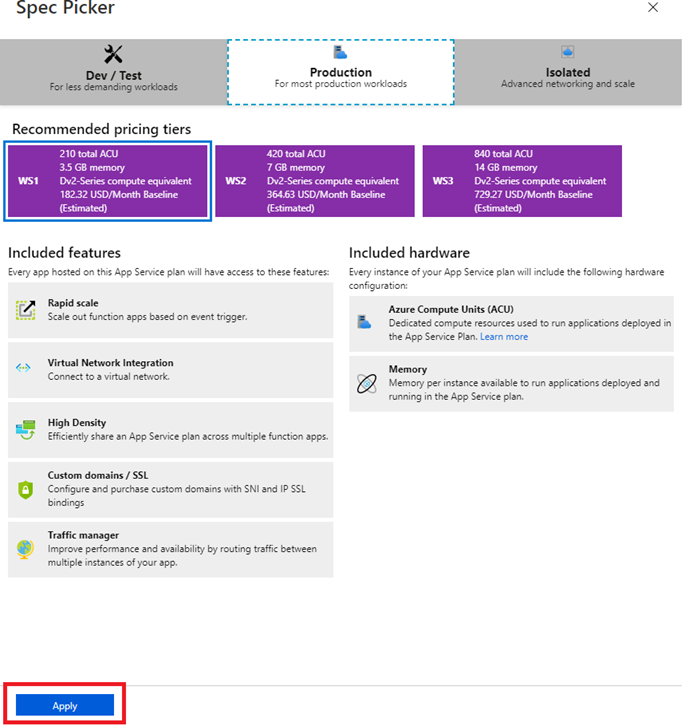
The plan you select dictates how your app scales, what options are enabled, and the way it’s priced.
Click on on Subsequent: Monitoring to configure the Monitoring and different configurations.
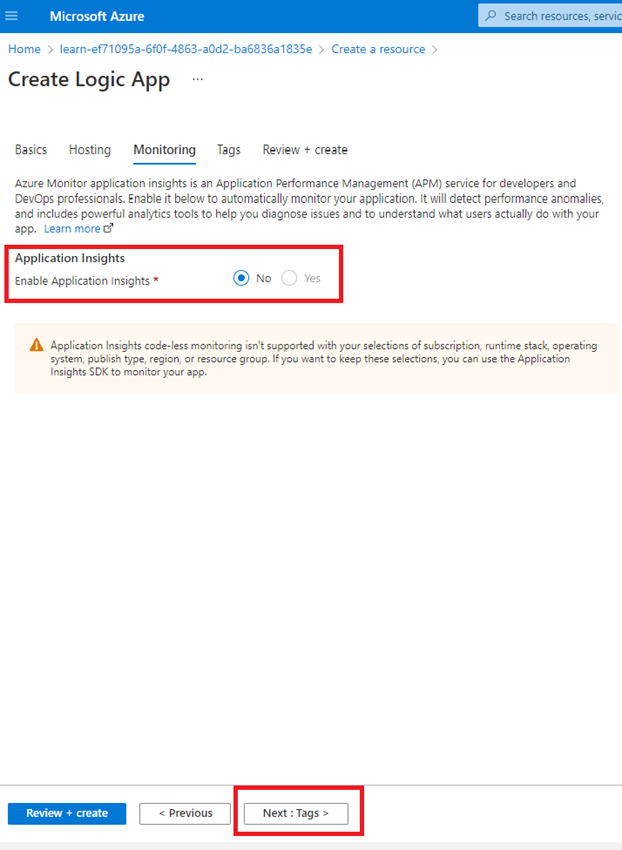
In Monitoring part, we are able to allow software perception to observe the applying. It should detect efficiency anomalies and consists of highly effective analytics instruments that can assist you diagnose points and to grasp what customers really do along with your app.
For this text, we aren’t going to make use of it. So we’ll hold the default worth ‘No’.
Click on on Subsequent: Tags to setup the Tags and different configurations.
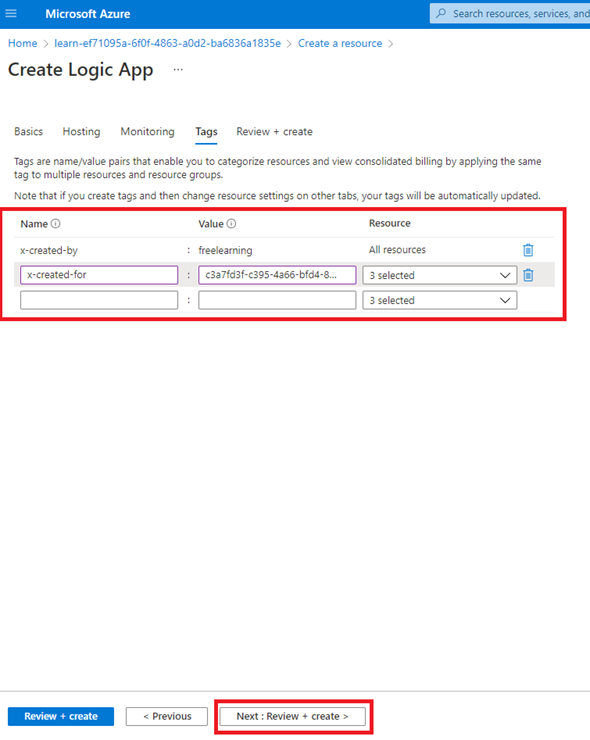
Tags are identify/worth pairs that allow you to categorize assets and examine consolidated billing by making use of the identical tag to a number of assets and useful resource teams.
Based mostly in your have to requirement, you’ll be able to add the Tags, in any other case go away it as it’s.
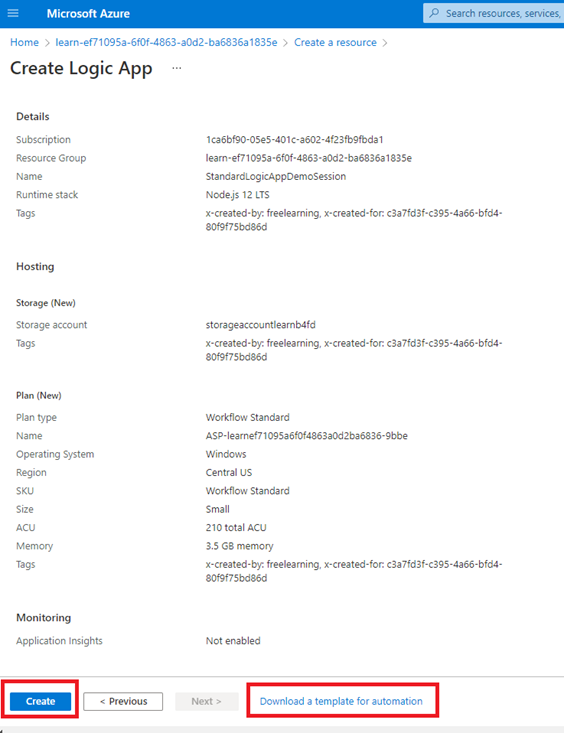
Click on on Subsequent: Overview + Create to examine the ultimate configurations and validation.
Ultimate step to validate and overview the knowledge that you just stuffed in earlier steps. If in case have any validation subject or lacking/mistaken configuration, you could find right here.
In case of success validation, you’ll see a button Create.
Right here, you’ll see one other choice to obtain the template for automation that may aid you to create this complete guide course of in automated method with single click on.
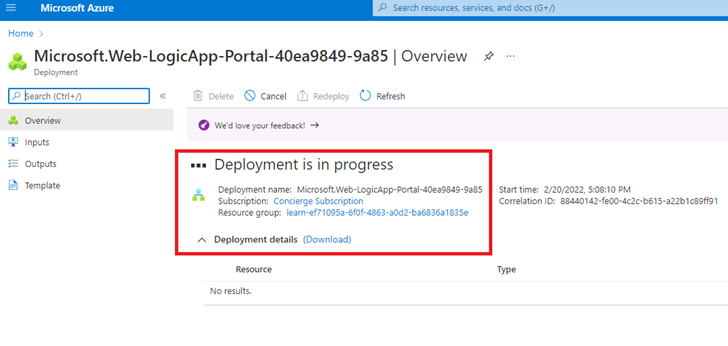
When you click on on Create, deployment will begin and also you’ll see a brand new window like beneath screenshot. It’ll present, Deployment is in progress. And it’ll not take a lot time to finish the deployment.
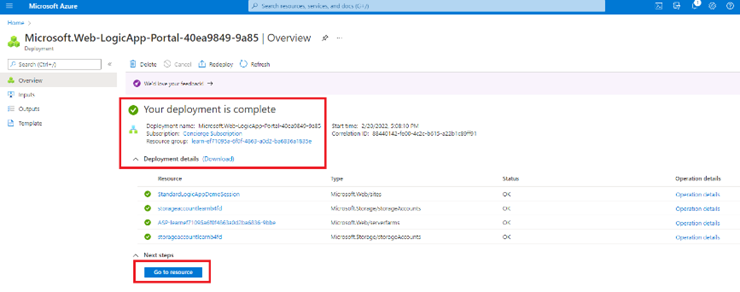
After deployment is completed, you’ll see the message ‘Your deployment is full’. Click on on Go to useful resource.
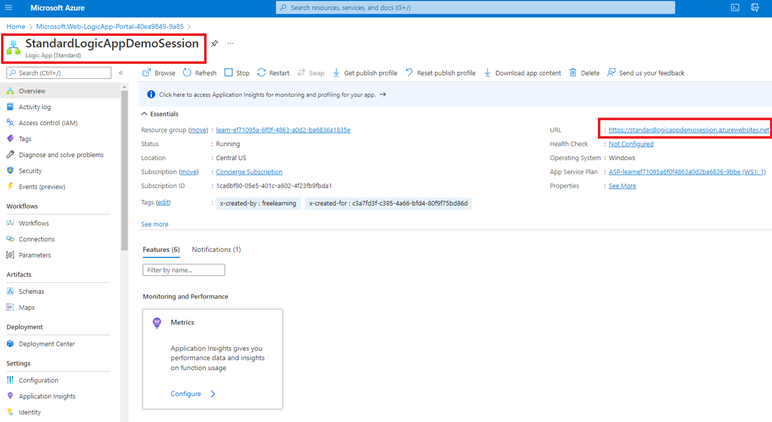
After that, you’ll see the brand new window along with your Customary LogicApp particulars, URL and all different configurations.
Create First Stateful workflow
We have now efficiently created the Customary Logic App, now let’s transfer forward create the workflow. There are 2 forms of workflows,
- Stateful workflow
- Stateless workflow
Let’s see, find out how to create Stateful workflow and take a look at it utilizing postman software.
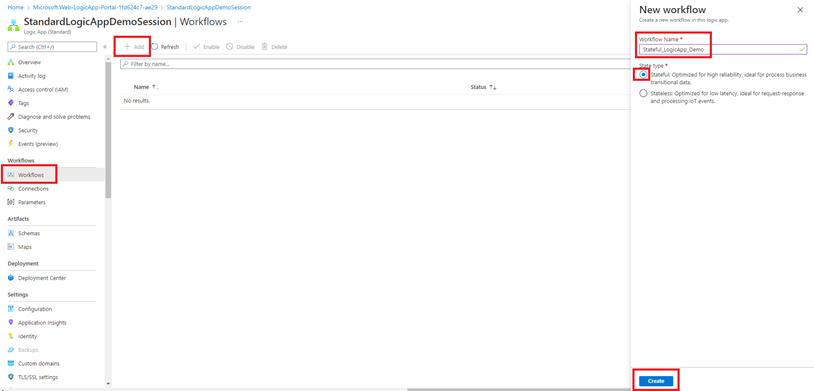
- Click on on workflows -> it’ll open new window the place you’ll see an possibility ‘+ Add’
- Click on on ‘+ Add’ -> new panel will open the place we now have to offer the Workflow Identify
- Set State kind ‘Stateful’ and click on on Create.
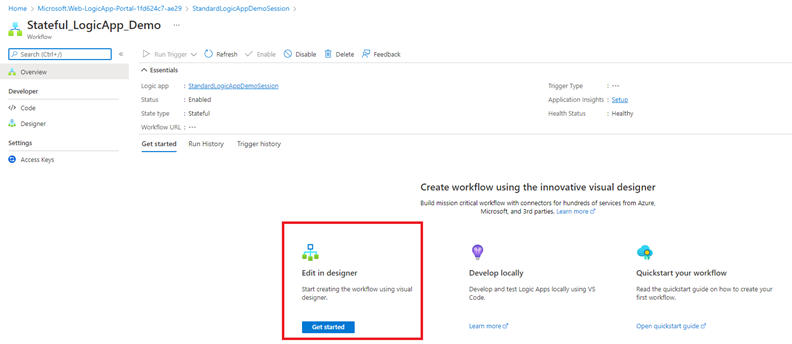
After Stateful workflow is efficiently created, you might see an choice to Edit in designer. Click on on ‘Edit in designer’ which can open the designer view of workflow.
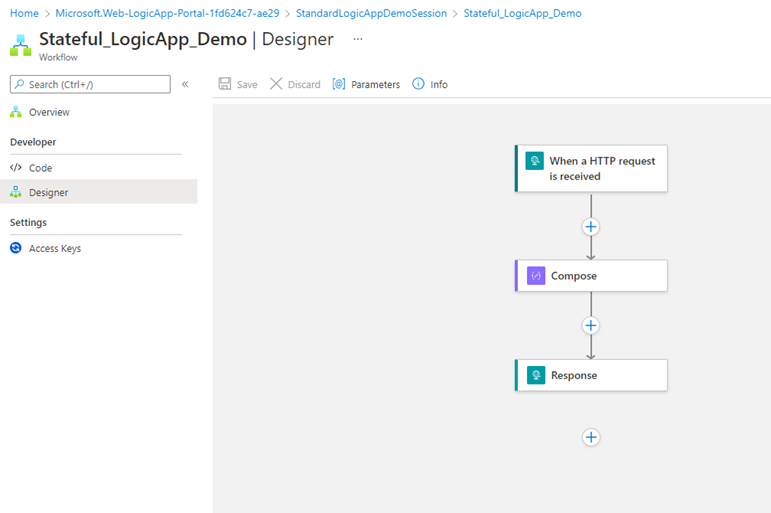
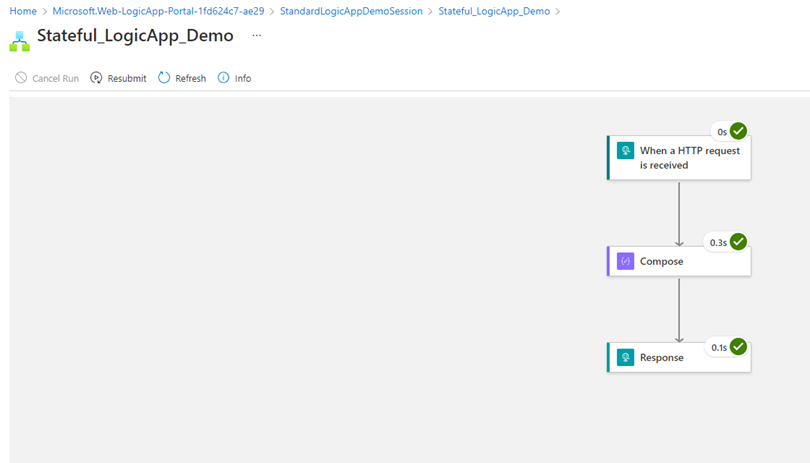
In designer view of workflow, let’s add some connectors, for this text, we’ll use a quite simple request-response stream, the place request will come and we’ll ship the customized response.
We have now added the straightforward stream underneath this workflow like beneath screenshot.
Save the workflow, which can generate the URL which can be utilized for testing.
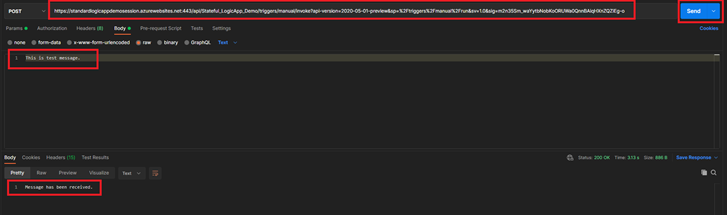
We have now stateful workflow URL generated, now it’s time to check the stream.
Open postman software and cross the workflow URL. Then in message request physique cross any random content material like beneath. And hit the ship button.
In case your workflow successes then you might see the response code 200 and the customized message that you just added for a response. In case of failure additionally you might see the response that may assist to troubleshoot the difficulty.
Now, let’s examine the execution element in Azure portal.
We’re once more again to Azure port the place we’ll simply refresh the workflow. Now right here, we’ll see the run historical past that may assist to examine the enter and output particulars.
Click on on the run-id (identifier) to overview every steps of workflow.
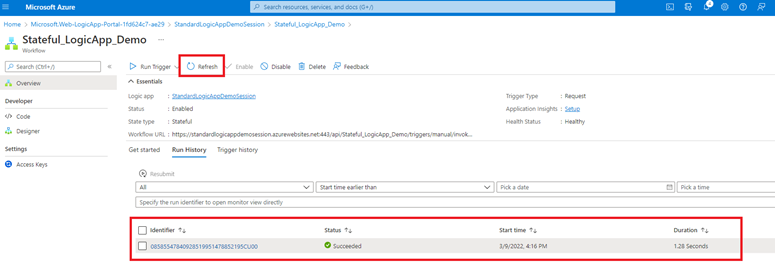
As soon as we open the run-id, it’ll present every steps execution outcome together with execution timing. Suppose if any stage we now have failure then we are able to monitor it right here as properly.
That’s it concerning the Customary LogicApp stateful workflow. Let’s perceive now the stateless workflow.
Create First Stateless workflow
Now, it’s time to see, find out how to create Stateless workflow and take a look at it utilizing postman software.
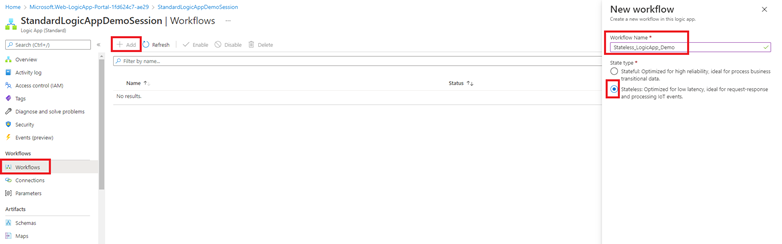
- Click on on workflows – it’ll open new window the place you’ll see an possibility ‘+ Add’
- Click on on ‘+ Add’ – new panel will open the place we now have to offer the Workflow Identify
- Set State kind ‘Stateless’ and click on on Create.
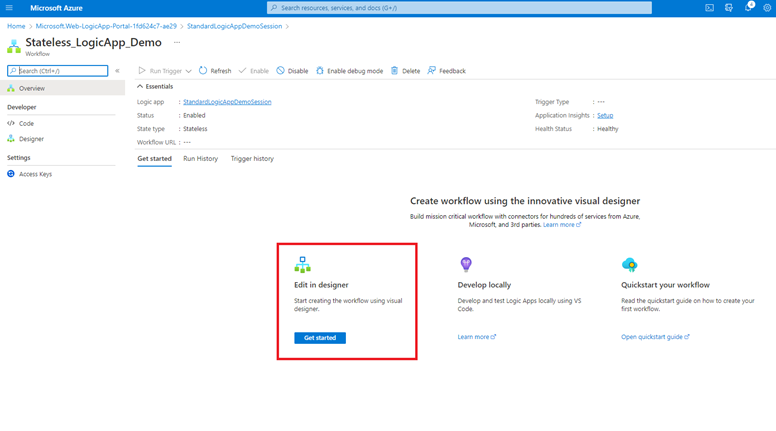
Right here once more, just like the stateful workflow, we’ll have choice to open the designer view and create the workflow.
For this text, we now have used the identical state of affairs, obtain the request and ship the customized response again to requester.
As soon as we save the stateless workflow, it’ll generate the endpoint URL, which we’ll use for testing objective.
Now, let’s open the postman software and cross the URL, and request enter like beneath screenshot.
As soon as we now have every part then hit the ship button and get the response again.
Let’s overview the request and response in Azure portal.
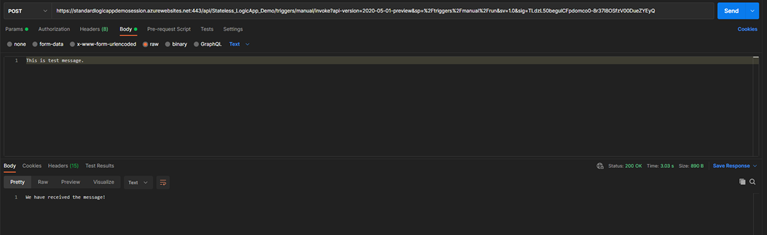
We’re again to Azure portal and let’s refresh the workflow. Now you might see the run historical past particulars.
If you’re unable to see the run historical past then please examine the debug mode. To see the run historical past in stateless workflow, it’s important to allow the debug mode, then solely you’ll be able to view it underneath run historical past.
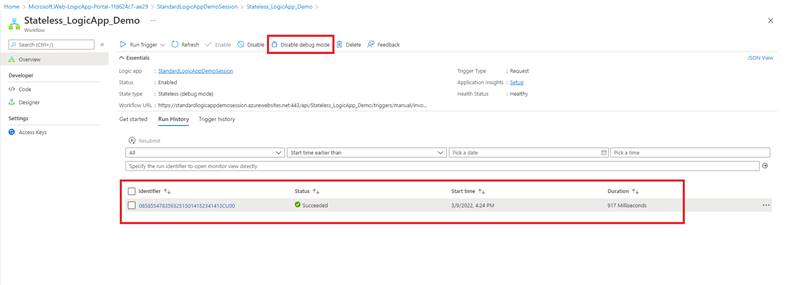
Warning: Preserve the debug mode disabled if it’s not required.
Conclusion
That concludes this submit, which offered an outline of Microsoft Customary Logic Apps and workflows.