About this text
This text will let you know the fundamental and foremost ideas of Digital Machines and Containers and the way we are able to create them within the Azure Cloud setting. You’ll be taught extra about cloud computing and Azure in my coming articles. So, keep tuned for the following articles.
The subjects to be lined are,
- Introduction to Digital Machines
- The structure of Digital Machines
- What’s Azure VMs
- Create a Digital machine utilizing Azure Portal
- Deploying VM to a server
- Differentiation between VMs and Containers
- What’s Docker Container
- What’s ACI in Azure
- Deploying Docker to ACI
Introduction and background
On this article, you’ll study creating digital machines in an Azure cloud setting. First, we’ll have a look at what a digital machine is after which how can we create it utilizing the Azure portal.
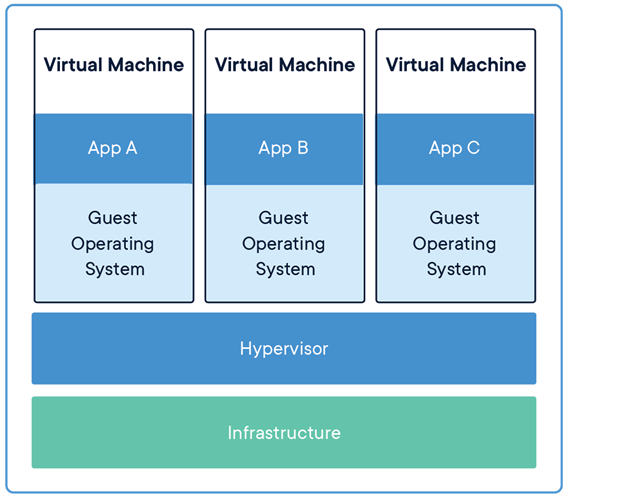
Digital Machines are the software program emulation of bodily computer systems. All of the computing sources like storage, networking, reminiscence, processors are included in it. It consists of separate working techniques that enable us to create our personal utility software program it particular to the digital machine’s duty. Anybody can entry the digital machine utilizing the correct credentials given by an administrator. In different phrases, you possibly can management and handle the digital machine utilizing a distant desktop shopper. Let’s focus on the entire structure of the digital machine in order that we are able to perceive the way it builds and works.
Structure of Digital Machine
As we all know, VM is an abstraction upon {hardware} that creates a number of situations of a single machine. It’s executed by the hypervisor whose duty is to run a number of VMs on a single machine. And every newly created digital machine will comprise an working system, the applying, and its dependencies. Let’s see this idea in a graphical view.
Right here, you possibly can see the hypervisor is put in upon infrastructure. Let’s perceive what hypervisor and infrastructure imply. For this, see the picture beneath which is self-explanatory.
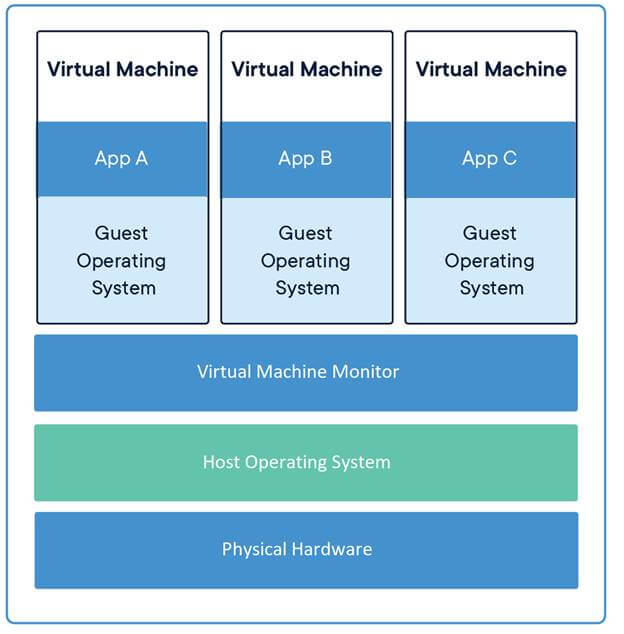
You may see our major working system is put in on our major bodily {hardware} after which we use VMM to make extra situations of this machine.
What’s VMM?
That is the software program that enables us to create extra situations of the machine known as digital machines after which enable us to handle and configure the digital machines. VMM can be referred to as hypervisor as depicted within the above picture.
Therefore you’ve seen that what the structure of the digital machine setting is. Now let’s perceive how we are able to face it within the Azure setting.
What are Azure VMs?
Azure VMs permits us to create, use and handle digital machines on the cloud. You may bodily entry the VM and have correct full management over VM. It’ll actually provide help to if you wish to do the shopper configuration of software program for any particular activity. Now, let’s create a digital machine within the Azure Cloud setting.
Create a Digital machine utilizing Azure Portal
Let’s create a digital machine within the Azure cloud. Following are the steps.
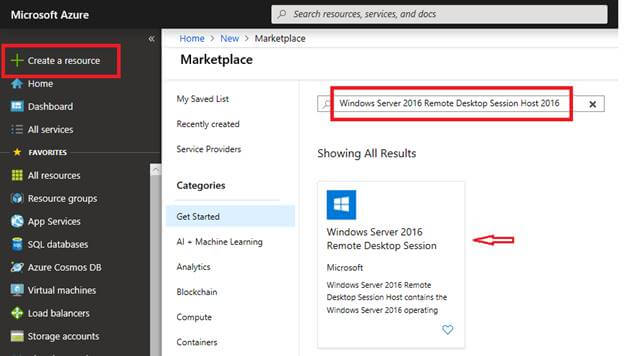
- Create a useful resource
- Search “Home windows Server 2016 Distant Desktop Session Host 2016” within the search bar.
- Choose the choice “Home windows Server 2016 Distant Desktop Session Host 2016”.
- Then, merely create it.
After clicking on the “Create” button, you’ll be redirected to the window the place you possibly can create the digital machine as proven beneath.
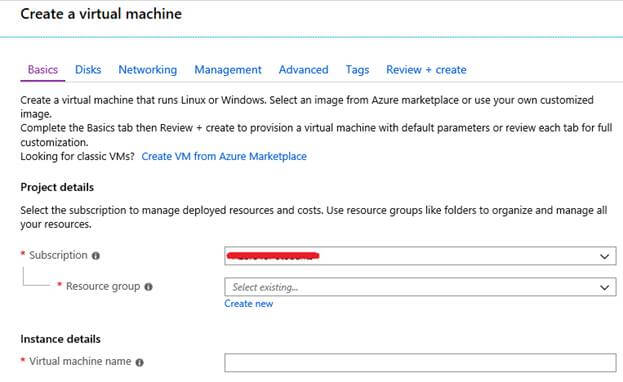
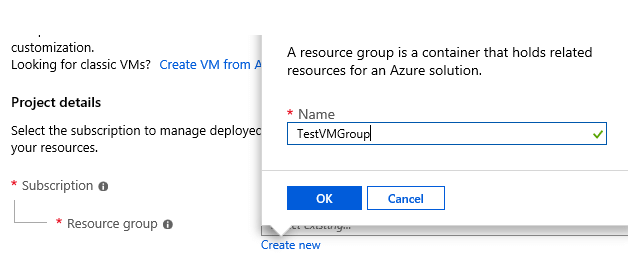
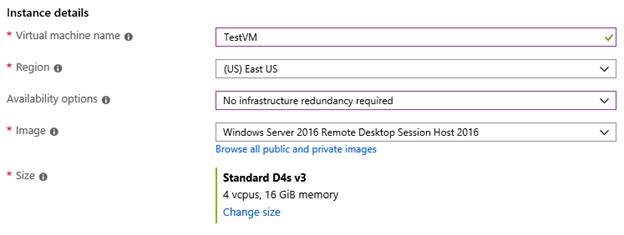
Right here you possibly can create the digital machine, within the mission particulars part, choose your subscription and provides the identify of the useful resource group or create a brand new useful resource group if it doesn’t exist. I’m giving the identify “TestVMGroup” as proven beneath.
Beneath the Occasion Particulars tab, choose the next choices (it might fluctuate in line with your required state of affairs).
Then, be certain to offer and keep in mind your administrator particulars.

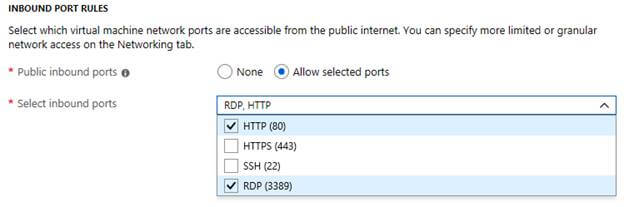
In inbound port guidelines, be certain to pick the next choices.
In “Nest: Disks >” you possibly can choose the Disk Choices and create Information disks or connect current information disks. Azure VMs additionally comprises short-term disks. Right here we are going to use “Premium Disk” which is really useful and click on on “Nest: Networking >”.
Within the Networking tab, you possibly can see, Azure VM routinely creates a digital community for you and outlined its subnet and public IP.
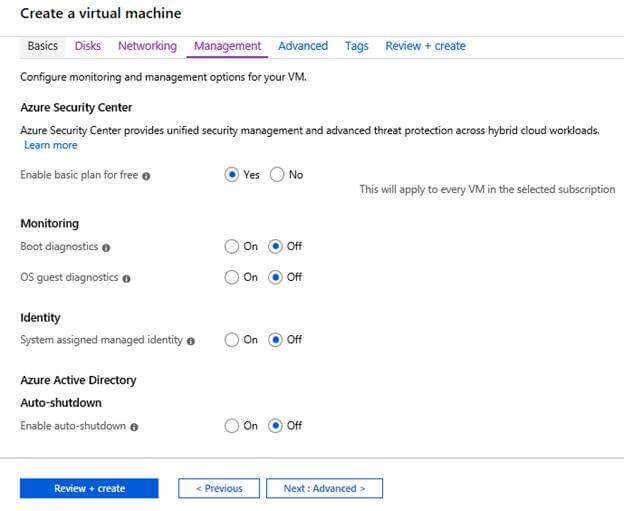
Within the Administration tab, choose the next choices.
The superior tab is for added configurations which we don’t want right here. So let’s skip tags and go to create a tab. Right here, you will notice all of the configured particulars of your digital machine, after which you possibly can merely click on on “Create” to create it.
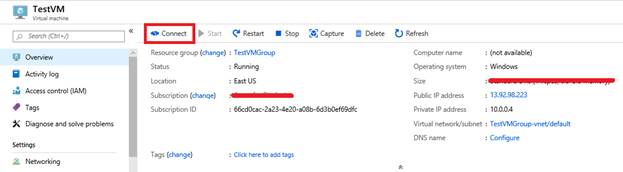
As soon as your VM is configured then choose your VM out of your useful resource group and click on on “Join”.
Once you click on on “Join”, you may be redirected to the next dialog field.
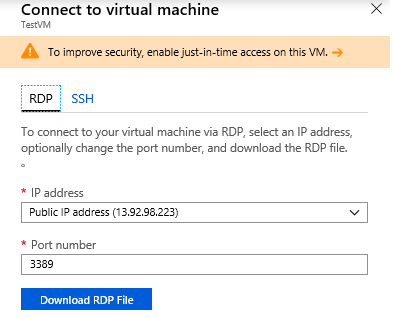
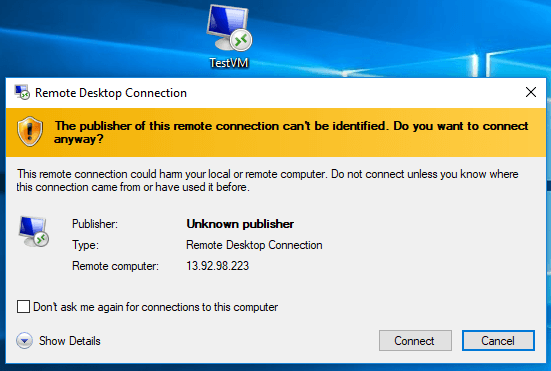
Then, merely obtain the RDP file and run it. After downloading it, merely open it and join it. Then, give the credentials like username and password.
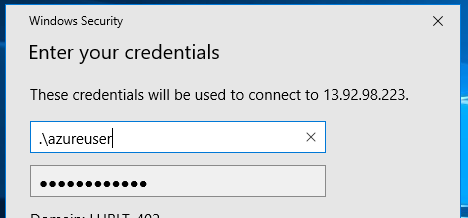
Then, give credentials and hook up with VM. You may give username as .azureuser or your unique created username as mine Usman Ikram.
Then, merely click on on “sure” to just accept the safety certificates and you may be redirected to the VM homepage. Congrats! You’ve gotten deployed and related a Home windows Server Digital Machine in Azure. Now let’s deploy it to a server.
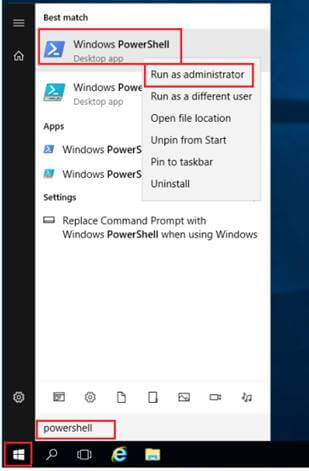
Deploying VM to a server
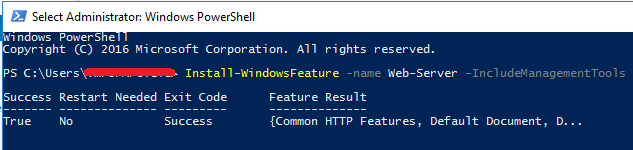
For this go to the digital machine after which run the “Home windows PowerShell” as administrator. Then write the depicted command in PowerShell.
Then to put in the webserver, run the next command.

Once you obtained the standing of success as true as follows,
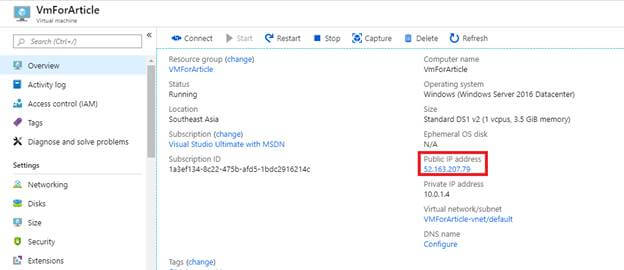
Then merely shut your RDP connection and return to your Azure portal. And choose the VM after which copy the IP tackle of the VM.
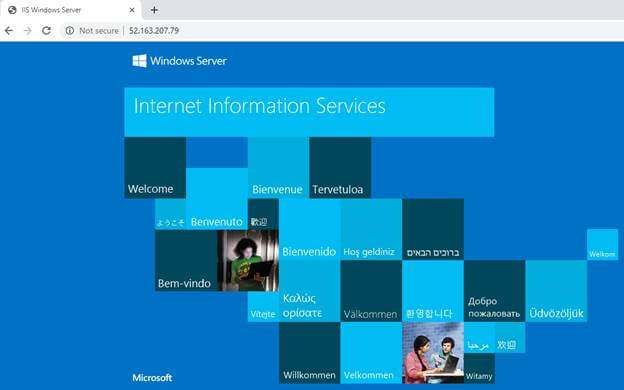
Then paste it into the net browser. You will notice the next window.
Now let’s give the Area Title to the general public IP tackle. So once more go to the overview of VM. After which, choose the “configure” possibility below the tab DNS identify.
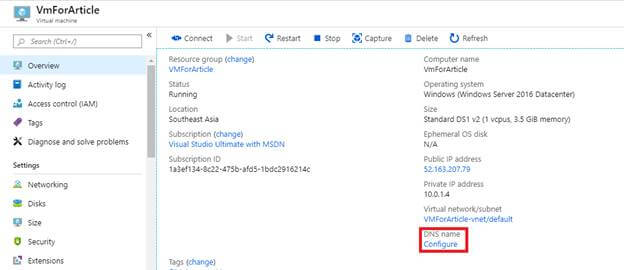
Then give the legitimate identify on your public IP tackle. See the picture beneath,
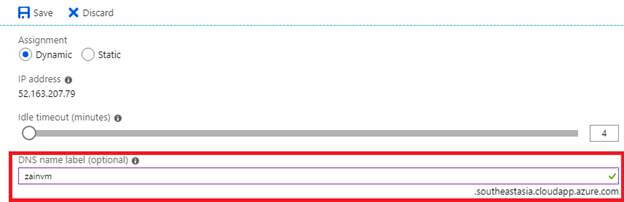
Now you possibly can see the DNS identify for my IP tackle of the digital machine.

Once you run this, it’s going to give the identical output as follows,
Congratulations! You’ve gotten created an internet server that may be related to publicly through this IP tackle, or through the absolutely certified area identify.
The distinction between Digital Machines with Containers
Let’s perceive the containers first. The container is the unit of software program wherein we bundle up the code and different dependencies of the applying to make the applying cross-platform and be capable to run on a number of computing environments. A number of containers can run on the identical machine. Containers comprise much less reminiscence than VMs (in some MBs) and may deal with extra purposes. Containers virtualize the working techniques as an alternative of {hardware} like VMs.
Then again, VMs turns one machine into many machines utilizing Digital Machine Monitor or hypervisor. Hypervisor permits a number of VMs to run on a single machine. As we all know, VM comprises the entire OS, code, utility, and its dependencies or libraries which makes its dimension larger (in GBs). Finally VM turns into sluggish.
Therefore you may have seen the distinction between the VM and a Container. In brief, VM virtualizes the {hardware} and Container virtualizes the working system which makes it environment friendly.
What’s Docker Container?
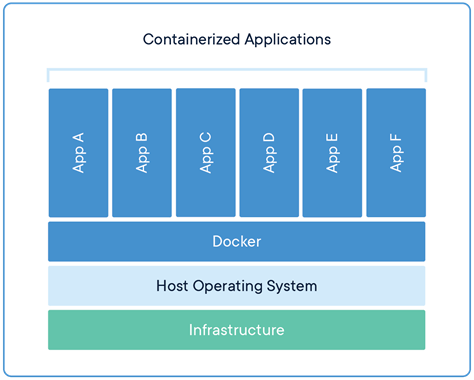
A platform for builders and sysadmins to develop, deploy and run the purposes utilizing containers. The usage of Linux to deploy the containers known as containerization. Utilizing Docker containers, we are able to create separate containers for a separate part of the applying.
The portability of the container makes purposes very simple to deploy in numerous environments. You may see the idea of containerized purposes utilizing the next picture.
Azure helps Docker containers and a number of methods to make the most of Docker containers and different sorts of Microsoft-based containers. Let’s perceive what are Azure Container Cases?
Azure Container Cases
Azure container situations enable us to run containers with out utilizing any third occasion providers or with out managing any sort of digital machines. So it offers us a platform as a service that enables us to add our containers after which run them.
Deploying Docker to ACI
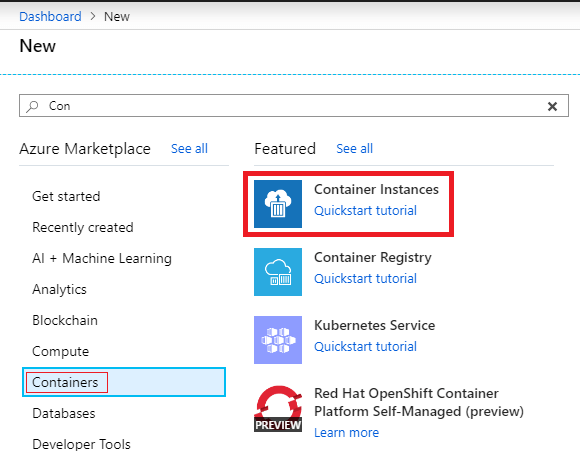
Right here you’ll create, configure and deploy the Docker container into the Azure Container Cases within the Azure portal. Right here we’ll use the picture for a container referred to as microsoft/aci-helloworld. Picture comprises a small net utility written in Node.js and comprises a static HTML web page. Let’s create a container occasion. For this, go to “Create a useful resource” after which below “Containers” market choose the “Container Cases” as follows,
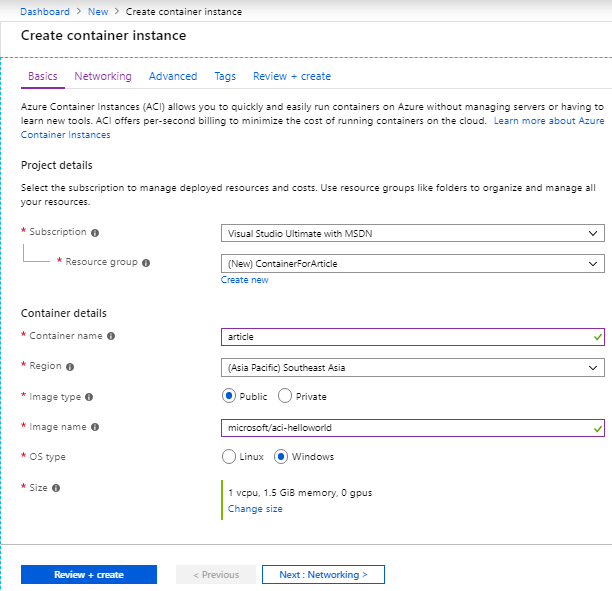
Then configure the next settings on the container like identify, area, useful resource group, picture, identify, pricing tier, working system sort.
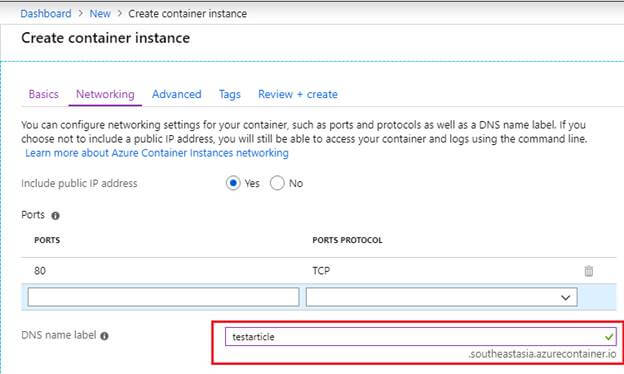
Then give the DNS identify of the container the place you and the general public can entry the containerized utility simply.
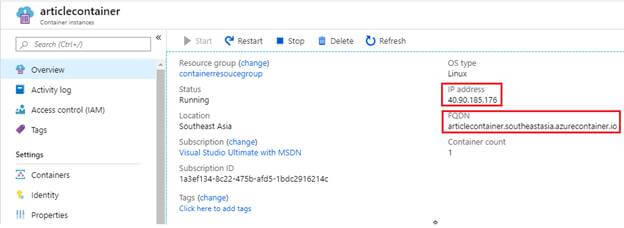
Then merely evaluate and create the container. When your deployment is completed efficiently then merely open the container. And choose the absolutely certified area identify (FQDN) or IP tackle and paste it into the browser. See the picture beneath,
Once you run it within the browser then you will notice the next window,
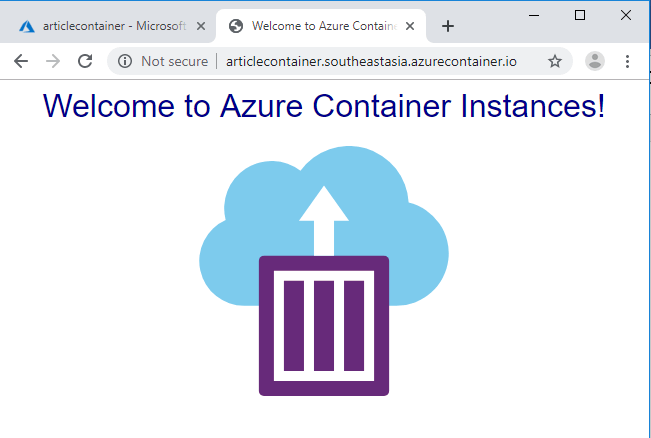
Therefore, you may have deployed an utility to a container in Azure Container Cases (ACI).
Conclusion
Congrats! You’ve gotten created, configured, and deployed the VM utilizing Azure portal and Containerized utility in ACI. Keep tuned for my subsequent articles. Be happy to offer your suggestions.