Microsoft Azure is a powerful cloud computing platform known for its exceptional performance, speed, and flexibility. As a web developer, it can be challenging to modify or use connection strings while users are actively using your website. Traditionally, it is not recommended to define connection strings within your code. However, Microsoft Azure offers a solution to this problem. In this article, we will explore how to define connection strings and utilize them in a .NET Web App.
For the purposes of this demonstration, we will use a basic ASP.NET website. If you need assistance creating Azure Websites, please refer to the blog by Anish Ansari.
Defining Connection Strings in Azure Websites
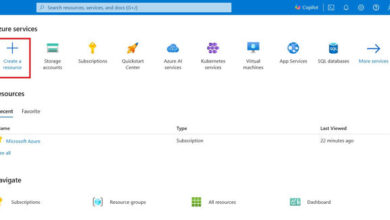
Step 1: Access your website’s dashboard in the Azure Portal and navigate to the Configure tab.
Figure 1: Go to Configure Tab
Step 2: Scroll down to the Connection Strings section.
Step 3: In the connection strings list, provide a name for the connection string in the corresponding text box, then enter the value or the connection string of the database. Finally, select the type of connection string. For this demonstration, we will use SQL Database.
Note: The demo connection string is “Data.”
Source=tcp:ServerName.database.windows.net,1433;Initial Catalog=DatabaseName;Integrated Security=False;User Id=username@servername;Password=password;Encrypt=True;TrustServerCertificate=False;MultipleActiveResultSets=True
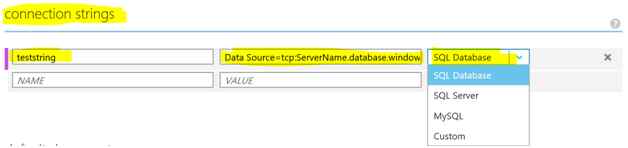
Figure 2: Entering Connection Strings for SQL Database
Step 4: Click the Save button on the command bar to apply the changes.

Figure 3: Click Save
Using a Connection String in .NET
Now that we have created and saved a sample connection string for the database, let’s retrieve it in our ASP.NET Site. Assuming you have already created an Azure .NET Web App or ASP.NET site.
Step 1: Open your project and navigate to the page where you want to retrieve the connection string (e.g., default.aspx).
Step 2: Add the following code snippet to the default.aspx.cs page.
using System;
using System.Configuration;
using System.Collections.Generic;
using System.Linq;
using System.Web;
using System.Web.UI;
using System.Web.UI.WebControls;

namespace ravitestwebsite
{
    public partial class _default : System.Web.UI.Page
    {
        protected void Page_Load(object sender, EventArgs e)
        {
            string key = "teststring";
            string value = ConfigurationManager.ConnectionStrings[key].ConnectionString;
            connectionLabel.Text = value;
        }
    }
}
In the default.aspx page, add a label with the following code:
<asp:Label runat="server" id="connectionLabel"></asp:Label>
Step 3: Publish your site to Azure and run it.

Figure 4: Connection String Retrieved
As demonstrated, using connection strings in Azure simplifies tasks and enhances reliability. It also improves security, protecting your site from vulnerabilities. Now, if you ever need to change the database, you don’t have to modify the code.
You can access the source code provided in this article for reference.
For more information and comprehensive services related to web development, please visit Skrots. We offer a wide range of services to help you achieve your goals. Feel free to explore our services at https://skrots.com/services. Thank you!