Introduction
In this blog post, we’ll explore the process of configuring Git to manage database objects in a Synapse Dedicated Pool environment (or Azure SQL Database) using Azure Data Studio.
We will guide you through the essential steps to seamlessly incorporate Git version control into your development process, allowing for effective collaboration and tracking of changes across various SQL objects like Tables, Stored Procedures, and Views.
By utilizing the robust features of Azure Data Studio and Git, you can optimize development workflows, ensure version control consistency, and boost team productivity within your Synapse Dedicated Pool (and Azure SQL Database) environment. Integrating Database objects with Git is crucial for implementing Data Ops.
Prerequisites
- Create an Azure SQL Database or Synapse Dedicated Pool.
- Create a few database objects in Azure SQL (e.g., Tables, Stored Procedures, Views).
- Download and install Azure SQL Data Studio from Microsoft’s official website. It comes automatically with the installation of SQL Server Management Studio (SSMS).
- Install Git software on your device.
- Create a Git repository in Azure DevOps (or a similar tool) and clone it to your local machine.
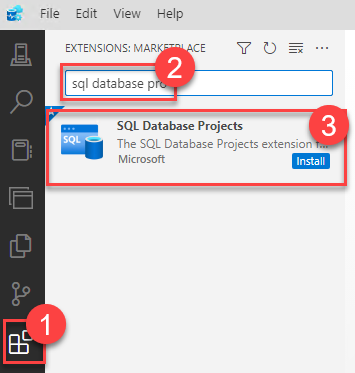
Install Azure Data Studio Extension
Launch Azure Data Studio, go to the extensions window, and install the SQL Database Projects extension.
Access the Git Repo folder
Now, open the project folder where you cloned the Database repository using the Git window.
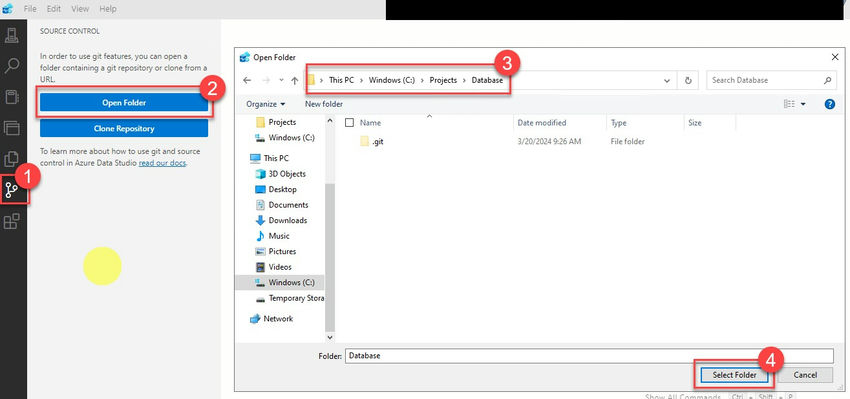
Ensure you can see the default branch name after opening the folder.
Establish SQL Connection from Azure Data Studio
Next, create a connection to Azure SQL Database or Synapse Dedicated Pool by selecting New Connection in the Connections tab.

A new pop-up will appear where you must provide all connection details.

Note: Ensure your Public IP Address is whitelisted in the Firewall rules of Azure SQL Server.
Once you’ve entered all details, click Connect to establish the connection. If you encounter any issues, feel free to share your error details in the comments section below.
If the connection is successful, you will see a confirmation message as shown below.
Create Database Project
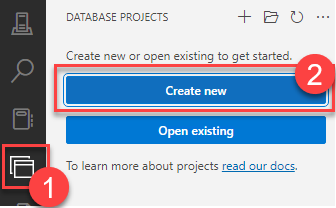
When working with Database Projects, the first step is to create the Database Project. Utilize the Create new button in the Database Projects window to start a new project.
In the Create new database project window, select Azure SQL Database, provide a name, choose a location (where you cloned the git repo), and ensure the SDK-Style Project checkbox is selected.

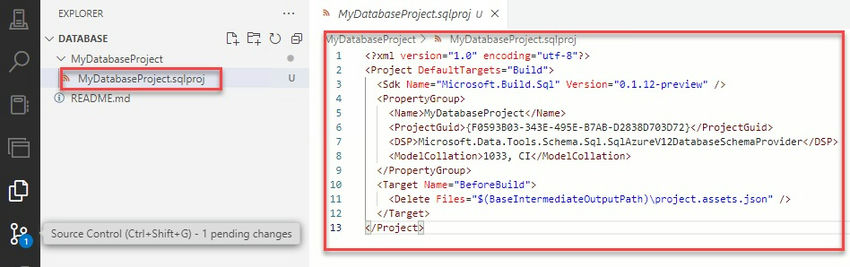
Click Create to generate the new project. Upon clicking Create, the SQL Database Project file will be created.
In most cases, in the DEV Environment, SQL developers create SQL objects directly using a SQL Client tool like SSMS. It’s crucial to integrate Git with SQL Database objects from the beginning.
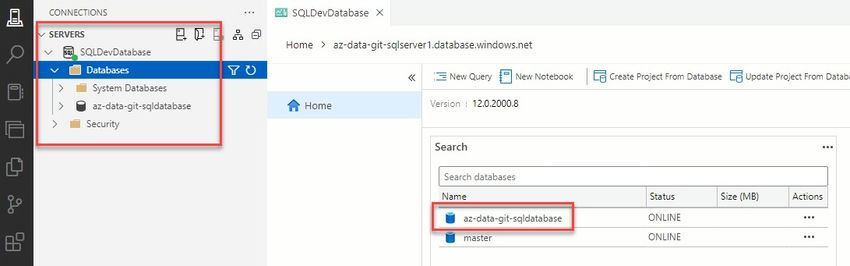
To retrieve all SQL Objects and integrate them with Git, we must leverage the SQL Data Projects extension. Open the Database Projects window and connect to the existing database.
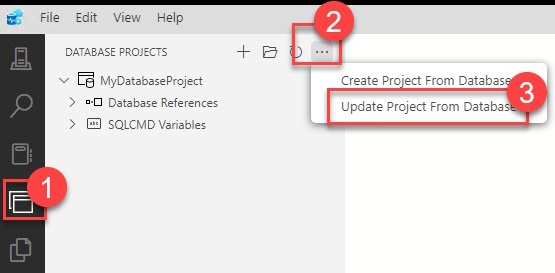
A pop-up will display where you fill in the following details:
- Server/Database: Choose the SQL Server and Database for connection.
- Location: Folder location where you cloned the git repo.
- Folder Structure: Select Schema/Object Type (other types are optional).
- Update Action: Apply all changes or View Changes in Schema Compare if you prefer to review changes.
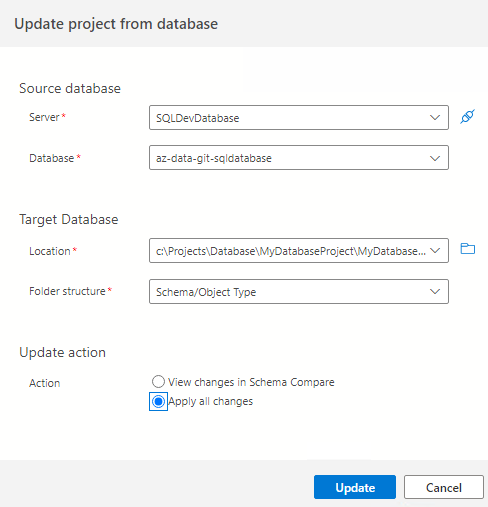
Once you’ve chosen all details, click the Update Button. A progress window will appear in the right-hand corner.

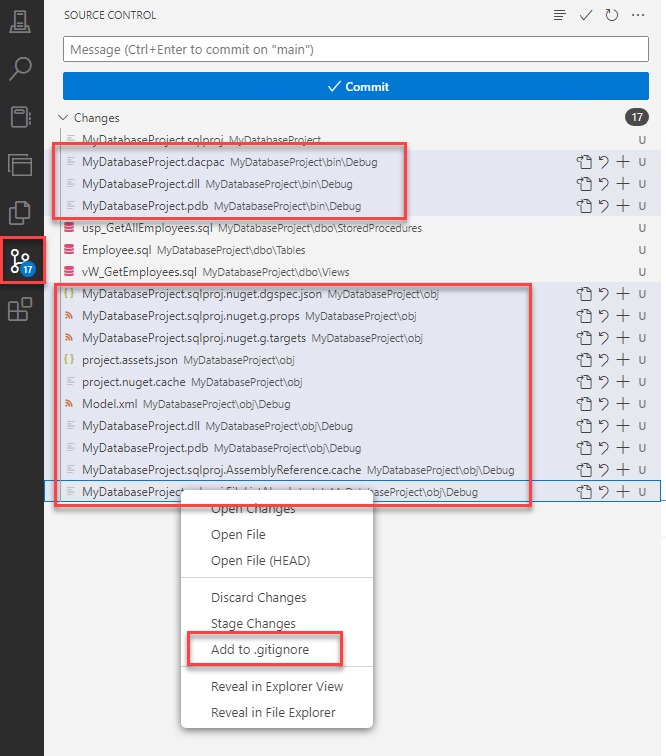
After a brief wait, all Database objects will be added to the Database Project, as seen in the screenshot below.

Simultaneously, an automatic build is triggered, creating a .dacpac file. Refer to another article to learn more about the .dacpac file.
To prevent temporary/intermediate files from being added to the git repo, ensure to add them to .gitignore as shown below.
Lastly, commit the listed files to your git branch. Review all files, stage the changes, and commit them to the git branch.
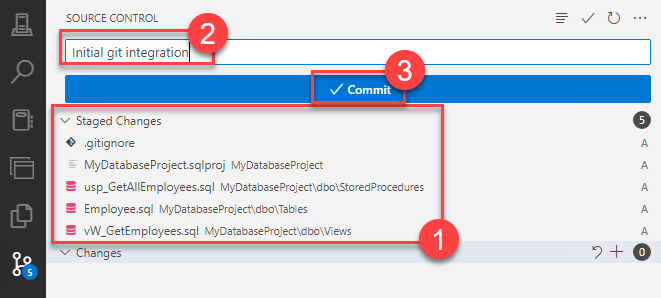
With this, SQL objects are successfully integrated with Git. Moving forward, ensure all new SQL Objects are promptly integrated with Git. The next step involves implementing Data DevOps for automated deployments to higher environments.
Conclusion
This article has provided a detailed guide on configuring Git to manage database objects in a Synapse Dedicated Pool or Azure SQL Database environment using Azure Data Studio. It has outlined the key steps to seamlessly integrate Git version control into the development process, promoting efficient collaboration and change tracking across SQL objects like Tables, Stored Procedures, and Views.
The prerequisites include creating a database, installing Azure Data Studio, Git software, and setting up a Git repository. The article further elaborates on installing the Azure Data Studio extension, accessing the Git repository folder, establishing an SQL connection, and creating a database project.
It stresses the significance of integrating database objects with Git to effectively implement Data Ops. The process involves utilizing Azure Data Studio’s SQL Database Projects extension to fetch SQL objects and merge them with Git. Additionally, it covers the steps for staging and committing changes to the Git repository.
Integrating SQL objects with Git ensures version control consistency, enhances team productivity, and sets the groundwork for implementing Data DevOps for automated deployments to higher environments.
Get to know more about our company at Skrots. Discover the range of services we offer at Skrots Services. Also, explore more insightful blogs on various topics at Blog at Skrots.