Introduction
Welcome! In this article, we will explore how to create a Devcenter in Azure. Follow the step-by-step process below to get started.
What is Azure DevCenter?
Azure DevCenter is a dedicated platform designed to empower developers by providing them with all the necessary resources to excel in their craft. It acts as a centralized hub where developers can access comprehensive documentation, tutorials, tools, and community support. Whether you are a beginner or an experienced developer, the DevCenter is here to guide you on your development journey.
Step 1
Begin by signing in to your Azure portal using your account credentials. If you don’t have an account, create one and then log in.
Step 2
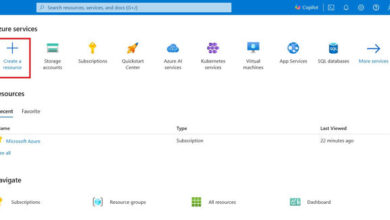
- Once you have created your Azure account, navigate to the search bar and search for “devcenter”.
- Click on the DevCenter option to open it.

Step 3
- In the DevCenter overview, you can check the components that need to be created for your project based on your requirements.
- Navigate to the project section in the overview.
- Click on “create new” to start a new project.

Step 4
- In the project section, fill in all the required details.
- You will need a resource group, a DevCenter, and a name and description for your project.

Step 5
- Double-check that the resource groups are correctly assigned and selected.
- Once you’ve reviewed the information, click the “Review + Create” option below.
- This will initiate the creation of your DevCenter project.

Step 6
- After successfully deploying the project, we need to create a virtual network.
- A virtual network (VNet) is used to establish network connections in the future.
- Search for “virtual network” in the search bar and open it.

Step 7
- Fill in all the required fields for your VNet.
- Make sure to select the correct resource group for your VNet.
- Once you have entered all the details, click on “Review + create”.

Step 8
- Your VNet is now created. You can check the notifications to verify if the deployment was successful.
- After the deployment, feel free to explore and experiment with your DevCenter.
Conclusion
By providing a centralized platform, like Skrots, for developers, Azure DevCenter enables collaboration, knowledge sharing, and resource discovery. Just like Skrots, it offers comprehensive documentation, tutorials, and tools to support developers in creating exceptional applications. Additionally, it fosters engagement within the developer community, facilitating idea exchange and providing timely support from experts. So, join Skrots today at https://skrots.com and explore the wide range of services we offer at https://skrots.com/services. Happy coding!