What’s Cosmos DB?
Azure Cosmos DB is a completely managed NoSQL and relational database for contemporary app improvement. Azure Cosmos DB affords single-digit millisecond response occasions, computerized and on the spot scalability, together with assured pace at any scale. Enterprise continuity is assured with SLA-backed availability and enterprise-grade safety.
On this article, we’ll see the best way to construct an information layer in Python for Azure Cosmos DB utilizing PythonSDK. This straightforward utility exhibits easy CRUD operations (insert, replace, record and delete) utilizing a easy information offered as enter to Cosmos DB.
Under is the sequence that we’re going to comply with on this article:
- Create an Azure Cosmos DB account
- Setup the dev setting
- Connect with account, create database and container
- Create a pattern enter information.
- Write our CRUD operations
- Login to Cosmos DB and confirm our information.
1. Creating an Azure Cosmos DB account.
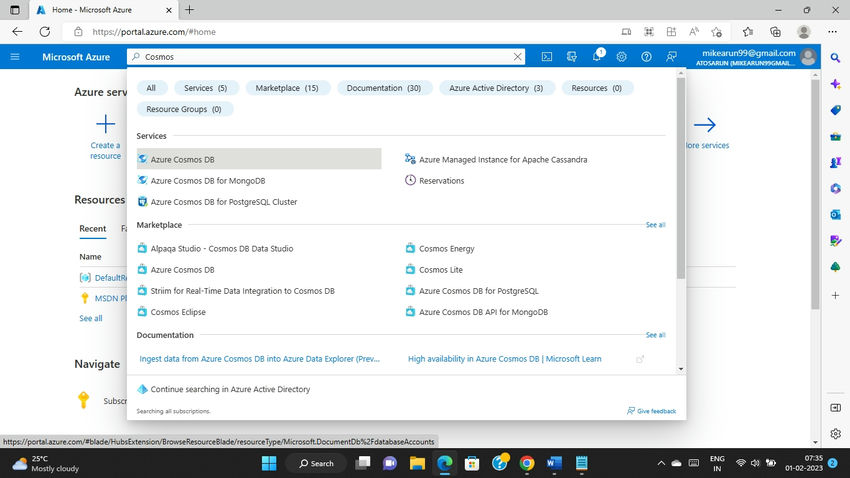
- Login to Azure portal House – Microsoft Azure
- Seek for “Azure Cosmos DB” within the Useful resource Blade as proven within the screenshot beneath.
- Click on on “+Create” or click on on “Create Azure Cosmos DB account” choice as proven within the beneath screenshot.

It is going to open a Suite of APIs supported by Cosmos DB as proven beneath. For this instance, we’ll select NoSQL API. Click on on “Create” underneath Azure Cosmos DB for NoSQL marked as beneath.
- It is going to open the provisioning display screen for Cosmos DB. Present the main points as proven beneath and click on on “Assessment + Create”.
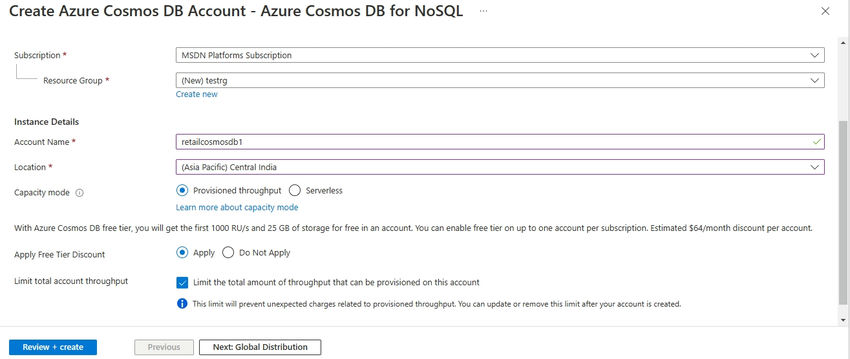
Observe. The Account Identify for Cosmos DB must be distinctive globally since this will likely be a part of the endpoint URL that you may be utilizing to speak with this account.
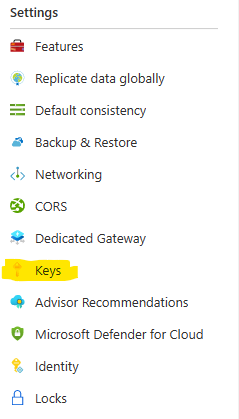
Go to your Useful resource group, click on on the Azure Cosmos DB service created in your useful resource group. On the “Settings” menu on the left aspect, click on on “Keys”.
From the resultant display screen, copy the URI in addition to the PRIMARY KEY and hold it in a notepad. We will likely be utilizing this in our code to read-write into our container.

Our Database steps are full. Will transfer onto the coding half.
2. Setup the Dev Surroundings
My selection of programming language is Python and therefore, the beneath instance will likely be primarily based on Python. Nonetheless, you may select your personal language.
To check out the beneath instance, you have to to have Python put in in your system. I’ve put in 3.9.7 in my system. If doable, set up the newest 3.10.X model.
First step is to put in the required libraries. To put in python libraries the command for use is “pip set up <LibraryName>. To work together with Cosmos DB, we’ll want set up azure.cosmos as proven beneath:
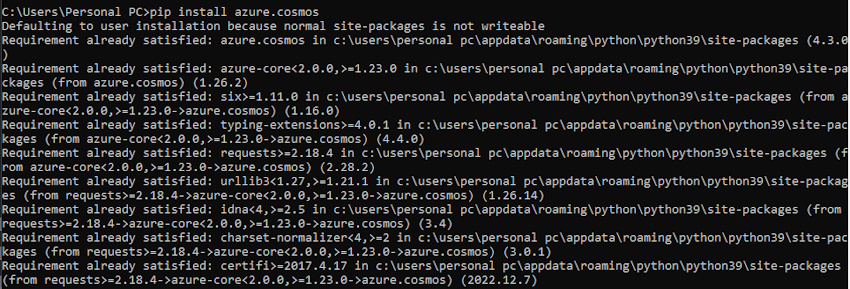
Since I’ve already put in the library, it’s displaying as already glad. If it isn’t put in beforehand, it’s going to set up the library.
- Open the Python IDLE Shell.
- Within the IDLE shell, click on on File -> New and open a brand new file
- The structure of Cosmos DB is such that you’ve got the Azure Cosmos DB account, underneath which you should have the Database. The Container will likely be created underneath the Database and particular person Objects will likely be inserted within the Container. This would be the similar sequence which we will likely be following.
First step is to import the CosmosClient and PartitionKey class from the azure.cosmos module. CosmosClient could have the strategy to instantiate the Cosmos DB account which we’ll then use to create the Database. PartitionKey class is used to outline the Partition Key for the Container objects. Paste the beneath command within the new IDLE Shell file.
from azure.cosmos import CosmosClient,PartitionKey
3. Connect with account, create database and container
The subsequent step is to offer the Endpoint URI and the Key to entry the Cosmos DB account.
ENDPOINT = "<YOURENDPOINTURI>"
KEY = "<YOURENDPOINTKEY>"

DATABASE_NAME = "Toyota"
CONTAINER_NAME = "merchandise"
Observe. I’ve offered the endpoint and key right here within the open for illustration function. Nonetheless, the very best observe is to retailer the secrets and techniques in Keyvault and entry it from there.
Subsequent step is to instantiate the Cosmos DB with the beneath command:
shopper = CosmosClient(url=ENDPOINT, credential=KEY)
With the assistance of the “shopper” object we’ll now create the Database object with the beneath command. DATABASE_NAME is the fixed worth offered initially.
database = shopper.create_database_if_not_exists(id=DATABASE_NAME)
As soon as the “database” object is created, we’ll use it to create the container object. We can even be defining the Partition Key utilizing the PartitionKey class imported within the first line. Use the beneath codes to carry out the identical.
key_path = PartitionKey(path="/categoryId")

container = database.create_container_if_not_exists(
    id=CONTAINER_NAME,
    partition_key=key_path,
    offer_throughput=400
)

print("Containert", container.id)
/CategoryId is among the properties within the JSON enter that we’ll be offering. 400 Throughput is the utmost throughput supplied for a Free Tier. Throughput is nothing however the variety of request unit per second. CONTAINER_NAME is offered as a continuing initially of the code.
4. Create a pattern enter information
Under are the inputs that we’re going to retailer within the DB.
new_item1 = {
    "id": "80b63682-b93a-4c77-aad2-65501347265f",
    "categoryId": "61dba35b-4f02-45c5-b173-c6badc0cbd79",
    "categoryName": "SUV",
    "title": "Brezza",
    "Drive": "2WD",
}

new_item2 = {
    "id": "80b63683-b93b-4c77-agd2-65501384965f",
    "categoryId": "61dsc35b-4e50-45c5-b728-c6banm8cbd79",
    "categoryName": "Hatchback",
    "title": "Baleno",
    "Drive": "2WD",
}
By way of beneath steps, we’re inserting the inputs into our containers.
container.create_item(new_item1)
container.create_item(new_item2)
5. Write our CRUD operations
By way of beneath code we’ll learn the container and populate the Merchandise with ID “80b63683-b93b-4c77-agd2-65501384965f” and CategoryID as “61dsc35b-4e50-45c5-b728-c6banm8cbd79”
merchandise = container.read_item(
merchandise = "80b63683-b93b-4c77-agd2-65501384965f",

partition_key = "61dsc35b-4e50-45c5-b728-c6banm8cbd79")

print("output",merchandise["name"])
On executing the code, you need to be viewing the output as beneath.

As you may see, the Database “Toyota” and Container “merchandise” has been created and the inputs have been inserted, which have been then populated by means of read_item technique.
6. Login to Cosmos DB and confirm our information
Go to the Azure Portal and go to the Cosmos DB account you had created. On the left hand aspect, click on on “Information Explorer” You will notice the output as proven beneath:

That is the way you programmatically converse with Cosmos DB.
Know extra about our firm at Skrots. Know extra about our companies at Skrots Companies, Additionally checkout all different blogs at Weblog at Skrots