Constructing a Timer Triggered Azure Perform to Fetch Climate Information and Add to Azure Blob Storage Desk
Introduction
On this article, we’ll create an Azure Perform with a Timer Set off that fetches climate knowledge for a selected metropolis utilizing the OpenWeatherMap API after which uploads the info to an Azure Blob Storage Desk. The perform will run periodically at a specified interval to maintain the climate knowledge up-to-date.
Conditions
- Azure account with Perform App and Blob Storage arrange.
- OpenWeatherMap API key.
Step 1. Organising the Azure Perform App and Blob Storage
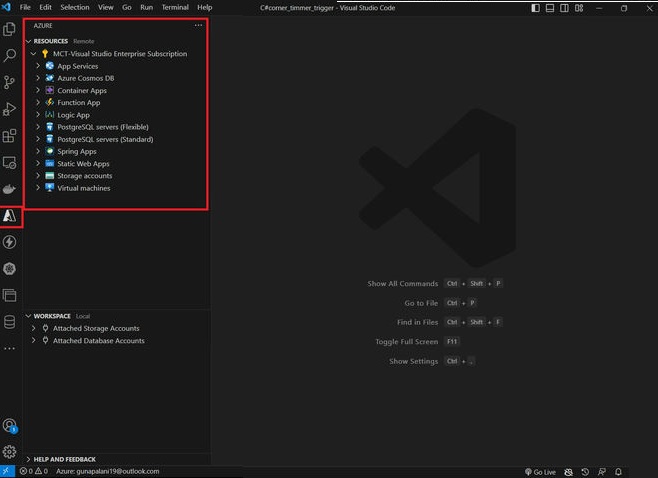
- set up Visual Studio Code, and add the Azure extension. Harness the ability of this light-weight code editor and seamlessly combine Azure cloud companies to supercharge your improvement workflow. The subsequent step is to register to your Azure account immediately throughout the extension.
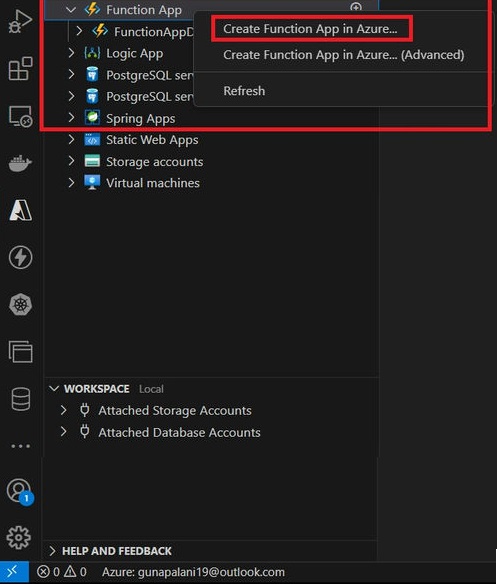
- Use the extension to create a brand new Perform App in Azure.
- Contained in the Azure extension, you will notice a piece for “Work house.” click on the Azure perform Icon.
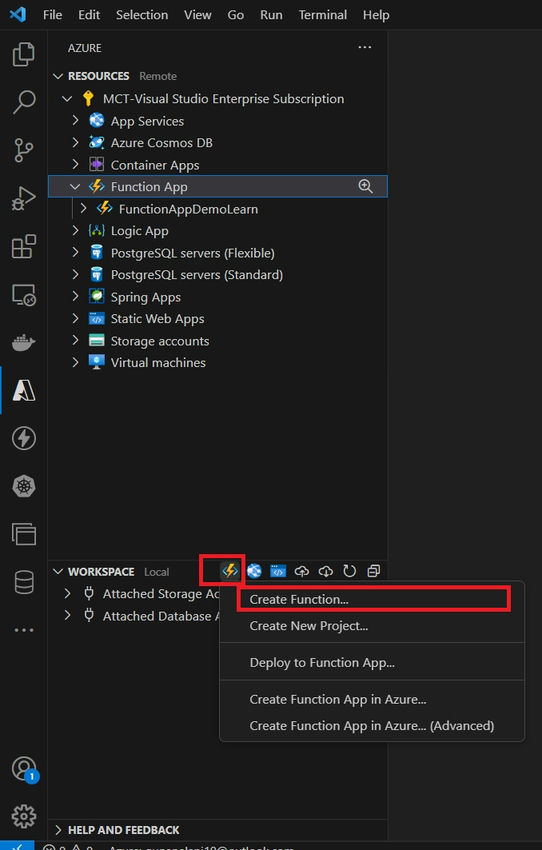
- After clicking “Create Perform,” you’ll be prompted to decide on the programming language on your Azure Perform. You’ll be able to choose from choices like Python, JavaScript, C#, and so forth.
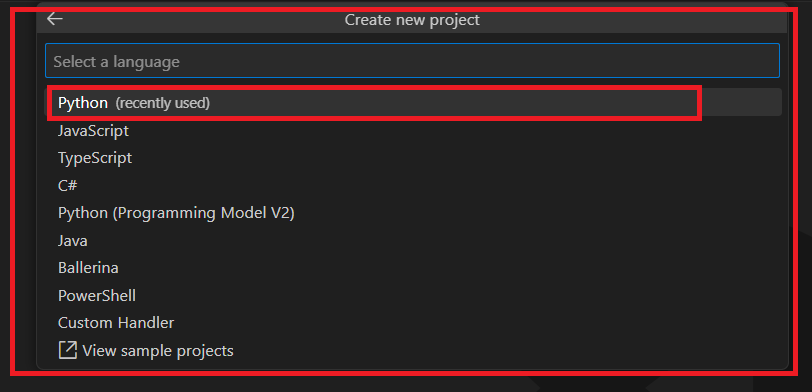
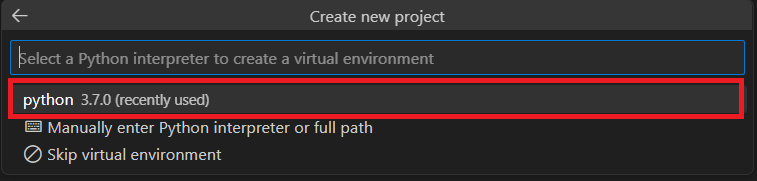
- Then select Python interpreter.
- Subsequent, you will want to decide on a template on your perform, resembling HTTP Set off, Timer Set off, Blob Set off, and so forth.

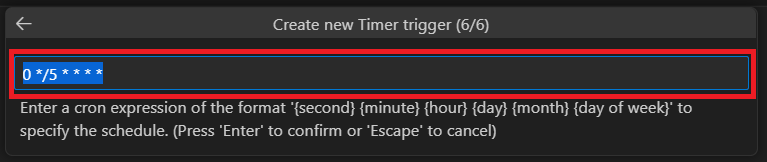
- As soon as you have chosen the language and template, you will want to supply further details about your perform, such because the perform identify and timing.

- Then your perform app is prepared.
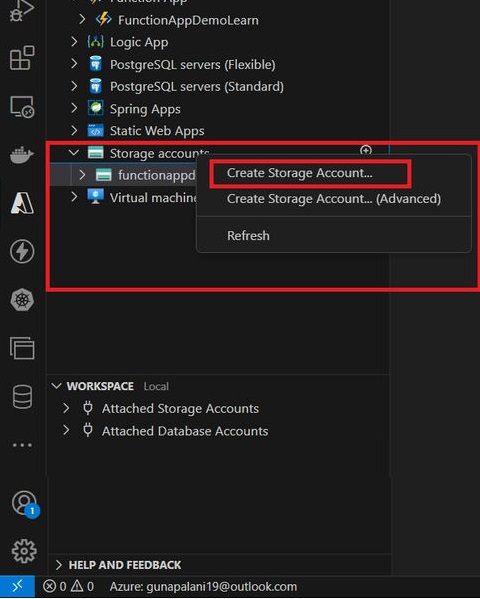
- After creating the Perform App, click on on the “Create New” button within the “Storage Account” part of the Azure Features extension. Fill within the required particulars to create a brand new Storage Account. Select the suitable choices for Account variety, Replication, and different settings as per your necessities.
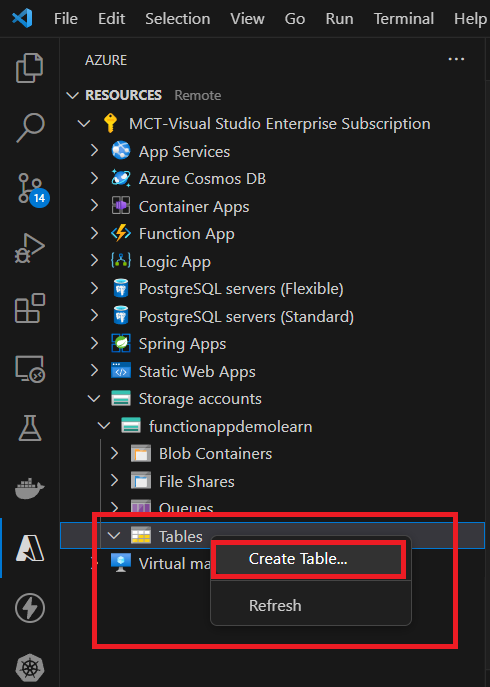
- As soon as the Storage Account is created, go to the “Desk” part and click on on “Create New”.
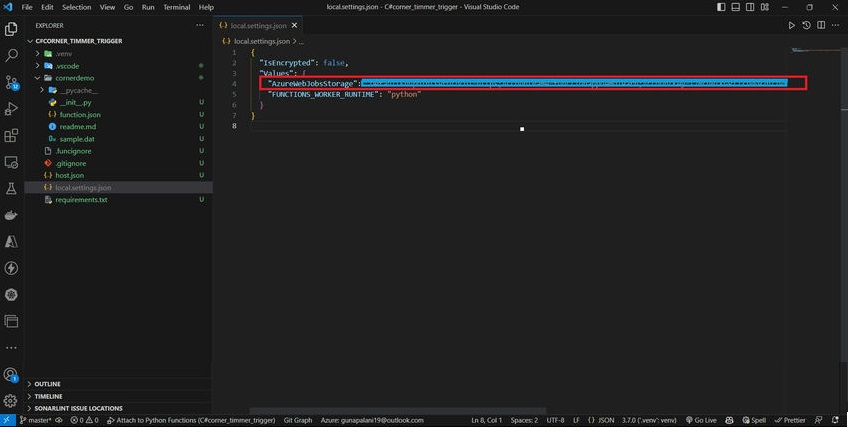
- Go to the “Entry keys” part of the created Storage Account within the Azure portal.Copy the “Connection string” from one of many key choices (both “Key1” or “Key2”).In your native Visual Studio Code challenge, navigate to the “native.settings.json” file.Open the “native.settings.json” file and discover the “Values” part. Add a brand new key-value pair below “Values” with the important thing as “AzureWebJobsStorage” and the worth because the copied connection string. Save the modifications to the “native.settings.json” file.
- Now, your Perform App in Visual Studio Code is configured to make use of the desired Storage Account connection string for native improvement and testing.
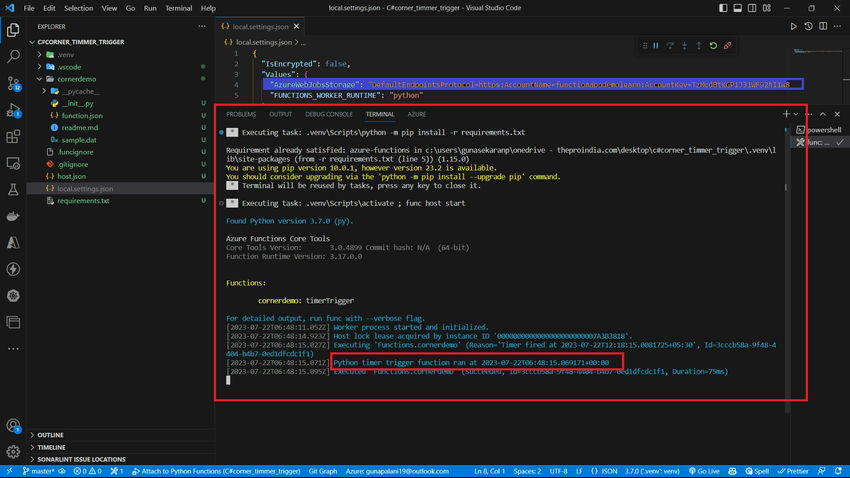
- Press the F5 key in your keyboard or go to the “Run” menu and choose “Begin Debugging.”The Perform App will begin working, and the Timer Set off shall be triggered in accordance with the schedule you’ve outlined. You’ll be able to monitor the output and logs within the “Terminal” or “Output” window to see the execution outcomes of the Timer Set off.
- Go to the OpenWeatherMap web site: https://openweathermap.org/Click on on the “Signal Up” button on the high proper nook of the web page. Join a brand new account utilizing your e mail or by connecting along with your social media account. After signing up, log in to your OpenWeatherMap account. As soon as logged in, navigate to the “API” part by clicking on the “API” hyperlink within the high navigation bar. and replica our key. In order for you a brand new on, click on the create possibility and create a brand new one additionally. then transfer to vs code.

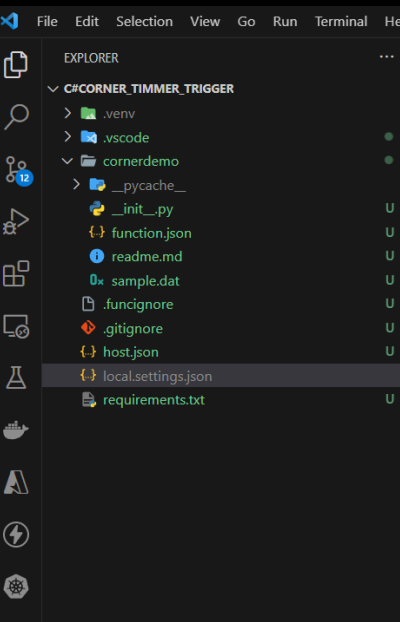
- To create the check_weather file and add the given code in Visual Studio Code.
- Your check_weather.py file ought to now comprise the next code:
-
import requests

def get_weather_data(api_key,city_name):
    base_url="http://api.openweathermap.org/knowledge/2.5/climate"
    params = {
        "q":city_name,
        "appid":api_key,
        "models":"matric"
    }

    strive:
        response = requests.get(base_url,params=params)
        response.raise_for_status()

        weather_data = response.json()
        return weather_data
    besides requests.exceptions.RequestException as e:
        print(f"Error fetching climate knowledge: {e}")
        return None
Now, you’ve created the check_weather.py file with the offered code. This file shall be utilized in your Azure Perform App to fetch climate knowledge from the OpenWeatherMap API.
- You name the get_weather_data perform in the principle perform. This API key shall be used to authenticate your requests to the OpenWeatherMap API and fetch climate knowledge.
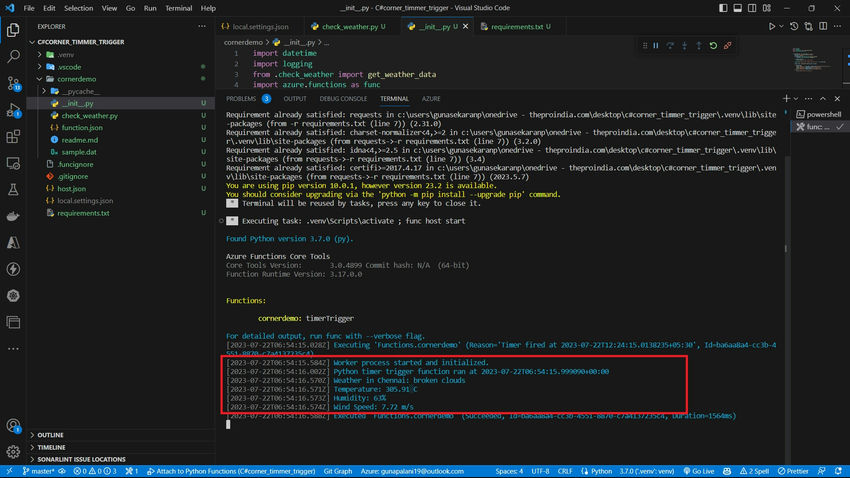
import datetime import logging from .check_weather import get_weather_data from .upload_table_azure import upload_weather_data import azure.capabilities as func def foremost(mytimer: func.TimerRequest) -> None: api_key ="your_weather_api_key" city_name ="Chennai" utc_timestamp = datetime.datetime.utcnow().substitute( tzinfo=datetime.timezone.utc).isoformat() if mytimer.past_due: logging.information('The timer is late!') logging.information('Python timer set off perform ran at %s', utc_timestamp) weather_data = get_weather_data(api_key,city_name) if weather_data: print(f"Climate in {city_name}: {weather_data['weather'][0]['description']}") print(f"Temperature: {weather_data['main']['temp']}°C") print(f"Humidity: {weather_data['main']['humidity']}%") print(f"Wind Pace: {weather_data['wind']['speed']} m/s") else: print("Climate knowledge not out there.") - When you completed all, simply run your perform app utilizing f5.
- Then add the Azure desk progress. To create the upload_azure_table.py file in your Azure Perform App challenge and embody the offered code.
- Copy and paste the next code into the upload_azure_table.py file:
import uuid import random from azure.knowledge.tables import TableClient from azure.core.exceptions import ResourceExistsError def upload_weather_data(weather_data): connection_string = 'your_storage_account_connection_string' # Create a TableClient table_client = TableClient.from_connection_string(connection_string, "weatherdata") # Outline the entity properties partition_key = str(uuid.uuid4()) row_key = str(random.randint(1, 100000)) climate = f"{weather_data['weather'][0]['description']}" temperature =f"{weather_data['main']['temp']}°C" humidity = f"{weather_data['main']['humidity']}%" pace =f"{weather_data['wind']['speed']} m/s" # Create the entity entity = { "PartitionKey": partition_key, "RowKey": row_key, "Climate": climate, "Temperature": temperature, "Humidity": humidity, "Pace": pace, } strive: # Insert the entity into the desk table_client.create_entity(entity) print("Entity efficiently uploaded to Azure Storage Desk.") besides ResourceExistsError: print("Entity with the identical PartitionKey and RowKey already exists within the desk.") besides Exception as e: print(f"Error importing entity to Azure Storage Desk: {e}") - Now, you’ve efficiently created the upload_azure_table.py file with the upload_weather_data perform that may add climate knowledge to the Azure Blob Storage Desk as per the offered code. Please make sure that to switch the connection_string with the suitable connection string on your Azure Storage Account. Moreover, be sure that the Azure Desk named weatherdata exists in your storage account to keep away from any errors throughout entity insertion.
- To name the upload_weather_data perform from the upload_azure_table.py file in your __init__.py
from .upload_azure_table import upload_weather_data - Now the principle file is.
import datetime import logging from .check_weather import get_weather_data from .upload_table_azure import upload_weather_data import azure.capabilities as func def foremost(mytimer: func.TimerRequest) -> None: api_key ="your_api_key" city_name ="Chennai" utc_timestamp = datetime.datetime.utcnow().substitute( tzinfo=datetime.timezone.utc).isoformat() if mytimer.past_due: logging.information('The timer is late!') logging.information('Python timer set off perform ran at %s', utc_timestamp) weather_data = get_weather_data(api_key,city_name) if weather_data: print(f"Climate in {city_name}: {weather_data['weather'][0]['description']}") print(f"Temperature: {weather_data['main']['temp']}°C") print(f"Humidity: {weather_data['main']['humidity']}%") print(f"Wind Pace: {weather_data['wind']['speed']} m/s") upload_weather_data(weather_data) else: print("Climate knowledge not out there.") - Subsequent, please remind necessities.txt
azure-functions
urllib3==1.26.7 --for unsupported perform app
requests
azure-data-tables
Utilization of necessities.txt file:
The necessities.txt file is used to checklist all of the exterior Python packages that your Azure Perform App will depend on. Once you deploy your Azure Perform App, the Azure platform will use this file to put in the desired packages and their dependencies within the Python atmosphere on your perform.
- All completed; please run our perform app.

- You also needs to see the log statements you added in your capabilities (e.g., “Entity efficiently uploaded to Azure Storage Desk”) indicating that your capabilities are executing appropriately.
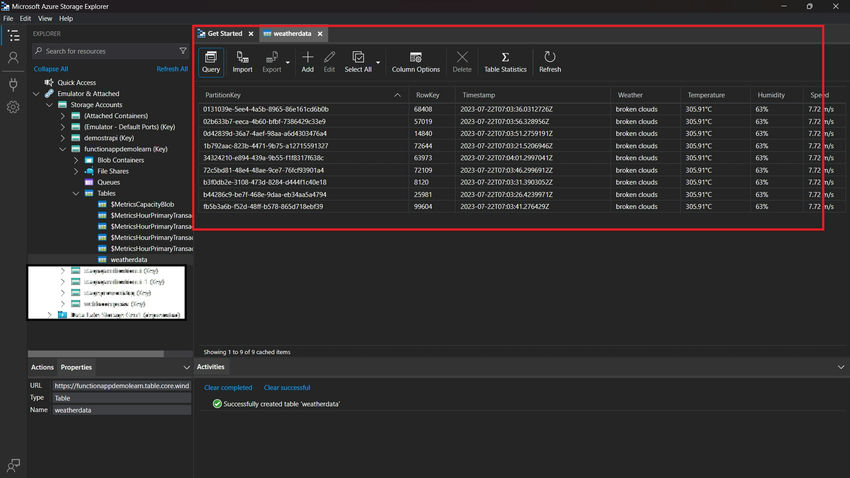
- Test Azure Desk Storage: In case your Perform App is efficiently posting climate knowledge to Azure Desk Storage, you may verify your Azure Desk to confirm that the info is being saved appropriately. You are able to do this utilizing the Azure Storage Explorer software.
Conclusion
Now we have efficiently created an Azure Perform with a Timer Set off that fetches climate knowledge from the OpenWeatherMap API and uploads it to an Azure Blob Storage Desk. This perform runs at a specified interval, guaranteeing that the climate knowledge stays present and up-to-date. If in case you have any doubts, please use the remark part.
Know extra about our firm at Skrots. Know extra about our companies at Skrots Companies, Additionally checkout all different blogs at Weblog at Skrots


