The Home windows Azure platform offers builders 4 methods of storing and retrieving information. Broadly these are known as Knowledge Companies. The 4 methods are,
- SQL Database
- Desk Storage
- Blob Storage
- Queues
On this article, I’m going to debate desk storage. Desk storage is a NoSQL information retailer aka non-relational information retailer. To work with the examples on this article, you could have a Home windows Azure account. Microsoft at the moment has a free 90-day trial provide that enables builders to experiment with the Home windows Azure platform. To join the 90-day trial, you could have a bank card. For these of you, who do not have a bank card or are unwilling to present bank card data to Microsoft for some purpose, I’ll present you how one can simulate Azure desk storage on the native machine utilizing the desk storage emulator.
Upon getting signed up for Home windows Azure, you possibly can create a desk storage account by logging into Azure administration. The administration portal is properly laid out and really intuitive. You will not have any hassle determining how one can create a desk storage account.
Getting Began
Initially, you could obtain and set up Home windows Azure SDK .NET. I used a software referred to as Net Platform Installer to obtain the SDK. And I like to recommend you additionally use it to obtain the SDK. The software is positioned at: http://www.microsoft.com/net/downloads/platform.aspx. If you set up and run the software, it shows all packages you can obtain and work with. You’ll wish to seek for the Azure .NET SDK within the net platform installer and set up it. The most recent package deal, on the time of writing this text, was model 1.8, launched in Oct 2012. Azure has SDKs for different languages and platforms like Python and node.js.
Upon getting downloaded and put in the SDK, open up Visual Studio, create a console utility, and name it “AzureTableStorageSample”.
You could add the next meeting references to your mission:
- System.Configuration.dll (To learn a connection string from app.config)
- Microsoft.WindowsAzure.Storage.dll
- Microsoft.WindowsAzure.StorageClient.dll
- System.Knowledge.OData (Set up this meeting from the Nuget console by typing Set up-Package deal Microsoft.Knowledge.OData -Model 5.0.2 In the event you do not see the Nuget console, then you possibly can flip it on by deciding on TOOLS -> Library Package deal Handle -> Package deal Supervisor Console menu possibility. Putting in this meeting from the Nuget console will set up extra assemblies which are required by it).
Storing an entity in an Azure desk
As soon as the required assemblies are added, add a brand new C# file to the mission with the next code.
utilizing System;
utilizing System.Collections.Generic;
utilizing System.Linq;
utilizing System.Textual content;
utilizing System.Threading.Duties;
utilizing Microsoft.WindowsAzure.Storage.Desk;

namespace AzureTableStorage
{
    public class EmployeeEntity : TableEntity
    {
        public EmployeeEntity()
        {
        }

        public EmployeeEntity(int id, string title, double sal)
        {
            Id = id;
            Title = title;
            Wage = sal;
            PartitionKey = id.ToString();
            RowKey = title;
        }

        public int Id { get; set; }
        public string Title { get; set; }
        public double Wage { get; set; }
    }
}
The stuff that’s saved inside an Azure desk is named Entities. An entity is analogous to a row within the SQL Server desk. Inside your utility code, it’s nothing however an object of some kind that you simply wish to retailer in a desk. Within the code above, I’ve outlined a category referred to as EmployeeEntity, deriving it from TableEntity. Each entity saved contained in the Azure desk has 3 obligatory properties: ParitionKey, RowKey, and Timestamp. The primary 2 properties should be assigned values by the applying code and type the first key of the desk.
Let’s now take a look at how objects of the kind EmployeeEntity might be saved in an Azure desk. Open up program.cs and the next utilizing statements on the high of the file.
utilizing System.Configuration;
utilizing Microsoft.WindowsAzure.Storage;
utilizing Microsoft.WindowsAzure.Storage.Desk;
Inside the primary technique, copy and paste the next code.
string connStr = ConfigurationManager.ConnectionStrings["ConnString"].ConnectionString;
CloudStorageAccount storageAccount = CloudStorageAccount.Parse(connStr);
CloudTableClient consumer = storageAccount.CreateCloudTableClient();
CloudTable desk = consumer.GetTableReference("worker");
desk.CreateIfNotExists();

var emp = new EmployeeEntity(1, "BillG", 123456.33);
TableOperation insertOp = TableOperation.Insert(emp);
desk.Execute(insertOp);
The previous code is fairly easy and self-explanatory. For the code above to learn the Azure desk connection string, you could put the suitable connection string within the app.config file.
<connectionStrings>
    <add
        title="ConnString"
        connectionString="DefaultEndpointsProtocol=http;AccountName=XXXXX;AccountKey=XXXX">
    </add>
</connectionStrings>
You will get the values for the AccountName and AccountKey keys from the Storage part of the Azure administration portal. Log into your Azure account, go to the Storage part and click on the “Handle Keys” hyperlink on the backside. Clicking on “Handle Keys” will open up a popup with all the small print that you could assemble the connection string.
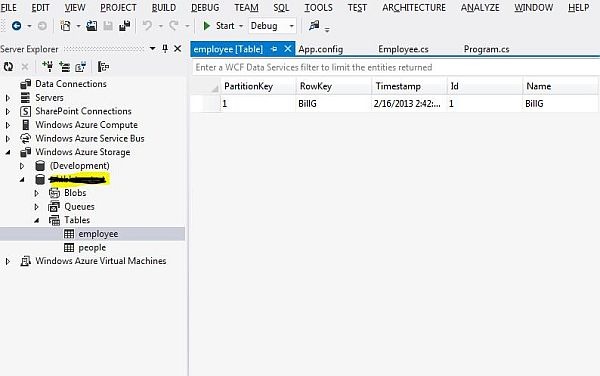
Upon executing this system, it is going to create a desk referred to as worker and add an worker entity. You possibly can examine whether or not the worker entity is saved within the desk or not by going to the Server Explorer and connecting to your storage account as proven under.
Retrieving an entity from a desk
Let’s now retrieve the entity that we simply saved. Add the next technique after the primary() technique inside your program.cs file. As soon as added, invoke the strategy from foremost() to see if the worker we added to the desk might be retrieved or not.
personal static EmployeeEntity RetrieveEmployee()
{
    string connStr = ConfigurationManager.ConnectionStrings["ConnString"].ConnectionString;
    CloudStorageAccount storageAccount = CloudStorageAccount.Parse(connStr);
    CloudTableClient consumer = storageAccount.CreateCloudTableClient();
    CloudTable desk = consumer.GetTableReference("worker");
    desk.CreateIfNotExists();

    TableOperation retOp = TableOperation.Retrieve<EmployeeEntity>("1", "BillG");
    TableResult tr = desk.Execute(retOp);

    return tr.Consequence as EmployeeEntity;
}
Simulating Azure Desk Storage on the native machine
First, you could run a program referred to as DSInit to arrange SQL Server or LocalDB because the desk storage. If you run this system, it creates a database within the specified SQL Server occasion with fairly a number of tables. To run this system, run the Home windows Azure command immediate from the Home windows Azure begin menu as an administrator. On the immediate, run the next command
DSInit /sqlInstance:<SqlServerInstanceName>
In my case, “SQL Specific” is the title of my native SQL Server title. I ran the command as follows.
DSInit /sqlInstance:sqlexpress
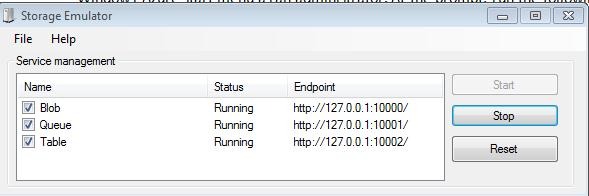
The subsequent step is to start out the storage emulator from the Begin menu. The storage emulator sits quietly within the system tray, however whenever you open it from the system tray, it’s as within the following.
You now want to vary the connection string to level to your native Azure desk storage setup. The next connection string ought to be just right for you.
<connectionStrings>
    <add
        title="ConnString"
        connectionString="UseDevelopmentStorage=true;DevelopmentStorageProxyUri=http://ipv4.fiddler">
    </add>
</connectionStrings>
When testing within the native surroundings, purchasers are compelled to make use of an online proxy. So, you have to run Fiddler (www.fiddler2.com) earlier than you run this system within the native surroundings. I learn someplace on the web that this wasn’t a requirement within the earlier variations of the SDK and is taken into account a bug by some individuals. So that you might not be compelled to make use of an online proxy when the subsequent model is launched.
Know extra about our firm at Skrots. Know extra about our companies at Skrots Companies, Additionally checkout all different blogs at Weblog at Skrots


