Introduction
When you will have an on-premises Digital Machine and if you must transfer it to the cloud, it is best to create a Digital Arduous Disk. The digital exhausting disks are of two sorts – VHD and VHDX. Sadly, the Microsoft Azure cloud helps solely the technology 1 VMs that are VHD. These VHDs are mounted dimension and the utmost dimension allowed is 1023 GB. Right here, on this article, we’re going to see how we will spin up a Digital Machine in Azure from the VHD file we have now. I’ll clarify why I got here to this example within the “Background” part. I hope you can find this text helpful. You’ll be able to all the time learn this text on my weblog right here.
Background
I used to be working with a product known as UCS (College Company Server). You’ll be able to think about it as a non-public Play Retailer the place you’ll be able to set up and use your customized functions. Additionally, you might be allowed to make use of the present ones as properly. Now, I needed to create an Azure VM with the UCS in it, however all I had in my hand was a VHDX file that isn’t supported in Azure.
Steps
On this article, we can be doing the next duties.
- Changing the VHDX file to VHD
- Importing it to the Azure Blob storage
- Making a Managed Picture from the VHD
- Creating the Digital Machine from the Managed Picture
Spin up the Azure VM from VHDX
As we have now mentioned, step one is to transform the VHDX file to VHD.
Convert VHDX to VHD
We’re going to use PowerShell for the conversion because it has some modules already to help this conversion.
Convert-VHD –Path c:CreateVMucs.vhdx –DestinationPath c:CreateVMucs.vhd -VHDType Mounted
Please observe that the Argument -VHDType is essential, in any other case, you could be getting an error as follows, while you attempt to create the Managed picture utilizing the command New-AzImage.
- New-AzImage: Solely blobs formatted as VHDs might be imported.
- ErrorCode: InvalidParameter
- ErrorMessage: Solely blobs formatted as VHDs might be imported.
- ErrorTarget: disks
- StatusCode: 400
- ReasonPhrase: Unhealthy Request
- OperationID: 16baa116-be93-4054-8ba9-265eda636f0c At line:1 char:10 + $picture = New-AzImage -ImageName $imageName -ResourceGroupName $rgName … + ~~~~~ + CategoryInfo : CloseError: (:) [New-AzImage], ComputeCloudException + FullyQualifiedErrorId : Microsoft.Azure.Instructions.Compute.Automation.NewAzureRmImage
As soon as you might be completed a brand new VHD picture can be created within the vacation spot path you will have given. Please observe that the dimensions of this file could also be big, and while you add it to the Blob storage, it could take longer relying on the community velocity you will have.
Add the VHD file to Azure blob storage
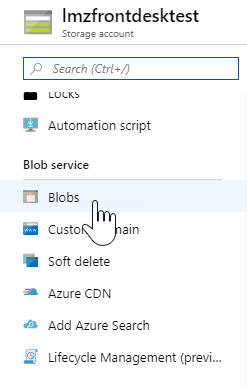
As a prerequisite, it is best to create a storage account earlier than you begin this course of. Upon getting created the storage account, you might be good to go and begin the add. Go to your Storage account, and click on on the Blobs underneath blob providers.
Now you’ll be able to click on on the +Container menu merchandise and create a brand new container which is nothing however the container to your information. Now we will go contained in the container and click on on the Add button. Within the upcoming pop up you’ll be able to choose the VHD file utilizing the file picker choice and add the file. As I mentioned earlier, this course of is dependent upon your community velocity.
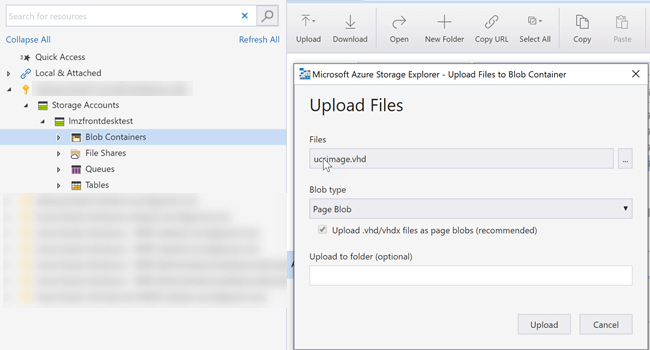
Typically, because of the browser’s inactivity, importing heavy information to the blobs utilizing the Azure portal could be a headache because it throws an error. One of many ideas I may give you right here is to make use of the Azure Storage Explorer software, which is kind of straightforward to make use of and efficient. When you obtain the software, log in together with your Azure credentials, go to the storage accounts, and click on on Blob Containers. Within the new window click on on Add after which Add information.
Please just be sure you are deciding on the Blob kind as Web page Blob after which click on Add. The importing is quicker if you’re utilizing the software as an alternative of the portal.
Create a Managed Picture from the VHD file
As we have now our VHD file in our Blobs, now it’s time to create an Picture from the file. We’re going to write some PowerShell instructions to do the work for us. To set the configuration we’re going to use the command New-AzImageConfig. If you’re getting the error “The time period New-AzImageConfig ‘ will not be acknowledged because the title of a cmdlet”, it is best to set up and import the module Az. Compute.
Set up-Module Az.
Compute import-module Az.
Compute
It’s doable to get some further error while you attempt to set up the Az. Compute module. In that case, you’ll be able to attempt the previous command.
Set up-Module Az.
Compute -AllowClobber
As soon as that’s completed, we will set some variables within the PowerShell as follows.
$vmName = "ucs"
$rgName = "ucs"
$location = "West Europe"
$imageName = "ucs"
$osVhdUri = "https://ucs.blob.core.home windows.internet/information/ucs.vhd"
Now we will begin the picture creation as previous.
$imageConfig = New-AzImageConfig -Location $location
$imageConfig = Set-AzImageOsDisk -Picture $imageConfig -OsType Linux -OsState Generalized -BlobUri $osVhdUri
$picture = New-AzImage -ImageName $imageName -ResourceGroupName $rgName -Picture $imageConfig
Because the UCS is a Linux-based system, I had given the -OsType as Linux, you’ll have to vary it as per your wants. For those who attempt to run the command New-AzImage with the VHDX blob, you’ll get an error as under.
- New-AzImage: Blob title in URL https://ucs.blob.core.home windows.internet/information/ucs.vhdx should finish with “.vhd” extension.
- ErrorCode: InvalidParameter
- ErrorMessage: Blob title in URL https://ucs.blob.core.home windows.internet/information/ucs.vhdx should finish with “.vhd” extension.
- ErrorTarget: blobUri
- StatusCode: 400
- ReasonPhrase: Unhealthy Request
- OperationID: 668b8e66-85b3-4c7b-a182-4f155e16b66d At line:1 char:10 + $picture = New-AzImage -ImageName $imageName -ResourceGroupName $rgName … + ~~~~~~~ + CategoryInfo : CloseError: (:) [New-AzImage], ComputeCloudException + FullyQualifiedErrorId : Microsoft.Azure.Instructions.Compute.Automation.NewAzureRmImage
However we don’t want to fret about it as we have now already transformed our VHDX file to VHD format. As soon as the New-AzImage command is profitable, you’ll be able to see the picture within the Azure portal for those who go to the Photographs part. You’ll be able to seek for the key phrase “Photographs” within the portal.
Create a VM from the Managed picture
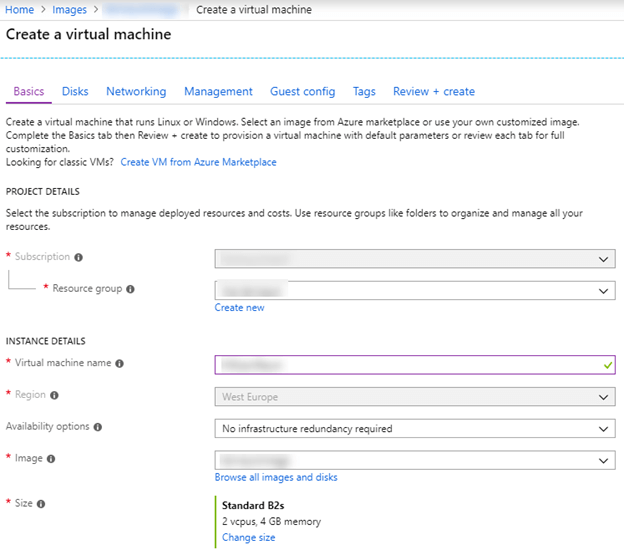
As we have now the picture now, we will create our VM simply from the Azure portal. Go to the Photographs choose your picture after which click on on the button Create VM. On the following web page, you may give the small print of your VM. You too can create the VM through the use of the PowerShell command as previous.
New-AzVm ` -ResourceGroupName “myResourceGroup” ` -Identify “myVMfromImage” ` -ImageName “myImage” ` -Location “East US” ` -VirtualNetworkName “myImageVnet” ` -SubnetName “myImageSubnet” ` -SecurityGroupName “myImageNSG” ` -PublicIpAddressName “myImagePIP” ` -OpenPorts 3389
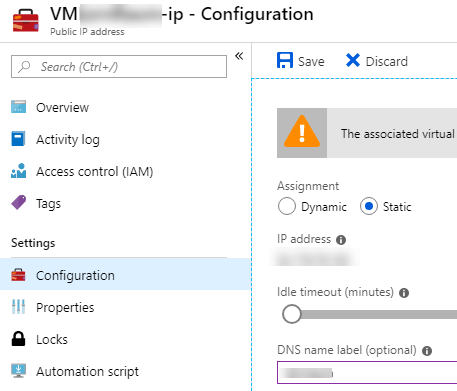
Upon getting crammed in all the small print, you’ll be able to both click on on the Assessment+Create or you’ll be able to undergo every step. The creation of a VM can take a couple of minutes. As soon as the duty is completed, you’ll be able to go to your Digital Machine and spin up the identical. I’d additionally advocate you assign a static IP and DNS title to your VM.
Conclusion
On this article, we have now discovered
- What are VHDX and VHD information
- The right way to convert the VHDX file to VHD
- The right way to add VHD information to Azure Blob storage
- The right way to create a Managed Picture from the VHD file in Azure
- The right way to create a Digital Machine utilizing the Managed Picture
Your flip. What do you suppose?
Thanks quite a bit for studying. Did I miss something that you could be suppose is required on this article? Did you discover this submit helpful? Kindly don’t forget to share your suggestions.
Know extra about our firm at Skrots. Know extra about our providers at Skrots Providers, Additionally checkout all different blogs at Weblog at Skrots


