Introduction
Azure Desk Storage in a layman’s language is a service that helps in storing non-relational structured information which is often known as the NoSQL information. This information can be utilized in storage and information operations on structured or semi-structured information.
Know extra about desk storage, click on on beneath hyperlink
Why Azure Desk Storage?
Azure Desk Storage service is a schema-less the place information is saved in tables as a group of entities that are simpler to adapt your information as the appliance and their want evolves. These desk storage information is quick and cost-effective for a lot of various kinds of functions. Since there are multiple entity in a desk, meaning one can retailer a number of entities in a desk having totally different properties. The price of that is decrease than the standard SQL for related volumes of information.
Desk storage can be utilized to retailer versatile datasets like person information for internet functions, deal with books, machine data, or different forms of metadata which can be required by your service. You possibly can retailer any variety of entities in a desk, and a storage account might comprise any variety of tables, as much as the capability restrict of the storage account.
Every entity can have as much as 252 properties and three reserved necessary properties they’re,
- PartitonKey
- RowKey
- Timestamp
What can we imply by the properties talked about above?
Properties are the distinctive and case delicate similar to desk identify and must be reviewed whereas making a desk. Let me clarify this to you by utilizing a instance of a ‘toy’. Allow us to contemplate toy as an entity, then its properties can be barcode, firm’s identify, and many others. Equally like this there are 252 customized properties and three system properties. These Three system properties are PartitionKey, RowKey and Timestamp (as talked about earlier).
Notice
Timestamp is system generated however you’ll have to specify the PartitionKey and RowKey whereas inserting information into the desk.
The way to Create Desk Storage Utilizing Azure Portal
Earlier than creating the desk storage you have to have azure subscription, useful resource group and storage account. To verify find out how to create azure subscription please click on on beneath hyperlink,
Beneath are the straightforward step to create desk storage in azure
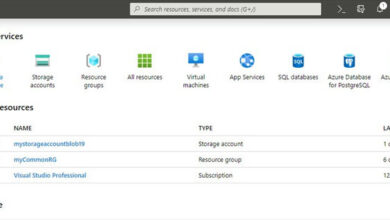
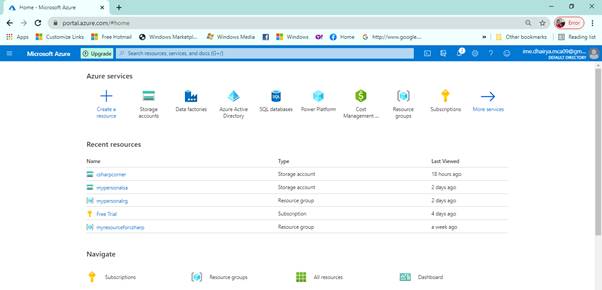
- Login on azure portal portal.azure.com and go to residence web page.
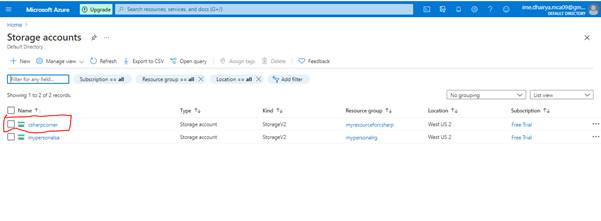
- Go to storage account and click on on it.
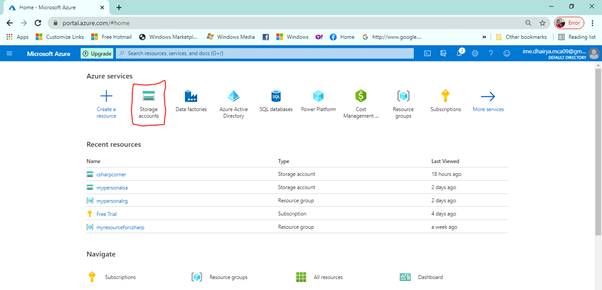
Right here one can find your storage accounts that you’ve got already created. Choose the one and click on on it.
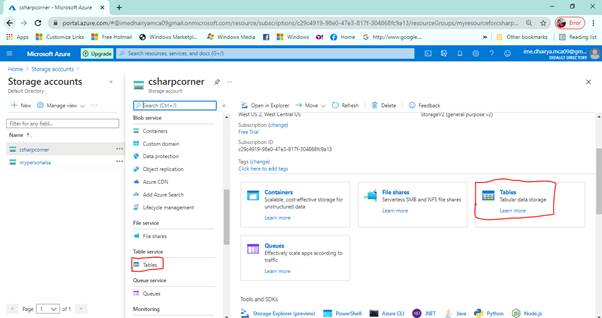
- after open the storage account one can find totally different kind of storage providers like Blob service, queue service, file service and desk service. I’ve already defined Blob and queue providers in my earlier article.
Now go to Desk service and click on on ‘Tables’.
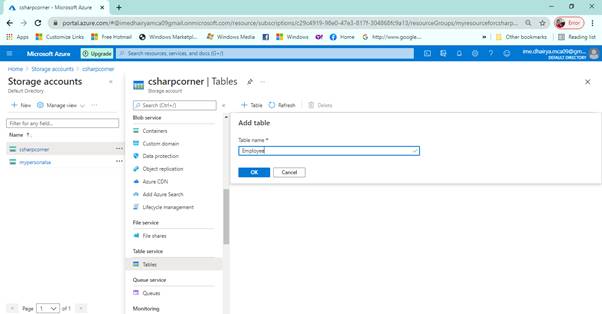
- After click on on ‘Tables’ additional click on on ‘+Desk’ to click on a brand new desk. give the identify of desk and click on on ‘Okay’.
Steps on Managing Tables Utilizing PowerShell
Step 1
Obtain and set up Home windows PowerShell on the system.
Step 2
Select ‘Pin to taskbar’ by right-clicking on the ‘Home windows PowerShell’. This can pin it to the taskbar of your laptop.
Step 3
‘Run ISE as Administrator’ is to be choosen on this step.
Step for making a Desk
Step 1
Copy these instructions given beneath and paste them into your display. The highlighted textual content is to get replaced together with your account.
Step 2
Now login into your account.
- $StorageAccountName = “csharpcorner”
- $StorageAccountKey = *******************************
- $Ctx = New-AzureStorageContext $StorageAccountName – StorageAccountKey
- $StorageAccountKey
Step 3
Go on creating a brand new desk.
- $tabName = “Worker”
- New-AzureStorageTable –Title $tabName –Context $Ctx
Information may be retrieved, deleted and inserted into the desk utilizing preset instructions in PowerShell.
Retrieve Desk
- $tabName = “Worker”
- Get-AzureStorageTable –Title $tabName –Context $Ctx
Delete Desk
- $tabName = “Worker”
- Take away-AzureStorageTable –Title $tabName –Context $Ctx
Insert rows into Desk
- perform Add-Entity() {
- [CmdletBinding()]
- param(
- $desk,
- [String]$partitionKey,
- [String]$rowKey,
- [String]$identify,
- [Int]$id,
- [String]$deal with,
- [String]$dpt
- )
- $entity = New-Object -TypeName Microsoft.WindowsAzure.Storage.Desk.DynamicTableEntity
- -ArgumentList $partitionKey, $rowKey
- $entity.Properties.Add(“Title”, $identify)
- $entity.Properties.Add(“ID”, $id)
- $entity.Properties.Add(“Tackle”, $deal with)
- $entity.Properties.Add(“Dpt”, $dpt)
- $end result = $desk.CloudTable.Execute(
- [Microsoft.WindowsAzure.Storage.Table.TableOperation]
- ::Insert($entity))
- }
- $StorageAccountName = “csharpcorner”
- $StorageAccountKey = Get-AzureStorageKey -StorageAccountName $StorageAccountName
- $Ctx = New-AzureStorageContext $StorageAccountName – StorageAccountKey
- $StorageAccountKey.Major
- $TableName = “Worker”
- $desk = Get-AzureStorageTable –Title $TableName -Context $Ctx -ErrorAction Ignore
Retrieve Desk Information
- $StorageAccountName = “csharpcorner”
- $StorageAccountKey = Get-AzureStorageKey – StorageAccountName $StorageAccountName
- $Ctx = New-AzureStorageContext – StorageAccountName $StorageAccountName –
- StorageAccountKey $StorageAccountKey.Major;
- $TableName = “Worker”
- #Get a reference to a desk.
- $desk = Get-AzureStorageTable –Title $TableName -Context $Ctx
- #Create a desk question.
- $question = New-Object Microsoft.WindowsAzure.Storage.Desk.TableQuery
- #Outline columns to choose.
- $listing = New-Object System.Collections.Generic.Record[string]
- $listing.Add(“RowKey”)
- $listing.Add(“ID”)
- $listing.Add(“Title”)
- $listing.Add(“Tackle”)
- $listing.Add(“Dpt”)
- #Set question particulars.
- $question.FilterString = “ID gt 0”
- $question.SelectColumns = $listing
- $question.TakeCount = 20
- #Execute the question.
- $entities = $desk.CloudTable.ExecuteQuery($question)
- #Show entity properties with the desk format.
- $entities | Format-Desk PartitionKey, RowKey, @{ Label = “Title”;
- Expression={$_.Properties[“Name”].StringValue}}, @{ Label = “ID”;
- Expression={$_.Properties[“ID”].Int32Worth}}, @{ Label = “Tackle”;
- Expression={$_.Properties[“Address”].StringValue}}, @{ Label = “Dpt”;
- Expression={$_.Properties[“Dpt”].StringValue}} -AutoSize
Delete Rows from Desk
- $StorageAccountName = “csharpcorner”
- $StorageAccountKey = Get-AzureStorageKey – StorageAccountName $StorageAccountName
- $Ctx = New-AzureStorageContext – StorageAccountName $StorageAccountName –
- StorageAccountKey $StorageAccountKey.Major
- #Retrieve the desk.
- $TableName = “Csharpcorner”
- $desk = Get-AzureStorageTable -Title $TableName -Context $Ctx -ErrorAction
- Ignore
- #If the desk exists, begin deleting its entities.
- if ($desk -ne $null) {
- #Collectively the PartitionKey and RowKey uniquely establish each
- #entity inside a desk.
- $tableResult = $desk.CloudTable.Execute(
- [Microsoft.WindowsAzure.Storage.Table.TableOperation]
- ::Retrieve(“Partition1”, “Row1”))
- $entity = $tableResult.Outcome;
- if ($entity -ne $null) {
- $desk.CloudTable.Execute(
- [Microsoft.WindowsAzure.Storage.Table.TableOperation]
- ::Delete($entity))
- }
- }
This script will delete the primary row from the desk, as Partition1 and Row1 are clearly specified within the script. After you might be finished with deleting the row, verify for the end result by operating the script for retrieving rows. The end result you can be getting is that the primary row is deleted.
Notice
Please be certain earlier than operating these instructions please that the account identify is changed together with your account identify and accountkey together with your account key.
Steps to Handle Desk utilizing Azure Storage Explorer
Step 1
Log in to your Azure account.
Step 2
Now, search for your storage account.
Step 3
Click on on the hyperlink for ‘Storage explorer’.
Step 4
Select ‘Azure Storage Explorer for Home windows’ from the listing.
Notice
Azure Storage Explorer for Home windows is a free instrument that may be downloaded and put in on the pc.
Step 5
Click on on the ‘Add Account’ button on the prime whereas operating this program in your laptop.
Step 6
Enter ‘Storage Account Title’ and ‘Storage account Key’ and click on ‘Take a look at Entry.
Step 7
Present ‘Tables’ of the storage are within the left panel below tables. Click on on the row to get the entry.
Steps for Making a Desk
Step 1
Click on on ‘New’ and enter the identify of the desk.
Insert Row into Desk
Step 1
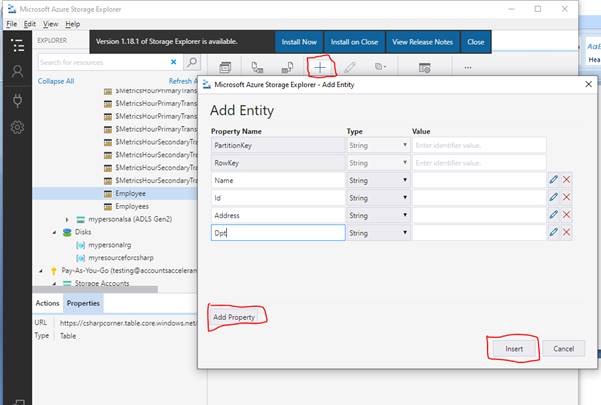
Click on on ‘+Add’ so as to add a subject.
Step 2
Enter Discipline Title and worth by click on on add property.
Step 3
From the dropdown menu, choose the info kind and enter the sector worth.
Step 4
Click on on insert
Azure Storage Explorer is an easy interface developer as in comparison with writing prolonged scripts in Home windows PowerShell. On, Azure Storage Explorer it’s straightforward to add, create, delete and obtain and handle the tables.
Abstract
Hope you perceive all of the strategies of making desk storage from the portal, utilizing PowerShell and Azure storage explorer. Strive these easy steps and let me know if any queries. You possibly can verify extra articles on azure desk storage right here,
Thanks for studying. Have a very good day.