
How To Deploy Knowledge Pipelines In Azure Knowledge Manufacturing unit Utilizing CI/CD
Introduction
On this article, we are going to discover methods to deploy Azure Knowledge Manufacturing unit’s information pipelines utilizing CI/CD. Steady integration (CI) allows us to construct and take a look at our code as quickly as it’s prepared. Steady deployment (CD) supplies a solution to deploy our modifications to completely different environments. The mixed course of permits information pipelines to be deployed routinely into the Azure Knowledge Manufacturing unit dwell mode.
Challenges
In our earlier article, we built-in Azure Knowledge Manufacturing unit with Azure DevOps’ git repository. With this integration, we’ve got to click on on the ‘Publish’ button in ADF to deploy the information pipeline modifications into the publish department and the dwell mode. The objective of CI/CD is to automate this course of and deploy the modifications to the dwell mode as quickly as it’s prepared for testing.
Let’s go over the Azure DevOps pipeline ideas first:
- Levels: Levels are used to group main actions collectively. In our case, we’ve got 2 levels: a CI stage and a CD stage.
- Jobs: Inside every Levels, we’ve got Jobs. Every job needs to be self-contained as they are often despatched to completely different Construct server for execution.
- Steps: A step is to carry out a person motion. Every job comprises a number of steps.
Tutorial
1. Create service connection
Earlier than we will dive into the DevOps pipelines, we have to create a Service connection so DevOps pipeline could make modifications to Azure Knowledge Manufacturing unit. I’ve linked the Azure article right here.
2. Create DevOps pipeline
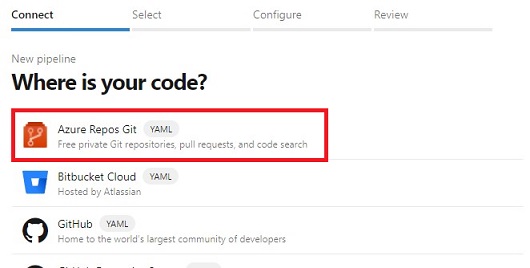
- In Azure DevOps, click on on Pipelines menu then click on on ‘New Pipeline’. A ‘New pipeline wizard’ seems.
- Underneath ‘Join’ part, we are going to choose ‘Azure Repos Git’.
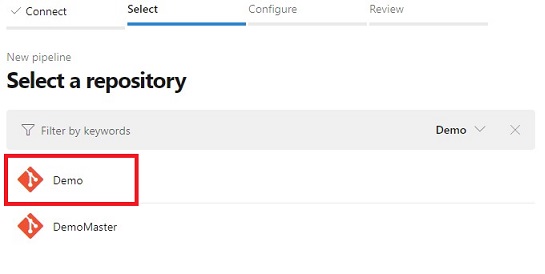
- Underneath ‘Choose’ part, let’s choose our ‘Demo’ repository.
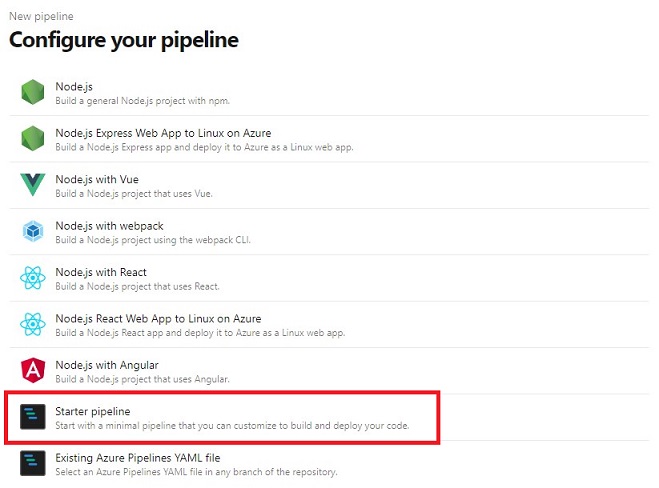
- Underneath ‘Configure your pipeline’ part, choose ‘Starter pipeline’.
- Underneath ‘Evaluate’ part, we will see the pattern code for a starter pipeline:

- set off: This set off reveals any modifications in ‘important’ department of our repo will begin a brand new construct.
- Contained in the steps, we’ve got 2 actions. The primary motion will print out ‘Hi there, world!’ and the second motion will print out ‘Add different duties to construct, take a look at, and deploy your challenge.’
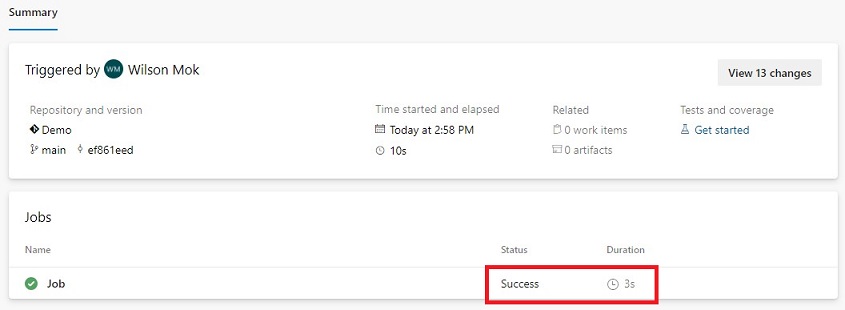
- Let’s click on on ‘Save and run’ and commit our modifications.
- After saving our modifications, a construct has efficiently accomplished.
Outline the variables
Earlier than we begin with the Construct stage, lets take away all of the steps and create ‘variables’ within the DevOps pipeline. The variables shall be used all through this pipeline.
Now we have outlined 5 variables. The worth for the primary four variables are discovered from our Azure Knowledge Manufacturing unit web page in Azure Portal,
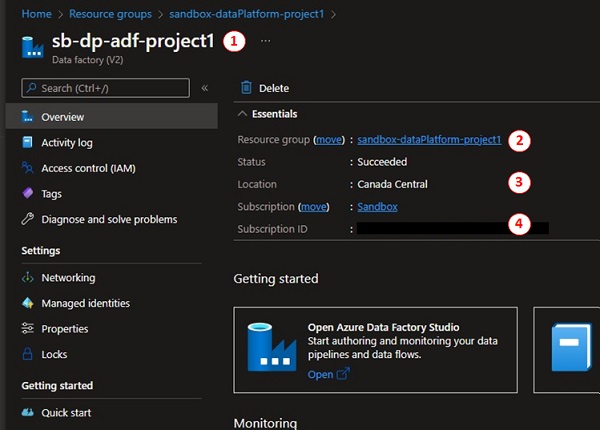
The adfName, resourceGroupName, and subscriptionId are used to create a brand new variable known as adfResourceId. That is how Azure uniquely identifies our ADF occasion. The principle profit of making the primary four variables enable us to reuse this supply code by change the variables for any new initiatives requires Azure Knowledge Manufacturing unit.
set off:
- important

pool:
  vmImage: ubuntu-latest

variables:
  - identify: adfName
    worth: sb-dp-adf-project1

  - identify: resourceGroupName
    worth: sandbox-dataPlatform-project1

  - identify: adfLocation
    worth: Canada Central

  - identify: subscriptionId
    worth: [redacted]

  - identify: adfResourceId
    worth: /subscriptions/$(subscriptionId)/resourceGroups/$(resourceGroupName)/suppliers/Microsoft.DataFactory/factories/$(adfName)
Implement Construct (CI) stage
Within the Construct stage, our objective is to retrieve the recordsdata from the ‘important’ department of the git repository and generate the ARM templates for the Deployment stage.
This stage consists of 5 important processes:
- Discover the Construct stage and the job identify. Recall that Levels comprises Jobs and Jobs comprises Steps.
levels: -stage: Build_Adf_Arm_Stage jobs: -job: Build_Adf_Arm_Template displayName: 'ADF - ARM template' steps: -
The following step, we have to set up the dependencies. Azure supplies a software name ADFUtilities. This bundle is used to validate and create the deployment template. So as to set up this bundle, we have to set up Nodel.js and npm bundle administration. The ‘Construct.Repository.LocalPath’ is a world variable supplied by Azure DevOps to point the place the supply code shall be situated.
- process: NodeTool@0 displayName: 'Set up Node.js' inputs: versionSpec: '10.x' - process: Npm@1 displayName: 'Set up npm bundle' inputs: command: 'set up' workingDir: '$(Construct.Repository.LocalPath)/construct/' verbose: true - We have to validate our supply code utilizing our Azure Knowledge Manufacturing unit. To do that, we are going to name the ‘validate’ perform. By default, our code is checkout within the ‘$(Construct.Repository.LocalPath)’ folder and we saved our adf supply code below adf-code listing. The working listing is the place the ADFUtilities is put in.
-task: Npm @1 displayName: 'Validate Supply code' inputs: command: 'customized' workingDir: '$(Construct.Repository.LocalPath)/construct/' customCommand: 'run construct validate $(Construct.Repository.LocalPath)/adf-code $(adfResourceId)' - Generate ARM template from supply code utilizing our Azure Knowledge Manufacturing unit. We’re utilizing the ‘export’ perform and output the ARM template within the ‘armTemplate’ folder contained in the workingDirectory.
-task: Npm @1 displayName: 'Generate ARM template' inputs: command: 'customized' workingDir: '$(Construct.Repository.LocalPath)/construct/' customCommand: 'run construct export $(Construct.Repository.LocalPath)/adf-code $(adfResourceId) "armTemplate"' - Lastly, we will publish our ARM template as DevOps pipeline artifact. This can create a zipper file with the artifact identify ‘sb-dp-adf-project1-armTemplate’.
-task: PublishPipelineArtifact @1
displayName: 'Publish ARM tempate'
inputs:
    targetPath: '$(Construct.Repository.LocalPath)/construct/armTemplate'
    artifact: '$(adfName)-armTemplate'
    publishLocation: 'pipeline'
Add the bundle.json file
Earlier than we will save and run the pipeline, we’ve got create a ‘bundle.json’ file. This file will comprise the course to acquire the ADFUtilities bundle:
- Within the repository, we have to create a ‘construct’ folder.
- Contained in the folder, we are going to create ‘bundle.json’ file.
- This npm bundle will use this JSON file discover the ADFUtilities bundle.
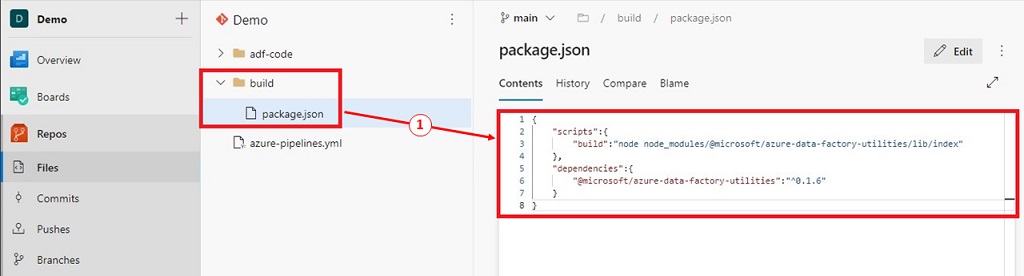
- Save and commit the become the ‘important’ department.
Take a look at Construct/CI course of
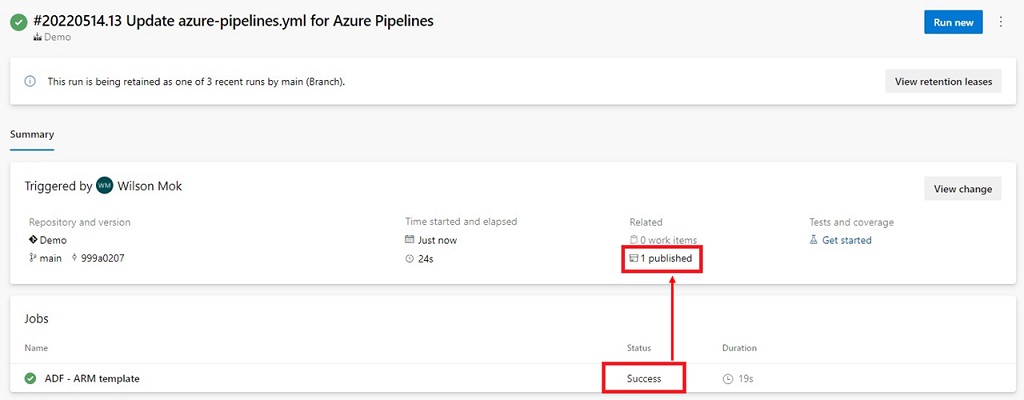
Now, we will save the modifications to our DevOps pipeline and run the pipeline. If that is the primary time this challenge makes use of the service connection, you would possibly have to grant permission.
After the construct is accomplished, we will overview the artifact created.
The ARM template recordsdata created are the identical within the publish department,
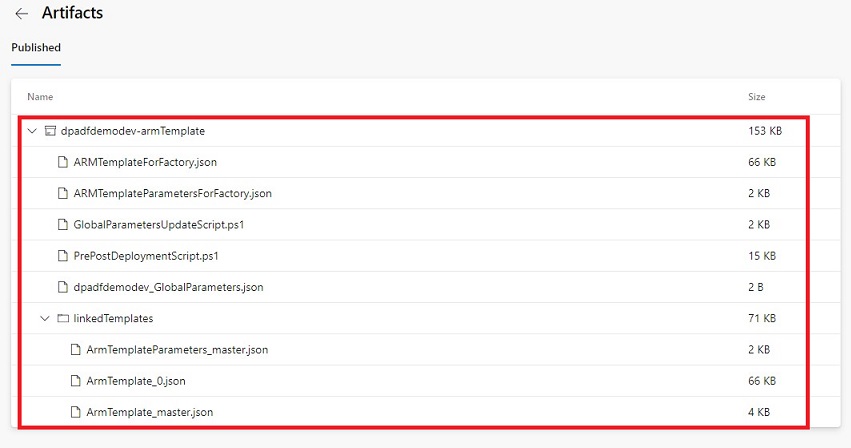
With this artifact created, we will begin on the deployment stage.
Implement Deploy to dwell mode (CD) stage
We have to outline a brand new stage for the deployment course of. On this instance, we are going to outline the Dev deployment stage. We shall be retrieving the pipeline artifact and deploying it into the Reside mode of Azure Knowledge Manufacturing unit.
- Outline the ‘Deploy_Dev_Stage’ and guarantee this code solely runs if the CI Construct stage is profitable. For deployment, we’re going to use the ‘deployment’ job as nicely. This enable us to outline the technique on the deployment. For this instance, we’re going to run this deployment as soon as solely.
-stage: Deploy_Dev_Stage displayName: Deploy Dev Stage dependsOn: Build_ADF_ARM_Stage jobs: -deployment: Deploy_Dev displayName: 'Deployment - DEV' setting: DEV technique: runOnce: deploy: steps: -
Obtain the artifact. Since every job may be ran on a distinct construct server, we have to obtain the artifact to make sure our recordsdata exists. We’re going to extract the artifact recordsdata below the targetPath. The ‘Pipeline.Workspace’ variable is a world variable outlined by Azure DevOps.
-task: DownloadPipelineArtifact @2 displayName: Obtain Construct Artifacts - ADF ARM templates inputs: artifactName: '$(adfName)-armTemplate' targetPath: '$(Pipeline.Workspace)/$(adfName)-armTemplate' -
Override the parameters and deploy the ARM template. The parameters we’re overriding are primarily from the Linked providers in Azure Knowledge Manufacturing unit. This permits us to deploy the artifact into Improvement, QA and Manufacturing environments by changing the specify the connection info. It is usually essential to set the deploymentMode to ‘Incremental’ to make sure solely the ADF pipelines are up to date.
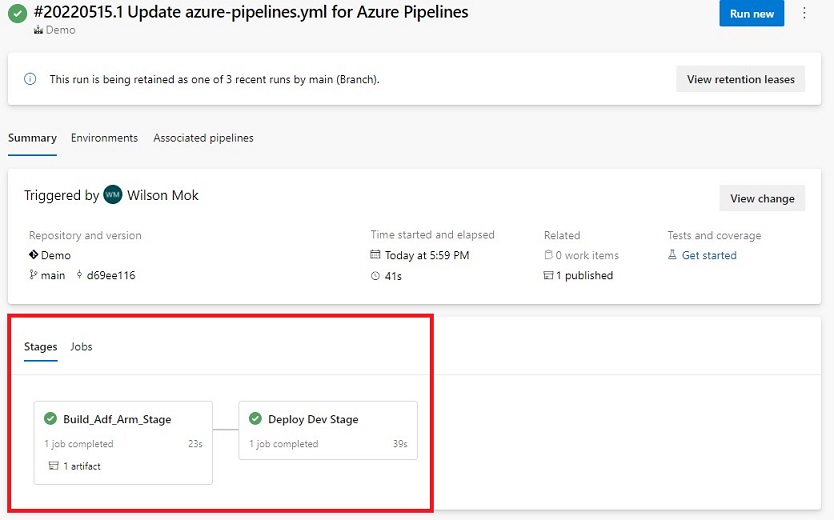
-task: AzureResourceManagerTemplateDeployment @3 displayName: 'Deploying to Dev RG process' inputs: deploymentScope: 'Useful resource Group' azureResourceManagerConnection: 'myServiceConnection' subscriptionId: '$(subscriptionId)' motion: 'Create Or Replace Useful resource Group' resourceGroupName: '$(resourceGroupName)' location: '$(adfLocation)' templateLocation: 'Linked artifact' csmFile: '$(Pipeline.Workspace)/$(adfName)-armTemplate/ARMTemplateForFactory.json' csmParametersFile: '$(Pipeline.Workspace)/$(adfName)-armTemplate/ARMTemplateParametersForFactory.json' overrideParameters: '-factoryName "$(adfName)" -LS_SalesDatabase_connectionString "Built-in Safety=False;Encrypt=True;Connection Timeout=30;Knowledge Supply=mySalesDatabase.database.home windows.web;Preliminary Catalog=mySalesDb;Consumer ID=myDataUser" -LS_DataLake_properties_typeProperties_url "https://myDataLake.dfs.core.home windows.web" -LS_KeyVault_properties_typeProperties_baseUrl "https://myKeyVault.vault.azure.web/"' deploymentMode: 'Incremental' - Run the pipeline and confirm the consequence. We are able to see the Deploy Dev Stage is accomplished and ran efficiently.
Abstract
By creating an Azure DevOps pipeline, we’ve got efficiently automate our information pipeline deployment course of. This method eliminates the necessity to manually click on on the ‘Publish’ button. Sooner or later, we will lengthen this resolution to deploy the artifact into QA and Manufacturing environments.
You possibly can receive the supply code from my github repo.
Glad Studying.


