Setup An identical Environments Throughout A number of Digital Machines To Host Hackathons And Coaching
Introduction
It is a follow-up article of “Create Digital Environments with Azure Lab Companies” If you’re new to Azure Lab Companies then it will be higher to learn it first. Furthermore, this text can also be a part of the Azure Creation Calendar the place specialists from completely different communities share their information by means of their very own contributions in numerous codecs, the commonest being publications of their blogs, though they will also be movies, webinars, and so on. Learn extra about it.
On this step-by-step tutorial, I’ll reveal methods to create a digital surroundings utilizing Azure Lab Companies to host an enterprise hackathon, decreasing the effort and time of individuals to arrange a number of digital machines with the software program builders most likely must innovate and clear up the challenges of the hackathon. This tutorial covers the next matters.
- Learn how to create lab plans
- Learn how to grant entry to a lab plan
- Learn how to create a lab
- Learn how to customise the template digital machine
- Learn how to publish the template digital machine
- Learn how to add customers to the lab
- Learn how to schedule occasions
- Learn how to use a pre-configured VM
Palms-on expertise
Allow us to suppose the enterprise Contoso develops APIs for its clients. Not too long ago, they realized that a few of their APIs may very well be migrated to serverless workloads to save lots of prices. A Program Supervisor has prompt internet hosting a serverless hackathon to reinforce the talents and information of the developer groups. Nonetheless, the developer groups can not cease their each day actions to put in and arrange an surroundings to develop serverless capabilities and neither can the supervisor set up the software program in a number of digital machines for each staff. Somebody has prompt utilizing Azure Lab Companies to organize the environments and host a one-day hackathon. As the corporate is utilizing .NET, most definitely all digital machines would require both Visual Studio or VSCode with some extensions and packages to develop serverless capabilities with the C# SDK.
All through the instance, the phrases “Educator” and “Pupil” proceed to seem to seek advice from the roles defined within the earlier article. On this instance, the Educator may very well be the Program Supervisor and the Pupil may very well be a developer staff.
Pre-requisites
To make use of Azure Lab Companies you will want an Azure Subscription, you will get one right here, or in case you are a pupil you may create one with Azure for college kids.
Step 1: Create a lab plan
For this text, Azure Portal is used alongside all steps, however Azure CLI may very well be used as a substitute.
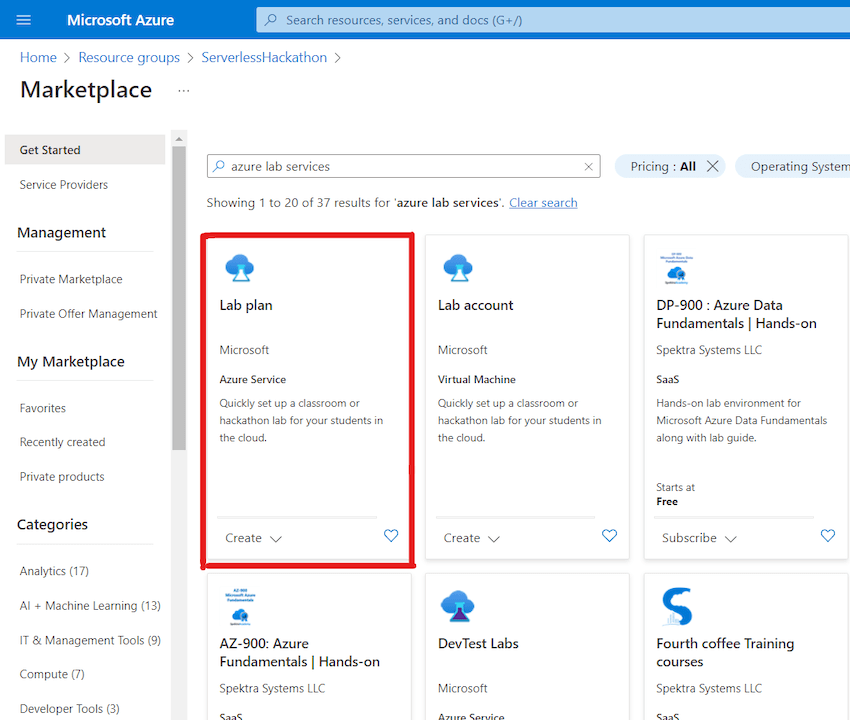
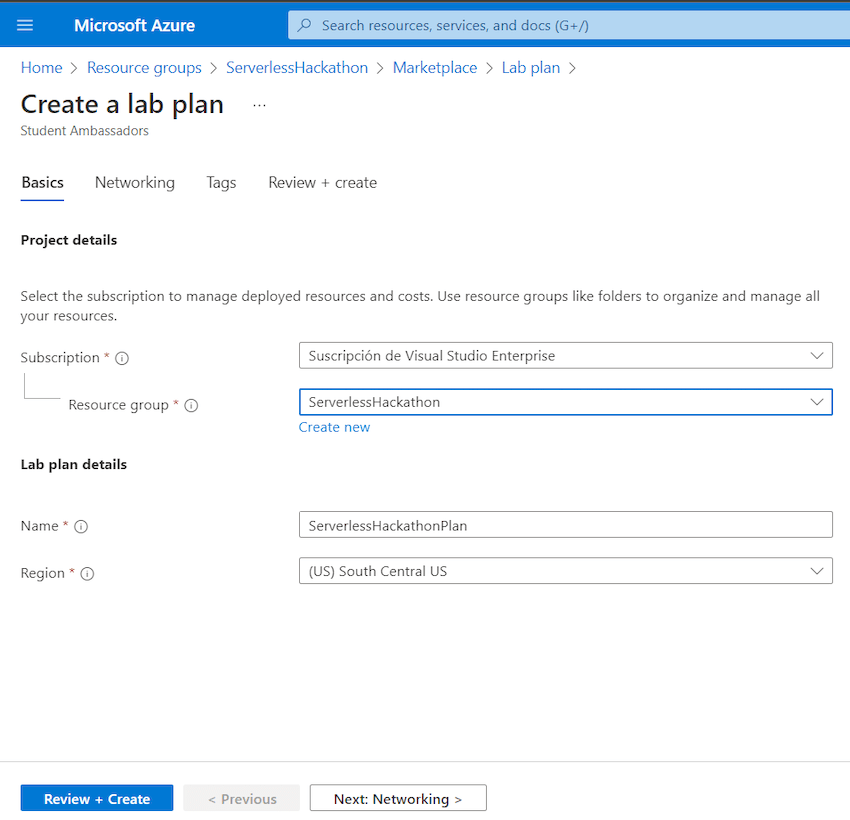
Create a useful resource group with a reputation (see prompt sample) and a area near your customers. Then, seek for “azure lab providers” within the market and select Lab plan. Click on on Create and fill the Fundamentals part (proven in Determine 2) from the wizard with a lab plan identify (see prompt sample) and a area (ideally the identical area as your useful resource group).
Determine 1
Determine 2
If you don’t plan to attach your new digital machines to different present digital machines out of your community, skip superior networking choices. Later, you may add a tag if you need (it’s at all times a good suggestion to take action). Lastly, Click on on Assessment + Create and anticipate the deployment to be accomplished.
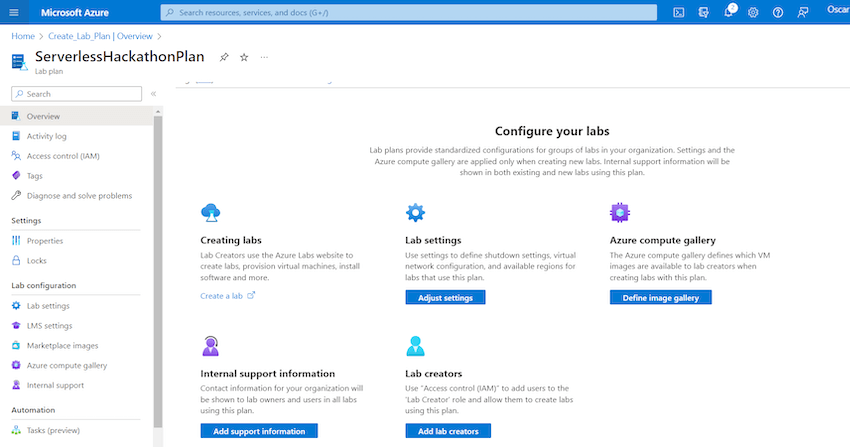
Click on on Go to useful resource and you will note some choices to configure your labs.
Determine 3
Step 2: Grant entry
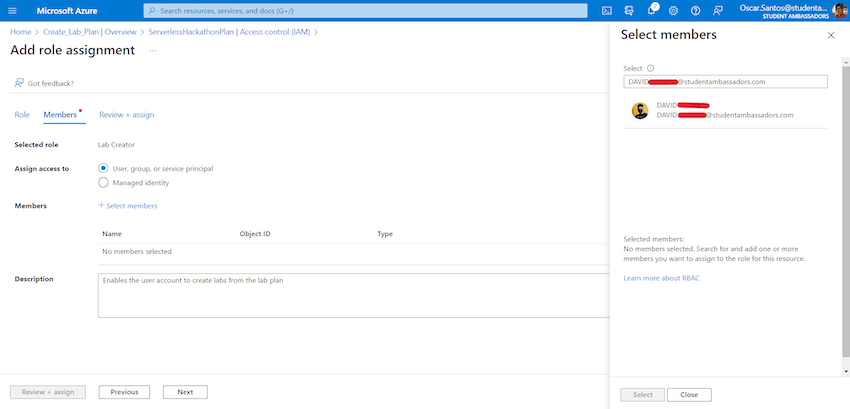
Click on on Add lab creators (Determine 3) to assign Function-Primarily based Entry Management (RBAC) to the Educator.
On this article, the Educator is added to the Lab Creator function (Determine 4), for those who want granular management test this out for an in depth description of the roles.
Determine 4
After you evaluate and assign the function, this one will seem within the IAM panel (Determine 5)
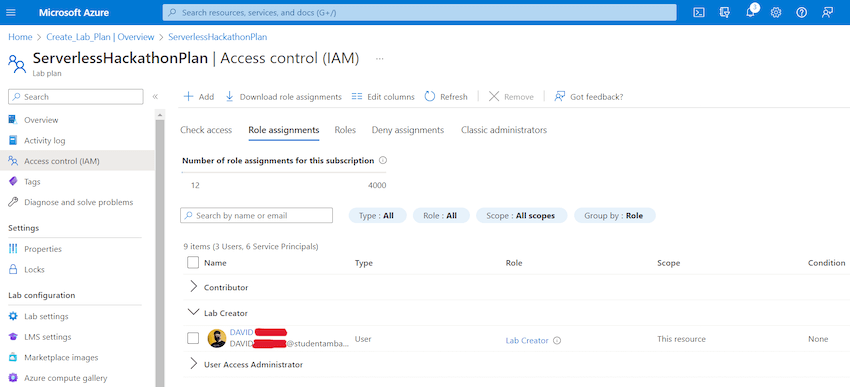
Determine 5
Then, you (the Proprietor) and the Educator can create labs. Return to the overview part and click on on Create a lab (Determine 3).
Step 3: Create a lab

Determine 6
First, you will want a lab identify (this isn’t the lab plan identify) as you may have a number of labs in a single lab plan. Second, a picture of the working system (OS) (Linux or Home windows), you’ll discover there may be solely a restricted record within the dropdown menu, nonetheless, you may allow extra from {the marketplace} pictures (Determine 7) and in addition use Azure Compute Gallery. Check out Determine 7, there may be even an present picture with Visual Studio put in, that’s already part of the duties we wished to do. Third and fourth, select measurement and site (relying in your choice prices could differ)
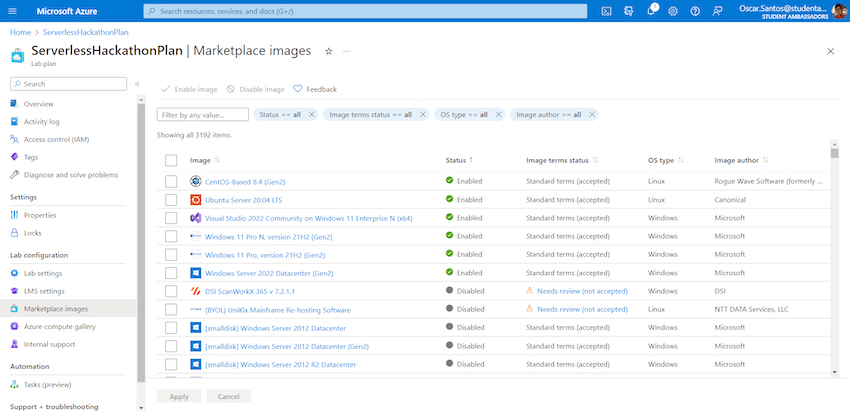
Determine 7
Click on subsequent and create a person to your template VM. You may create a non-admin account for the VMs, and you’ll decide to make use of that very same password for all VMs or ask the person to create one instantly at his/her first login.

Determine 8
In step 3, you may set the variety of hours that customers can use their digital machines outdoors of a scheduled occasion. This feature may very well be helpful for college kids who want a while to do the homework outdoors of sophistication time. For a hackathon, this is probably not mandatory however allow us to give 2 hours in order that the builders may save their options after the hackathon is completed. In the identical step, you’ve got some choices to close down the VMs mechanically after person inactivity, after customers have logged out or when a person didn’t log in.
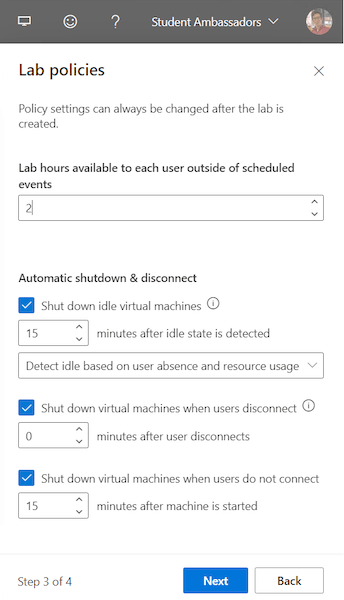
Determine 9
Within the final step, Azure Lab Companies asks if it is advisable to customise one thing else, if that’s the case, then it’ll present you a template VM the place you may set up all the things you want. If that was not the case and you’re able to go together with the chosen OS picture the method shall be shorter as you’ll not customise the template VM. For this text, allow us to suppose Visual Studio was not sufficient for the hackathon and the Educator wants so as to add extra software program. Preserve the primary possibility chosen (Determine 10)
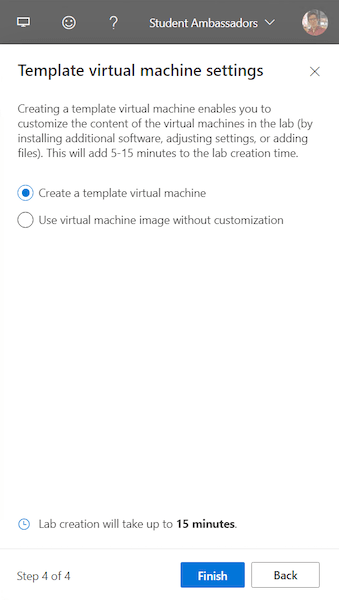
Determine 10
As soon as accomplished it is possible for you to to hook up with your template VM over Distant Desktop Protocol (RDP)
Initially, the VM shall be stopped (Determine 11), you handle the template and the replicates straight from the Azure Lab Companies Portal, not the Azure Portal. Discover on the high (Determine 11) there’s a button to publish. This one shall be chosen when the Educator decides the VM has all the things put in and is prepared for use by the College students.
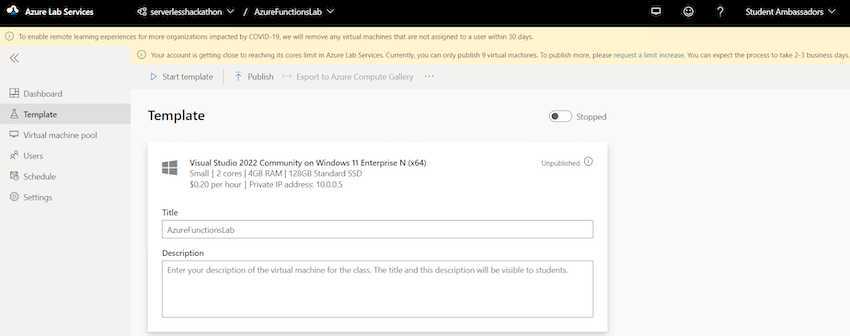
Determine 11
Begin the VM and join as you’ll do with different VMs, log in with the username and password you’ve got beforehand created, and you’re able to go.
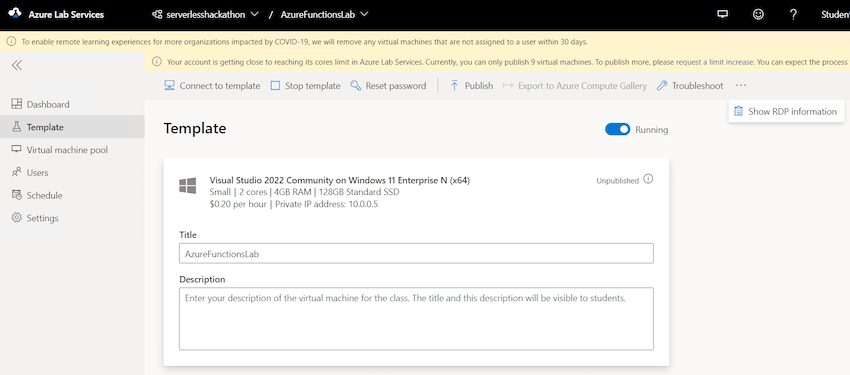
Determine 12
Step 4: Customise the template VM
Determine 13
You’ll discover Visual Studio is already put in as proven in Determine 14. In reality, VSCode is put in too with this OS picture (it merely doesn’t seem as a shortcut on the desktop). So, having each Visual Studio and VSCode offers our developer groups the liberty to decide on between the 2.

Determine 14
Visual Studio appears to be prepared for the hackathon. For the reason that Azure Operate template works nice.
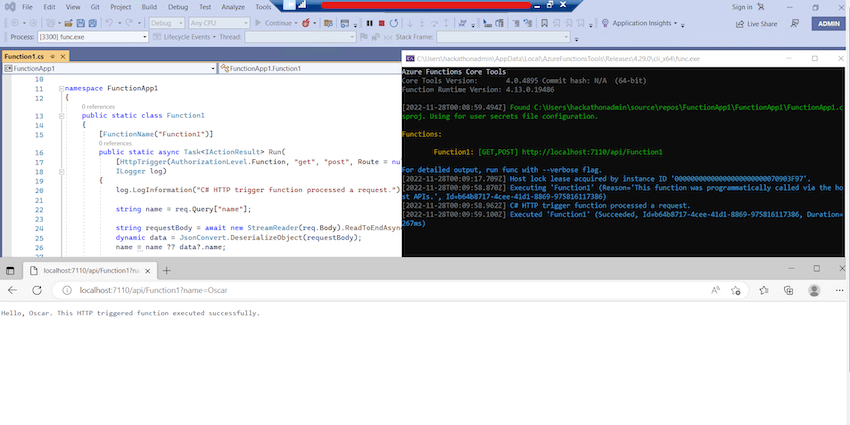
Determine 15
Nonetheless, VSCode requires some conditions and necessities to develop capabilities in VSCode. VSCode already offers a number of methods to sync your extensions. Nonetheless, there may be a few steps moreover extensions. So, having all the things put in within the template could be helpful for the builders in order that they’ll begin straight away.
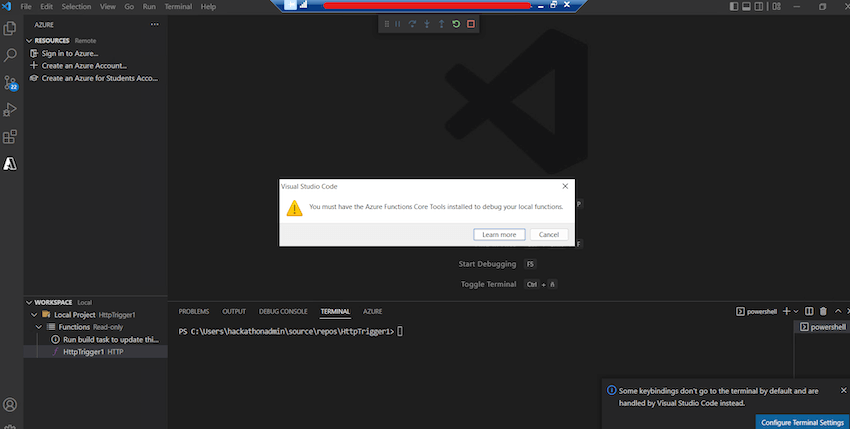
Determine 16
After set up of Azure Operate Core Instruments and after reboot, VSCode is prepared for use for azure capabilities growth.
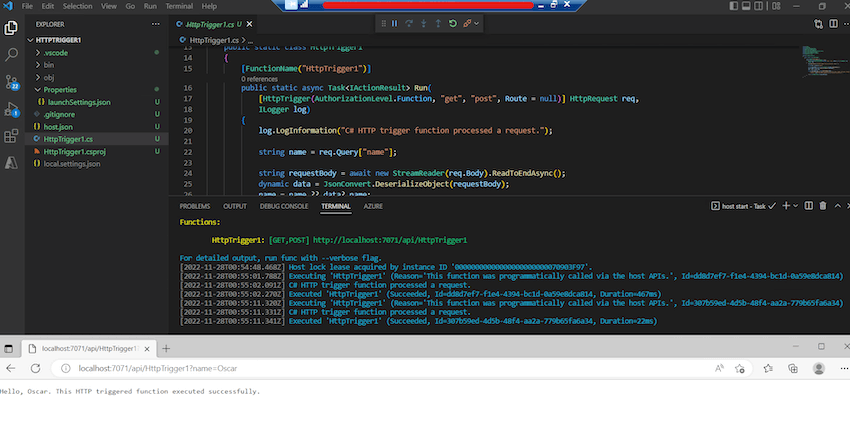
Determine 17
Moreover, VSCode was added to the desktop in addition to a txt file with the hackathon guidelines. We may have hidden the Unity and the Survey that got here from the OS Picture however this doesn’t matter.

Determine 18
Step 5: Publish the template
After getting completed customizing the VM, it is going to be stopped to be revealed. Allow us to say there are 5 groups and every of them will use a VM. An alternative choice could be to create one VM for every developer of every staff, however this might improve the variety of VMs significantly.
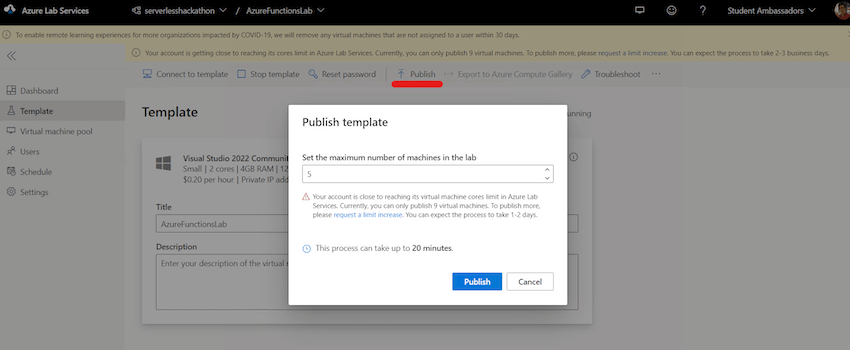
Determine 19
After getting revealed them, the 5 VMs shall be seen within the Digital Machine pool (Determine 20).
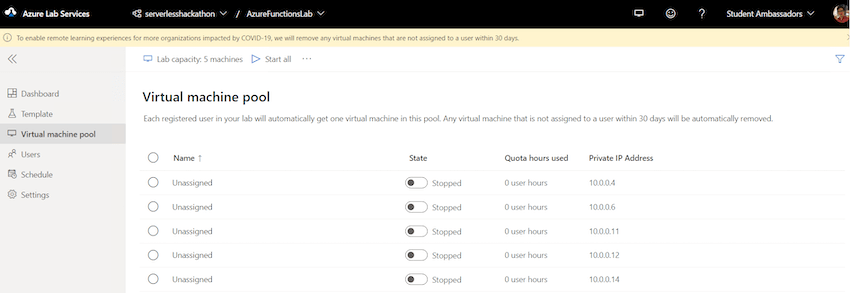
Determine 20
You may entry every of them individually if you need, nonetheless, ideally you’ll assign every of them to a person. Subsequently, go to Customers and add them manually or with Azure AD Teams.
Step 6: Add customers
For Azure AD Group, go to Azure Portal, seek for Azure Lively Listing, after which New Group
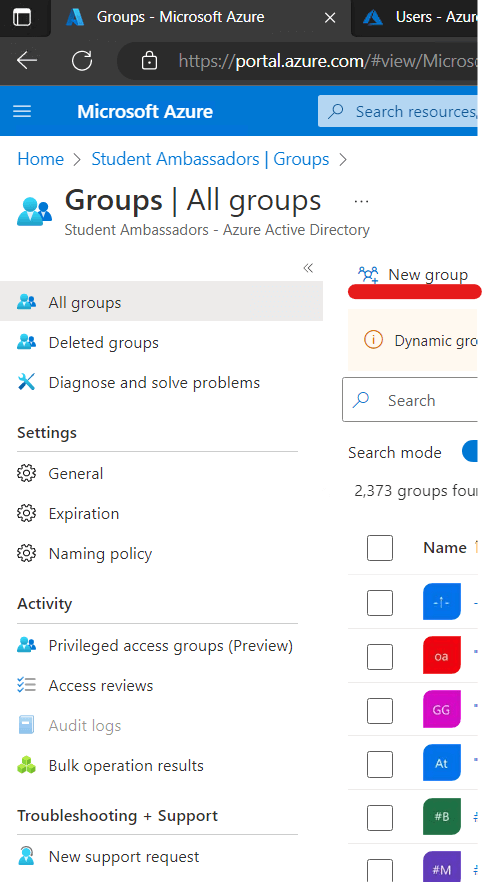
Determine 21
Give it a reputation, and outline. An important half is the place you add the members.
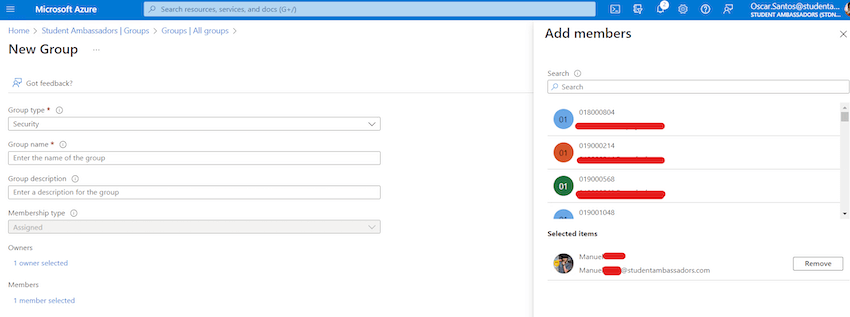
Determine 22
Then sync it with Azure Lab Companies
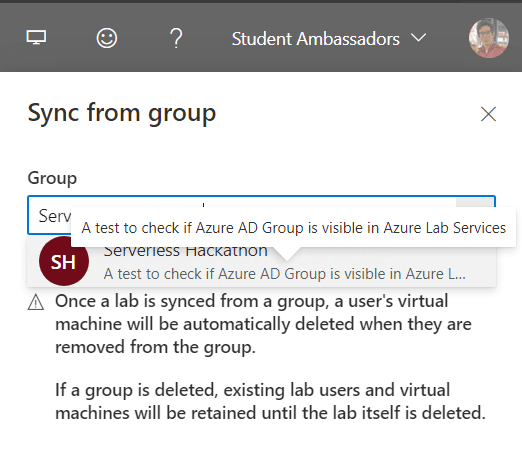
Determine 23
Nonetheless, discover that the lab shall be completely synced from the group. As soon as synced, you will be unable to manually add or take away customers and machines on this lab at any time.
The second possibility could be so as to add them manually or with a CSV
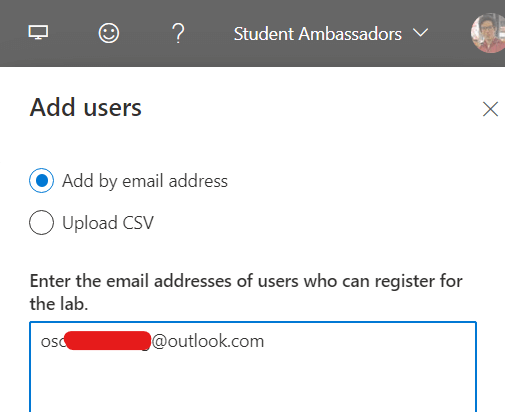
Determine 24
After getting added them you could invite them by e-mail or share a registration hyperlink. You may also customise a message within the e-mail and embrace the hyperlink to hitch.
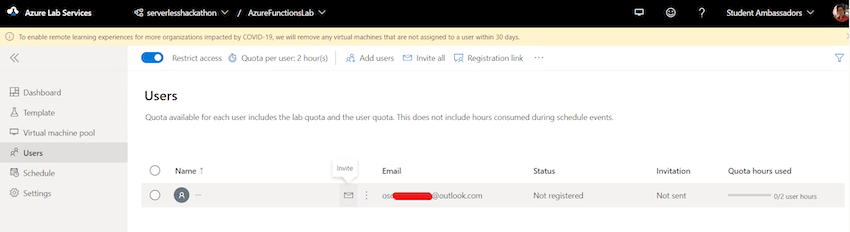
Determine 25
The e-mail seems like Determine 26
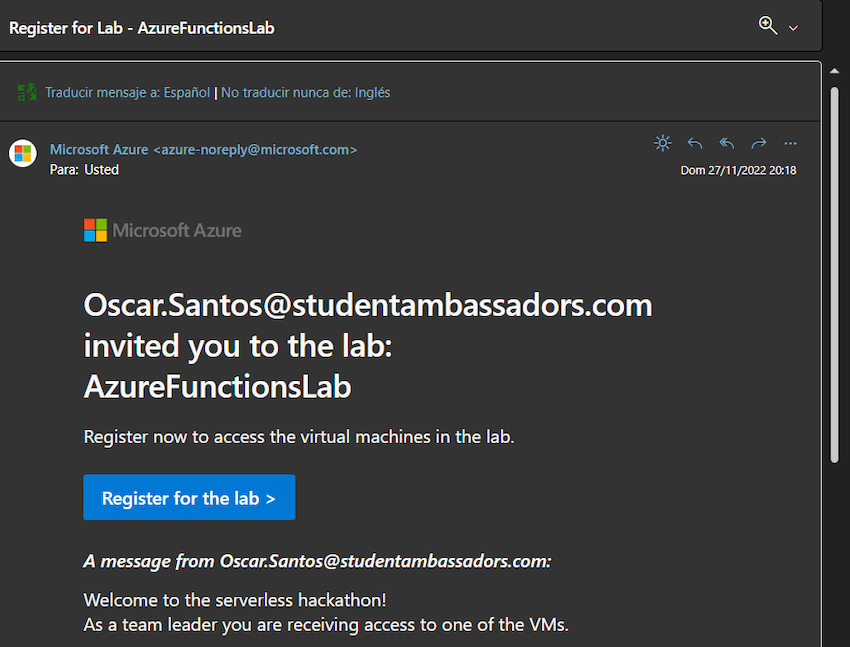
Determine 26
As soon as the person has accepted the invitation, the Standing will change within the portal
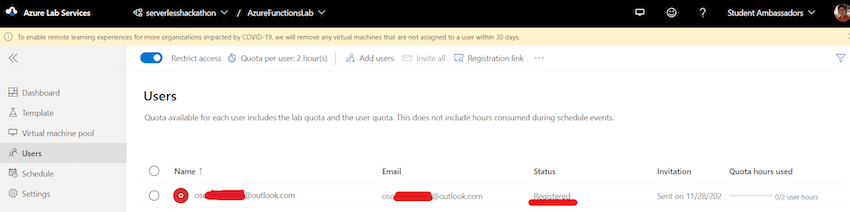
Determine 27
An inventory of the VMs to which he/she has entry is displayed in Determine 28. For instance, this person had already entry to a different VM from a lab known as Lab-de-prueba and he/she has used a while outdoors of what’s scheduled.
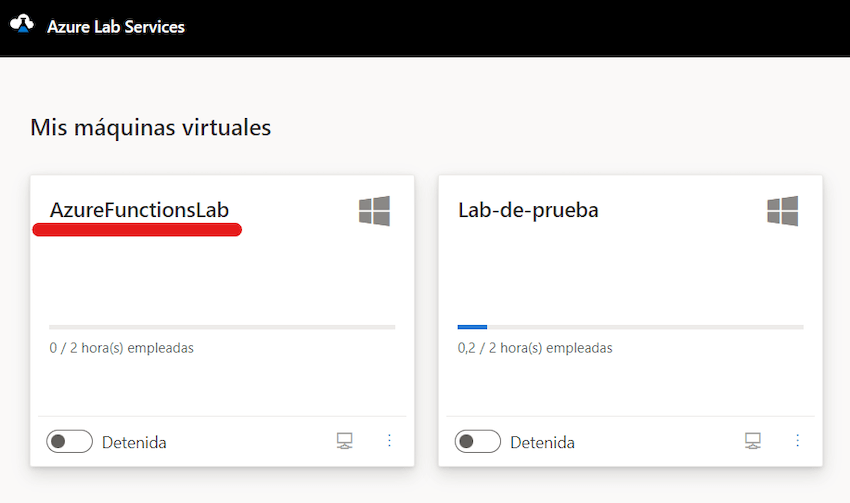
Determine 28
Step 7: Schedule an occasion
Now you may schedule the hackathon in order that the customers don’t spend the allowed time outdoors of occasions (i.e., 2 hours for this instance)
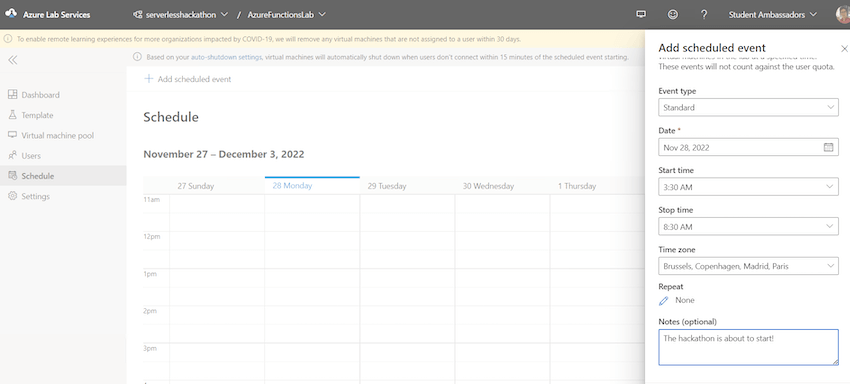
Determine 29
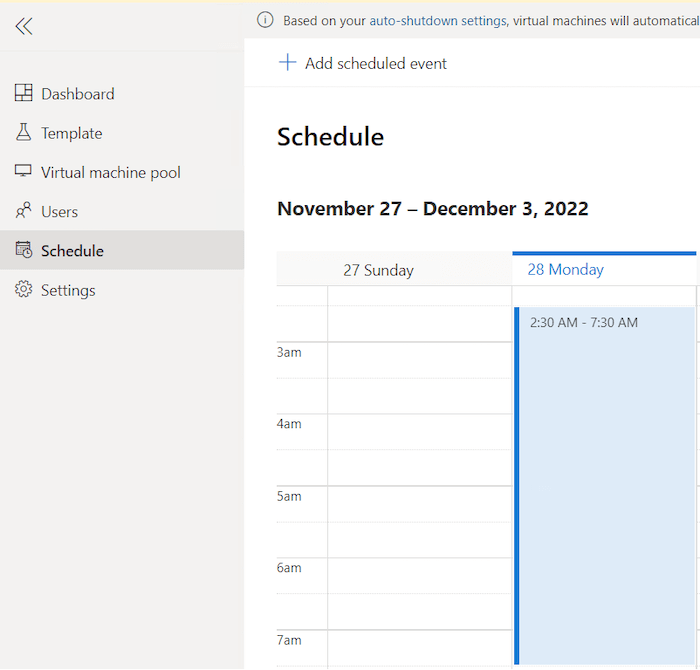
Determine 30
The hackathon was scheduled from 2:30 – 7:30 am (UTC+2) so throughout this era customers can use the VMs with out spending their extra time.
Return to the VM pool, you’ll discover a VM was assigned to a person when he/she has accepted the invitation by means of his/her e-mail.
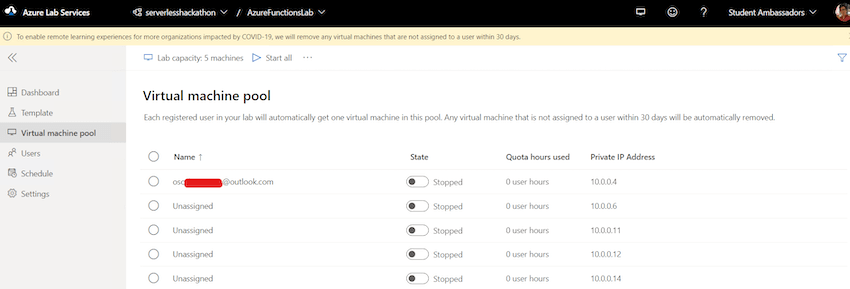
Determine 31
The Educator can begin all VMs however for that individual VM, each the Pupil and the Educator can begin it.
There may be additionally a dashboard the place you’ve got details about the lab. If it is advisable to make adjustments to the template VM it is advisable to republish it, however all VMs shall be changed once more.
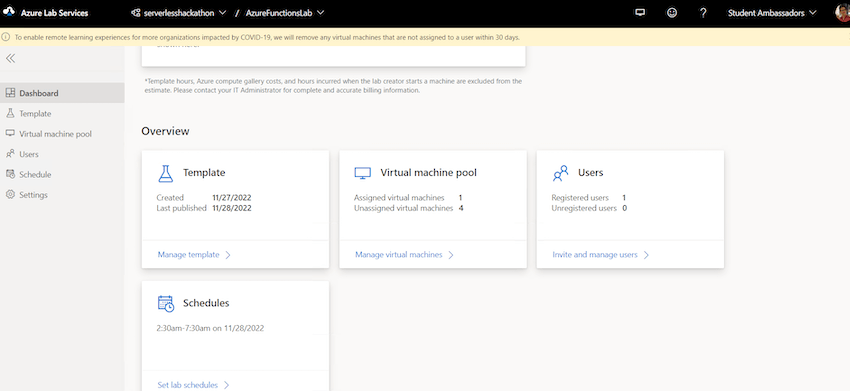
Determine 32
Step 8: Begin the VM because the Pupil

Determine 33
That’s it! You will have all the things it is advisable to begin growing options for the hackathon as all of the instruments that have been put in within the template VM are already there in every VM. Now, these VMs are completely different from one another. Thereby, every staff has its personal growth surroundings.
Abstract
On this article, I mentioned how Azure Lab Companies permits one to create, handle, present, and destroy digital environments. Though this case concerned establishing VMs for an enterprise hackathon, there are a selection of eventualities as mentioned within the earlier article. Azure Lab Companies could be deployed by an IT Administrator who will present entry to the lab plan to the Educator. In a plan, there could also be a number of labs, and every of them may have or not have a template VM with a base OS picture from {the marketplace} or yours. The template VM should be revealed as soon as accomplished and choose what number of VMs shall be deployed. Then, you may sync an Azure AD Group with the customers and import them manually or with a CSV. Later, you could ship an invite e-mail or share the registration hyperlink with them. As soon as a VM is assigned to a person, the person may use it throughout a scheduled occasion and through the time the person is allowed to make use of the VM outdoors of a scheduled occasion. On the finish of this text, we noticed {that a} person was ready to make use of a pre-configured digital machine with the software program that was put in within the template VM, saving effort and time.


