Introduction
The Azure cloud has many prospects and methods of working and making every part simpler for us by way of computing within the cloud, one in every of them is the well-known blob storage. However then what’s a blob storage? … Azure blob storage is designed to retailer unstructured knowledge, which doesn’t have an outlined construction that features textual content recordsdata, pictures, movies, paperwork, and far more. An entity saved in blob storage is known as a blob. There are numerous methods to work a blob storage, on this article we’re going to develop a easy option to add content material from a multimedia file similar to a picture, sound, video, to very heavy recordsdata utilizing all the facility of the Azure SDK.


What you’ll study on this article,
- Fundamental ideas of a blob storage in Azure
- Create a blob storage container
- Join an utility in C # to Azure utilizing its SDK
- Add media recordsdata utilizing the Azure SDK
Fundamental necessities
- Visual Studio 2019
- An Azure account (For this you’ll be able to create a brand new account for free of charge)
- Internet Core 5 put in
- Fundamental data of C #
- Willingness to study
Create a blob storage container
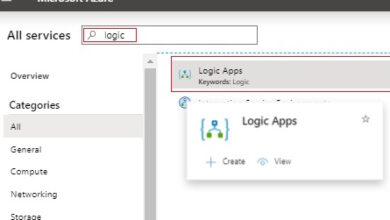
The very first thing we should do to place into observe is to start out getting ready all the required sources within the Azure cloud, however for this, we should first create our Azure account (Create an Azure account – Be taught | Microsoft Docs). If you have already got it then you’ll be able to skip this step and enter the primary Azure portal (https://portal.azure.com) the place we’re going to choose the hamburger button within the higher left nook of the primary portal and clicking on the primary possibility because it seems within the following picture

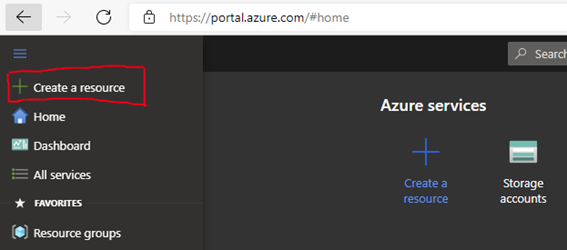
As soon as we have now clicked, a brand new web page shall be displayed, and we are going to write the phrase blob within the search bar as proven within the following picture

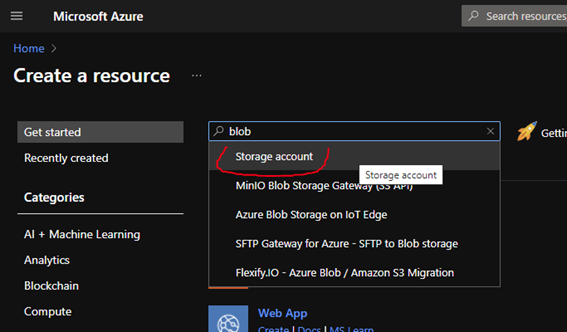
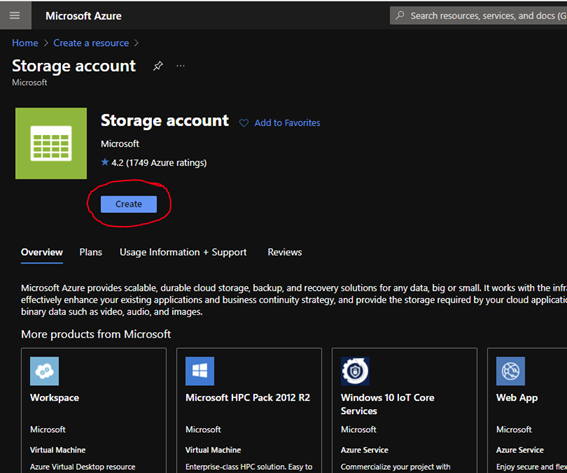
By clicking, it’ll ship us to a brand new web page the place it’ll element all the data associated to this useful resource, introducing the worth plans, use of assist data, and evaluations of this, in addition to a suggestion of sources just like the storage account that we’re going to create, Subsequent, we’re going to click on the create button as proven within the following picture

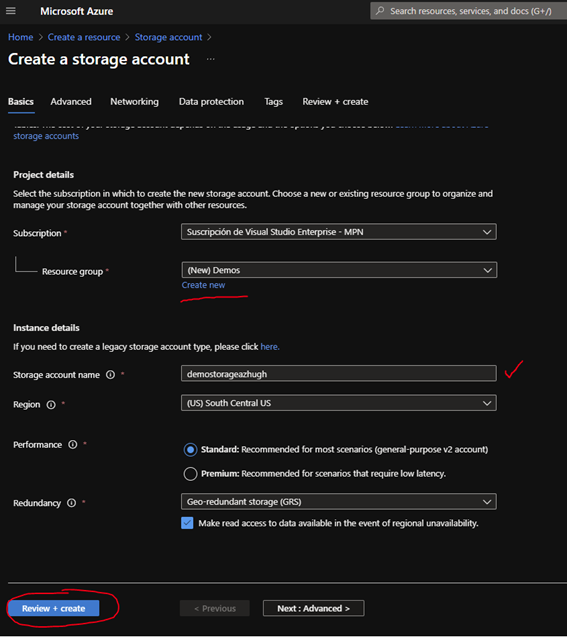
As soon as the create button is clicked, it’ll take us to a web page the place we’re going to begin configuring our storage account the place the primary worth that it asks us is the subscription. We choose the subscription then the useful resource related to that subscription. If you happen to do not need a useful resource you’ll be able to create a brand new one by clicking on the “Create New” beneath the textual content field. Then within the particulars part of the occasion, we at the moment are going to offer a reputation to our storage account for this text “demostorageazhugh“. The title of the storage account have to be in lowercase letters and the title have to be accepted by Azure. Within the subsequent step we’re going to choose the area, on this case, I’ll choose ” US South Central US“. Within the final step we’re going to choose the efficiency and redundancy for this demo. We’re going to go away it as default values and we’re going to choose click on the evaluation and create button as proven within the following picture

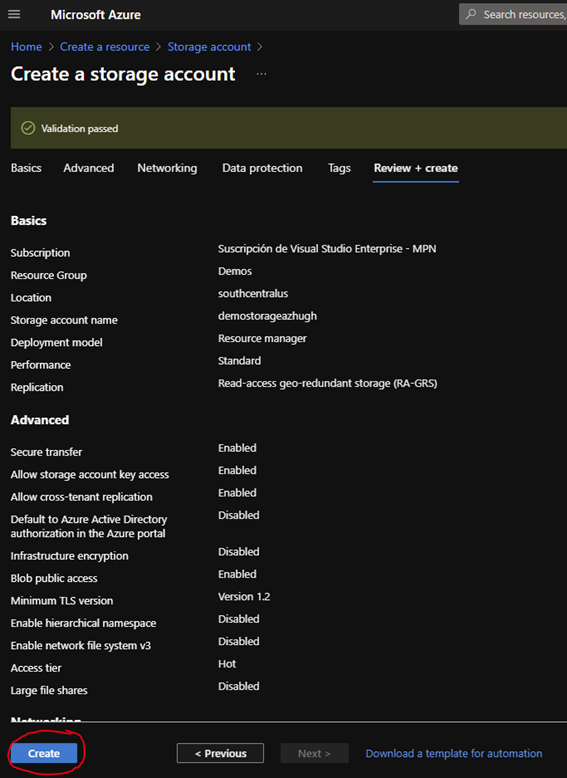
As soon as the validation of all this configuration that we have now generated has been profitable, what we do is just click on the create button as proven within the following picture

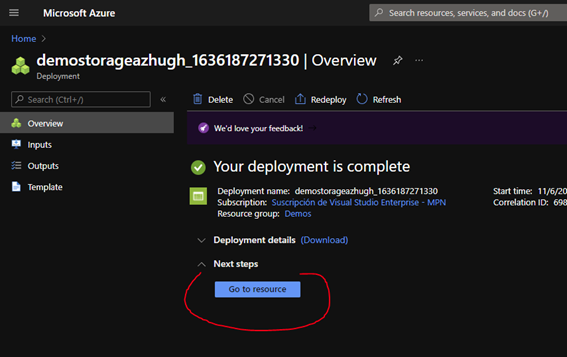
After ready for that useful resource to be created, we are going to now go to entry it by clicking on the go to useful resource button.

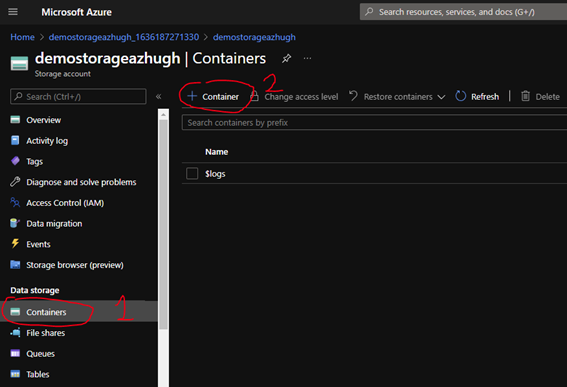
Now accessing the web page the place the useful resource that we have now simply generated exhibits us, we’re going to go to the information storage part within the left menu. We’re going to see a bit referred to as containers and we’re going to create a brand new container by clicking on the image of extra as the next image exhibits

Then we’re going to go to a window that’s displayed on the suitable facet the place we’re going to write the title of the container the place we’re going to retailer our weblog recordsdata. For this, we’re going to decide a reputation in lowercase and that it’s accepted by Azure as such then within the subsequent part we’re going to see the entry ranges of this container. For this, we’re going to choose the second possibility for this text as such so as to have the ability to give public output to the recordsdata that we’re going to add later and that may be consumed each learn and unloaded dynamically by way of the Azure SDK, we go away the opposite choices as default and click on the create button.


To make sure that the recordsdata that we’re going to add will be seen accurately by way of an Azure URL, we’re going to add a file straight by clicking the add button, deciding on the file after which clicking the add button. After importing the file we’re going to choose it and a window or a web page will seem the place it’ll clarify the element straight of every part associated to that file itself. There’s a property referred to as URL which is the place we’re going to copy that worth and we’re going to paste into the browser on to see if we will already entry the container itself as proven within the following pictures


On this approach, we will already entry our recordsdata publicly from any browser and we will now generate the appliance to eat both its life or obtain our blob recordsdata.
Construct the console utility in Visual Studio 2019
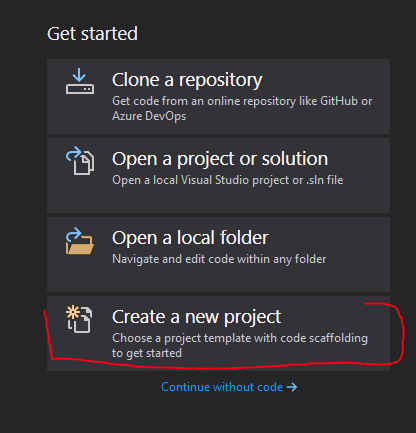
To proceed with the event of this text we’re going to open visible Studio 2019, then we’re going to go to the primary dialog window that visible Studio affords us and we’re going to choose the choice to create a brand new undertaking as proven within the following picture

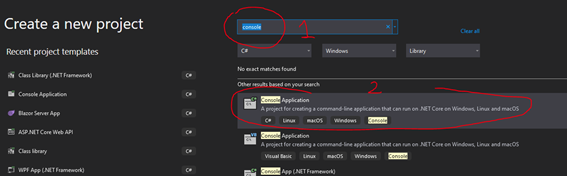
Then we’re going to go to the search bar and we’re going to write console then that is going to filter the forms of functions supported in Visual Studio and we’re going to choose the primary possibility that filters us which is known as console utility. Word that there are a number of forms of functions with the identical title the one factor that varies is the kind of language and platform during which they’ll be configured and ready within the Visual Studio atmosphere. For the needs of this instance, we’re going to work with C#, due to this fact, we’re going to choose the undertaking akin to the C# and .Internet Core growth platform as proven within the following picture

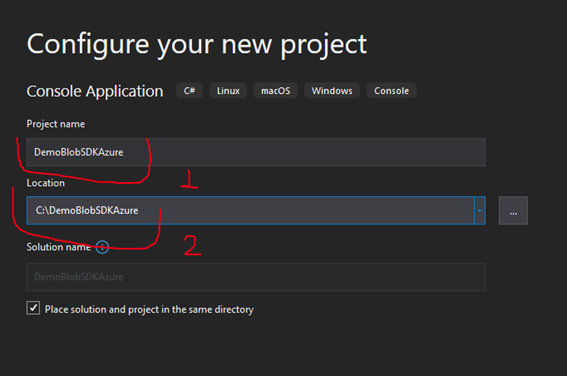
We click on the following button and a subsequent window will seem the place we’re going to specify the title of the undertaking, the situation of the undertaking and we’re going to choose the following button once more.

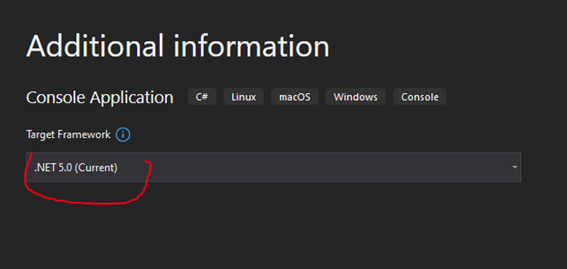
Then we are going to see extra details about the framework that we’re going to use for growth on this case we’re going to choose .Internet 5.zero and we’re going to click on on the create button as proven within the following picture

Up thus far we have now already configured the cloud storage; we have now the required permissions, and we have already got our console utility created within the visible Studio 2019 atmosphere.
Set up and configure the Azure SDK
To put in the Azure SDK our beforehand created console resolution to have the ability to both eat recordsdata by way of a obtain, in addition to place or add these objects to a weblog storage container, what we do is just right-click on the undertaking, and we choose the choice to deal with the NuGets packages as proven within the following picture.

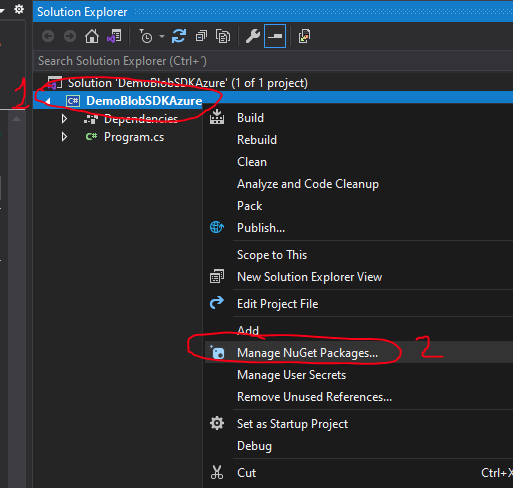
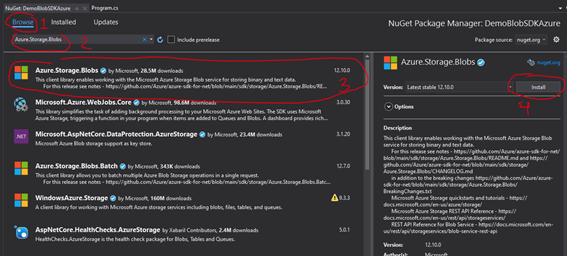
As soon as the choice is chosen, it’ll present us on the left facet a tab the place the NuGets bundle supervisor shall be displayed, the place we are going to then choose and kind within the Azure search bar.Storage.Blogs and we’re going to choose the primary possibility and click on the set up button as proven within the following picture

As soon as this step is finished effectively, we will work straight with the Azure SDK, we solely have to return to the Azure portal and produce us the corresponding configuration.
Implementation of the answer
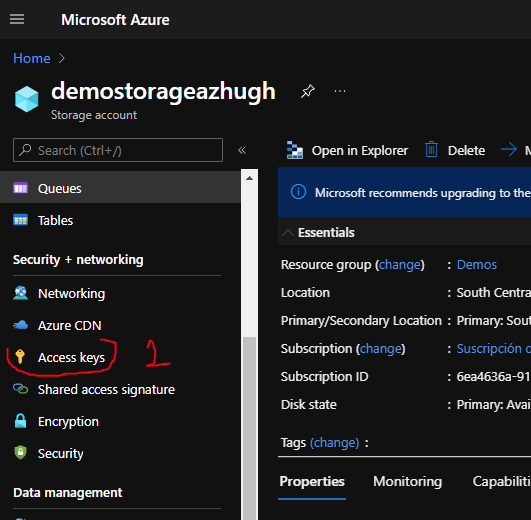
To start out consuming the Azure SDK we’re going to carry out an train to obtain the file that we examined when creating the blob storage container in Azure, then add a brand new picture and at last we’re going to checklist the recordsdata that exist already in blob storage container to substantiate that it already exists within the cloud. As a primary step to implement, let’s return to the Azure portal and go to the part of the storage account that we had already generated, and we’re going to go to the safety part and click on on the Entry keys possibility as proven within the following picture

Subsequent, a brand new web page will open the place the entry and rotation keys shall be displayed, in addition to some related knowledge in accordance with the safety of those keys. We are going to click on on the primary possibility to point out the keys that initially look shall be hidden and to have the ability to copy the data, for this text we’re going to copy the Connection String, I took the primary key, however with out drawback, you’ll be able to take both of the 2 as proven beneath within the following picture

This data of the connection string is critical to carry it to our utility and we’re going to create a variable the place we’re going to paste this connection string and we additionally want the title of the container that we named when creating the storage account on this case we name it ” demoshugh“, these two values are vital to have the ability to entry these cloud sources by way of the Azure SDK.
static string storageconnstring = "<connection string>";
static string containerName = "demoshugh";
static string fileToDownload = "azure.png";
static string fileToUpload = "azurelogo.png";
static string filepath = @ "C:DemoFiles";
Along with these 2 values, we are going to create three extra variables, fileToDownload variable for title of the file that’s already up within the blob container, the fileToUpload variable that refers back to the worth of the file title that’s regionally on the computer and we wish to add to that blob container, and at last, the filePath variable is the trail the place the file is to be uploaded and it’ll additionally serve to obtain the file that we have now in stated blob container. We have to initialize the BlobServiceClient objects the place we’re going to cross the storageconnstring variable and we’re additionally going to specify the title of the container by way of the perform contained in the blobServiceClient referred to as GetBlobContainerClient and we cross the title of the containerName variable
personal static void InitializeBlob() {
    strive {
        blobServiceClient = new BlobServiceClient(storageconnstring);
        containerClient = blobServiceClient.GetBlobContainerClient(containerName);
    } catch (Exception) {
        throw;
    }
}
We’re going to implement the DownloadBlob methodology the place we’re going to specify with using the Azure SDK which file we wish to obtain and save on our computer utilizing the next supply code fragment beneath.
personal static async Process DownloadBlob() {
    strive {
        BlobClient blobClient = containerClient.GetBlobClient(fileToDownload);
        //Obtain knowledge content material of blob and replica to the disc
        utilizing FileStream stream = File.Create(filepath + fileToDownload);
        var outcome = await blobClient.DownloadToAsync(stream);
        if (outcome.Standing > 200 || outcome.Standing < 300) {
            Console.WriteLine("File downloaded sucessfully!");
            return;
        }
        Console.WriteLine("Error to obtain file!");
    } catch (Exception) {
        throw;
    }
}
We’ve already created the tactic to obtain an merchandise from the blob container, we’re effective no! Now we are going to proceed to create the UploadBlob methodology the place we’re going to add the file that we have now on our laptop to retailer it within the blob storage container as proven within the following code fragment.
personal static async Process UploadBlob() {
    strive {
        BlobClient blobClient = containerClient.GetBlobClient(fileToUpload);
        var outcome = await blobClient.UploadAsync(filepath + fileToUpload, true);
        if (outcome.GetRawResponse().Standing == 201) {
            Console.WriteLine("File uploaded sucessfully!");
            return;
        }
        Console.WriteLine("Error to add file!");
    } catch (Exception) {
        throw;
    }
}
As soon as the tactic to obtain a picture has been created, in addition to a way to add a picture, to make sure that all the weather exist in our container we’re going to create a way to checklist or acquire the gadgets or recordsdata saved within the container utilizing the next code snippet beneath.
personal static void ListBlobs() {
    strive {
        Console.WriteLine($ "Record of all gadgets in blob {containerName} container");
        Console.WriteLine("----------------------------------------------------");
        // Print out all of the blob names
        foreach(BlobItem blob in containerClient.GetBlobs()) {
            Console.WriteLine(blob.Title);
        }
    } catch (Exception) {
        throw;
    }
}
Now let’s put all of the items collectively at the start line of the appliance within the Predominant methodology of the console utility.
static void Predominant(string[] args) {
    InitializeBlob();
    DownloadBlob().Wait();
    UploadBlob().Wait();
    ListBlobs();
}
And on this approach we compile and execute the appliance, to see the complete course of in additional element, It’s advisable to execute the appliance by making use of breakpoints in every methodology to be able to see the appliance move extra carefully.
Conclusion
On this approach, as we noticed within the earlier steps, we will shortly display using this Azure SDK to deal with a blob storage container dynamically both to add parts to that container or to have the ability to obtain straight by including an answer database the place we may save the data that’s generated by way of a path or URL generated within the blob storage as a very good observe for managing multimedia content material or file content material in our functions. The Azure cloud has a lot of sources and instruments that any developer can merely handle from a command console by way of an SDK in addition to its interactive use straight by way of its internet portal, for higher administration of the data and sources that we wish to work within the cloud both from a database to a digital machine or just a save of related data for use in any of our functions.