Introduction
Pre-requisite
- Lively Azure subscription
- SOLR connection string if you’re going to use SOLR as search engine. If you’re going to use Azure search, then no must have this. As in market you’re going to get two choices, one is utilizing SOLR and one other is utilizing Azure Search.
- Sitecore license file
So, let’s start the set up course of.
Steps
Step 1
Step 2
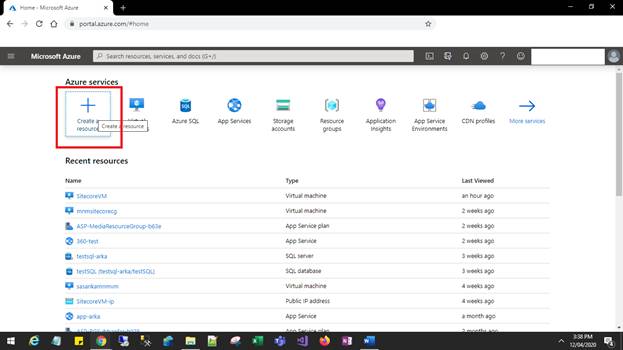
Click on on the Create useful resource hyperlink on the very starting. And seek for “Sitecore”.
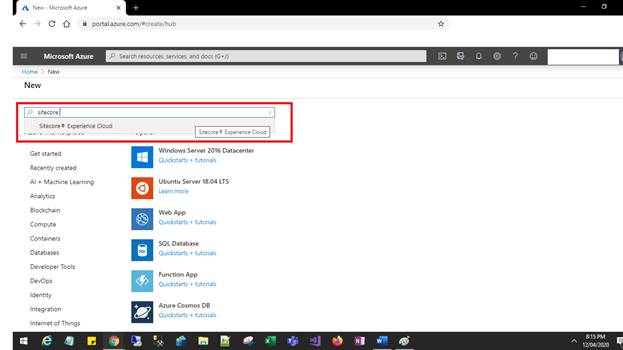
You will discover the Sitecore Expertise Cloud within the auto drop-down checklist. Choose this and click on on “Create” to proceed.
Step 3
Within the new Sitecore Expertise Cloud, you have to select your subscription to proceed. Submit your choice of the subscription when deciding on the useful resource group title. Right here, in contrast to each different useful resource, you possibly can create a brand new useful resource group, or you possibly can choose an present one. In case you are deciding on an present one, please ensure it’s a full empty. In any other case, it’ll throw an error.
Step 4
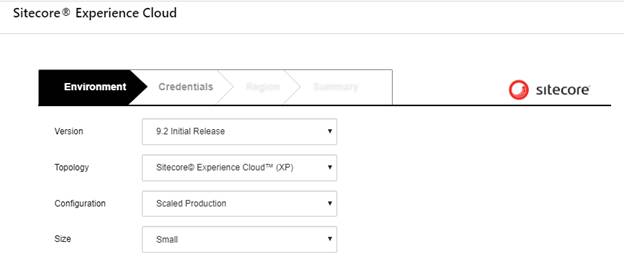
Now click on on the Sitecore settings choice. It should open a brand new blade the place you must fill the atmosphere, credentials & area.
First choose the Sitecore model from the drop-down. Right here in our case, we’ll choose Sitecore 9.2 Preliminary launch.
Then we should choose the topology. Right here, we’ve to pick out Sitecore Expertise Platform (XP).
Then choose the configuration as “Scaled manufacturing”. That is for the manufacturing atmosphere, for growth there are a number of different environments like “Developer”, “Scaled Developer” & “Scaled Manufacturing”.
As soon as you choose the “Scaled Manufacturing”, you must select “Measurement”. Sitecore is available in 5 (5) sizes. “Additional small”, “Small”, “Medium”, “Giant”, “Additional massive”. That is the SKU you choose throughout ARM template set up.
In our case, we’re going to select “Small”.
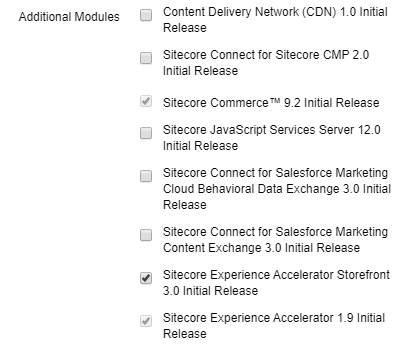
As soon as you choose the dimensions, you must select the Sitecore XC (Commerce) module for set up.
Choose “Sitecore Commerce™ 9.2 Preliminary Launch”, “Sitecore Expertise Accelerator Storefront 3.zero Preliminary Launch” & “Sitecore Expertise Accelerator 1.9 Preliminary Launch”.
Click on on the “Subsequent” button to proceed. Earlier than continuing, Sitecore is exhibiting some essential message on the fitting facet. Be at liberty to undergo this.
On the second Credential tab, set your Sitecore credentials. You need to put Sitecore admin password, SQL server username & password. Please notice, the Sitecore default username will stay “admin” and you’ll’t change it from right here. Whereas setting the password, please be sure to are following the Sitecore password insurance policies. The set up wizard is not going to immediate you for password validation, in the midst of set up, you’re going to get the password coverage violation error. And you must set up the identical from the start,
You should add the Sitecore license file. Then select whether or not you need to go along with Azure Search or SOLR. If you’re going to selected SOLR, please make sure that the URL must be one thing like this https://<your-solor-url>/solr. Https and nothing on the finish are the precise URL. The certificates must be a legitimate one, in any other case, the set up course of will fail.
Within the Authentication half, set the certificates title as “certificates” and the password as “secret”. Clearly, you possibly can set your personal info right here.
Click on on the “Subsequent”. Within the subsequent web page you must select the area the place you’re going to set up the Sitecore. We’ve two completely different dropdowns, one for Sitecore and one other for Software Perception. It’s because, for some area (like South India & West India), Software Perception doesn’t assist. So. Select your areas and click on on “Subsequent”.
Step 5
On the following web page, you’re going to get an summary of the entire Sitecore installations. Click on on OK and are available again to the preliminary blade. Right here click on on the “Authorized phrases” and go to the top. Verify the time period & situation checkbox and click on on “OK”.
Step 6
On the preliminary blade Click on on “OK” and your set up will begin. It should take close to about 2 – 2:30 hrs. After set up, you will see that all of your sources below your chosen Useful resource group. From there you possibly can instantly entry the identical.
A small scale Sitecore 9.2 commerce can have the under sources:
|
Sr. No. |
Useful resource |
Depend |
|
1 |
App Perception |
1 |
|
2 |
App Service Plan |
9 |
|
3 |
App Service |
17 |
|
4 |
Redis cache |
2 |
|
5 |
Service Bus |
1 |
|
6 |
SQL Db |
17 |
|
7 |
SQL Server |
1 |
|
8 |
Search Service (If Azure search is taken) |
1 |