At the moment, on this article, we are going to focus on the way to develop an online software or console-based software to insert a message into the Azure Queue Storage. Now, as everyone knows Queue Storage is part of the Azure Storage. So, first, we are going to focus on some primary ideas about azure queue storage after which we are going to focus on the way to retailer information into the Azure queue storage.
As a developer, everyone knows about queues. Most of us have already used or written an identical sort of knowledge construction a minimum of as soon as in our development-related work section. Basically, it’s a assortment that at all times has two major strategies: enqueue (technique to insert new information to the queue on the finish) and dequeue (to get the topmost report from the queue). Sure, your assumption is right. Microsoft Azure Queues are regular queues as we perceive them. Nevertheless, it’s greater than a category or an idea in comparison with others. Microsoft Azure Queues are a ready-to-use service which loosely connects elements or software by the Azure platform infrastructure.
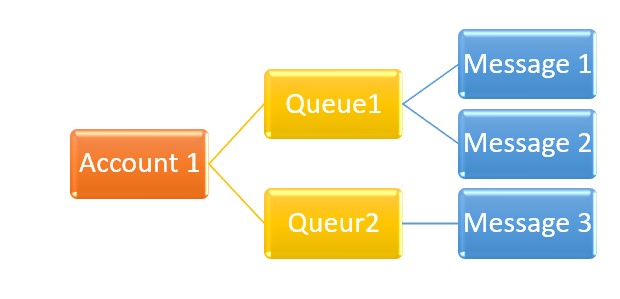
Azure Queue Storage is a kind of message queuing providers offered by the Azure Platform which gives the queue storage infrastructure for a REST-based interface inside and between the totally different purposes and providers. With the assistance of Azure Queue storage service, we will retailer numerous messages which may be accessed from wherever through an authenticated calls utilizing HTTP or HTTPS. So, in easy phrase, Azure queues are queues which positioned within the Cloud platform and we will use it for exchanging messages between totally different elements both within the cloud or on-premise. Each message usually represents a process created by somebody (“produced”) which must be processed by another person (“client”). Each message at all times has a small physique and a few attributes like time-to-live, by which we will use to configure our service. As Microsoft Azure at all times ensures that any dequeued message shall be invisible to the opposite client or listener, we might think about many produces and shoppers in addition to a one-to-one relationship state of affairs. So, the primary advantage of the Azure Queue Service is the free coupling.
As mentioned within the above part, Azure Queues are a RESTful service by which we will use to enqueue and dequeue messages as function (create, delete) our queues. For performing one of these work programmatically, Microsoft Azure gives many language-specific wrappers APIs (like .NET, Node.js, Java, PHP, Ruby, Python, and so on) by which we will develop purposes to ship or obtain REST name on to entry the Azure Queue storage.
Benefit and Disadvantages of Azure Queue Storage
The principle key benefits of the Azure Queue Storages are:
- Azure Queue Storage service is less expensive in comparison with the opposite. Since Azure Queues are charged based mostly on what we pay-per-use coverage relying on the specified redundancy stage, the required space for storing and variety of transactions (i.e. learn, write, delete).
- Queue Storage information is way more safe since for entry the info we have to use both HTTP or HTTPS protocol by purposes
- We simply must pay just for the storage and operations. There isn’t a long-running value for comparable to an Occasion Hub or a Service-Bus.
Regardless of the above benefits, Azure Queue storage additionally has some disadvantages, like:
- There isn’t a provision or choice to say any order sequence of the message, so messages may be acquired the Queue service randomly from totally different producers.
- There isn’t a subscription system within the Azure Queue service. So, to know whether or not new messages have arrived or not, we have to carry out a pull to delete the brand new messages.
- The utmost dimension of each message is 64 KB.
- By default, most TTL (Time-To-Stay) for every message is 7 days.
An Azure Storage Queue shall be labored simply as we anticipate. We usually use a library that incorporates an Summary API, by which we are going to do REST calls to a storage layer the place messages are saved. The principle distinction between the Blob Storage and the Queue Storage is that the Queue Storage system has a retention time or TTL for 7 days and a dimension restrict of 64 KB.
Azure Queue – The place or When to Use? A Typical Situation
As per the dialogue, it’s clear that the primary purpose behind the usage of Azure Queue is to separate elements and loosely join them. We could say two totally different elements of our software attempt to alternate information, possibly one in every of them on-premise part (say A) and one other is within the cloud surroundings (say B). Now, once we utilizing frequent alternate mechanism comparable to calling an online service from A to B (or vice-versa), we at all times confronted some disadvantages to associated this like,
- We have to depend on or belief that each the elements shall be out there on the similar time or concurrently. If one in every of them is down, then there isn’t a communication.
- We have to implement strive or retry logic to get issues Up and operating once more after an outage
- It is vitally arduous to scale up if extra workload is current.
In Azure Queue Service, we now have a 3rd participant that connects the 2 elements and acts as each a buffer and a mediator. It means if the patron accomplice is down, then nonetheless produces can insert messages within the queue course of whereas it is ready for the opposite part to again on-line. Additionally, Azure Queue service may be very straightforward to scale up. What we have to do for scaleup: simply add extra shoppers (i.e. Employee Roles) and our queues shall be processed in parallel. In Azure Queue Storage, Scaling up and down is at all times be a dynamic course of – since we will add or take away staff robotically relying on the precise dimension of the Queue, therefore it is going to be quick on heavy load and save prices when the queue is empty.
Perquisites Required
- Microsoft Visual Studio 2017
- The account in Azure Portal.
In case you don’t have an present Azure account, then you possibly can create a free trial account within the Azure portal utilizing your e-mail ID.
How one can Create a Message in Azure Queue Storage Account utilizing Azure Portal
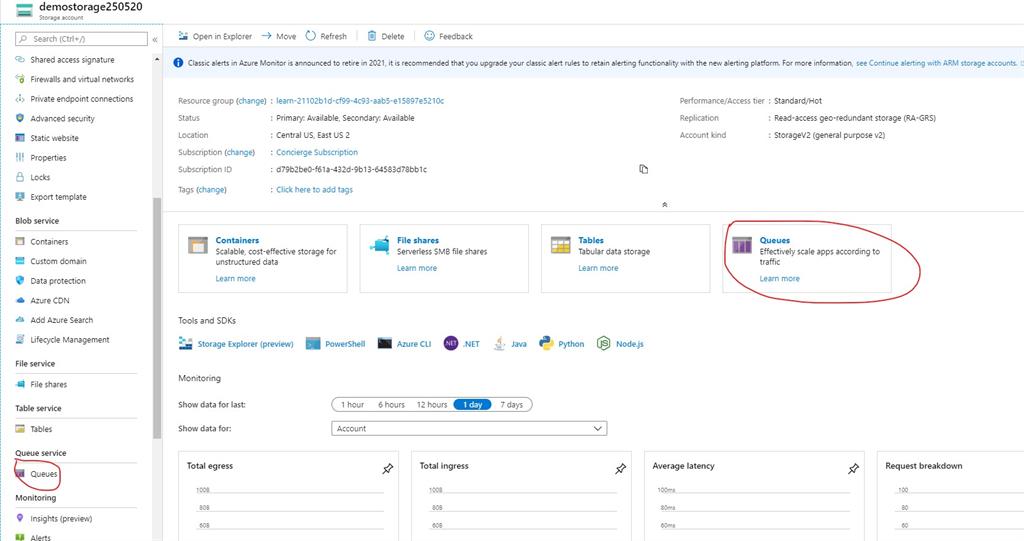
For utilizing Azure Queue Storage, we first must create a Storage Accounts in Azure Portal. As soon as the Storage Account has been created, click on on the account to open it in Storage Account Explorer.
Step 1
Now Click on on the Queues choice within the Storage Explorer.
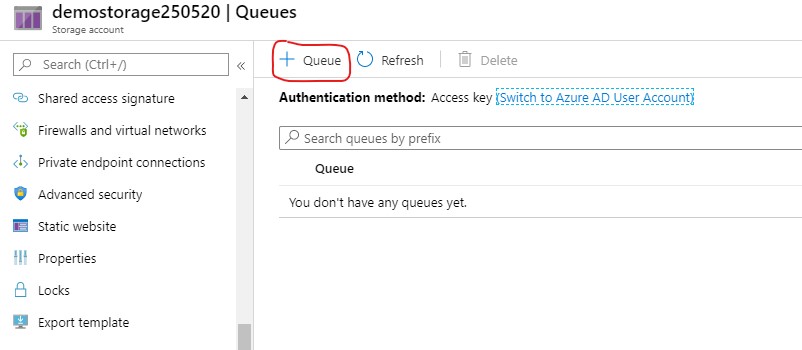
Step 2
Beneath the Queues choice, click on on the Queue button to create the queue choices.
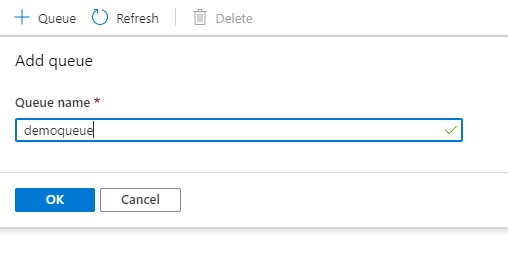
Step 3
Within the Add Queue part, present the distinctive Queue Identify and click on on Okay Button.
Step 4
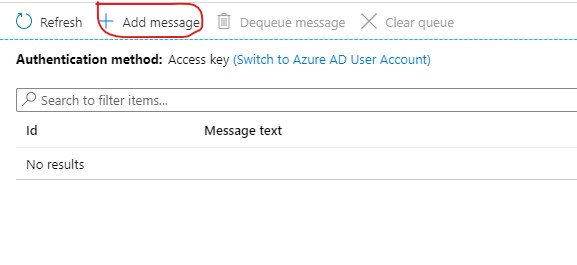
Now within the Queue Explorer window, click on on the Add Message button so as to add a brand new Message beneath the chosen Queue.
Step 5
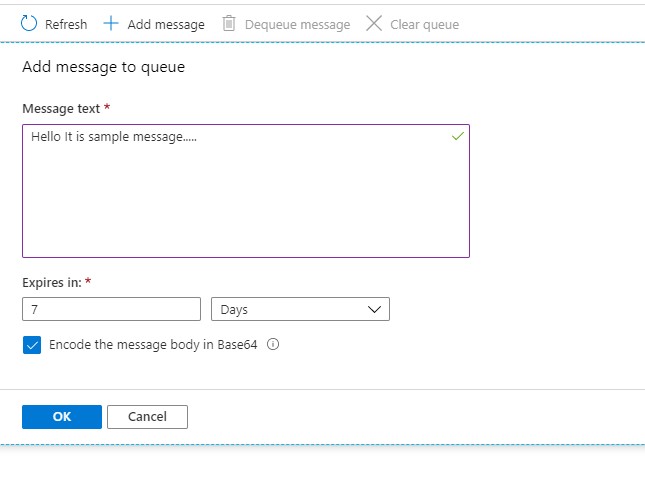
Within the Add Message space, present the Message within the Message Textual content Field and click on on the OK button. As proven within the image, the default TTL for the Message is 7 days.
Step 6
Now, the newly created message is displayed within the Queue explorer.

Step 7
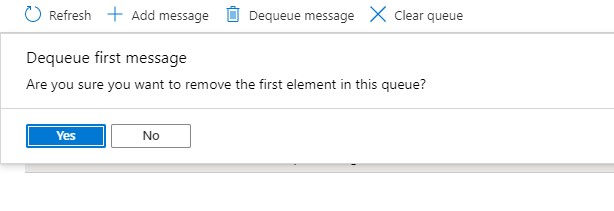
If we need to Dequeue the Message, then we have to click on on the Dequeue message button after which click on on the Sure Button.
Step 8
The Dequeue Button will delete the primary aspect of the message record beneath the queue.
Add Information in Azure Queue Share utilizing .NET Core Console Software
Step 1
Now open Microsoft Visual Studio 2017 and click on on File –> New –> Initiatives.
Step 2
Choose Console App Mission template and Click on on Okay Button
Step 3
Earlier than going to begin coding, we first want to put in some packages which assist us to implement Azure Queue Storage within the console purposes.
Step 4
Within the Answer Explorer, right-click to our undertaking and select Handle Nuget Packages.
Step 5
Now, Within the Nuget Package deal Supervisor, choose Browse.
Step 6
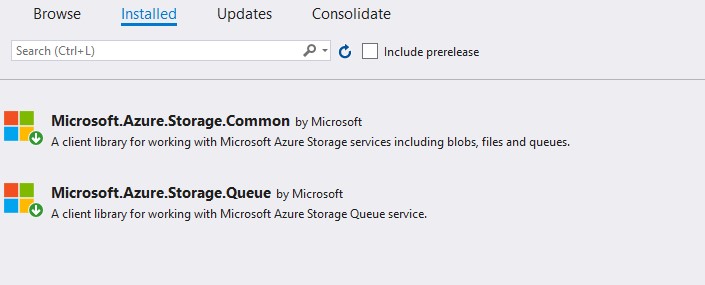
Now, Seek for the Package deal Microsoft.Azure.Storage.Queue after which Set up.
Step 7
Equally, set up the beneath packages:
- Microsoft.Azure.Storage.Frequent
Step 8
Now write down the Under code to create a brand new message programmatically within the Azure Queue Storage.
Run this system after which verify the Azure Portal for the brand new Message.
Now, we need to learn the message through the use of the Software. For that function, add the beneath technique:
Now, run the above program and verify the output. It would show the message which we created first.
Now, once more go to the Azure Portal and click on on the refresh button.
In step 9, it exhibits the Dequeue depend for the message is zero since after the message is created, so we don’t eat that message anymore. However now, we eat the message by the Software. In order that’s why Dequeue Depend improve to 1 for the primary message. If we run this system once more, then it should present us the following message (which we created with the appliance) and made the dequeue depend to 1 for that message additionally.


