Introduction
This text explains how we are able to create Azure operate apps from the Azure portal utilizing C# and .NET Core. We’re going to create “HttpTrigger” and “TimerTrigger” capabilities on the Azure portal.
On this article, we’re not going to cowl how we are able to subscribe to Home windows Azure, however with out solely specializing in Azure Operate App.
If a .NET Developer want to begin studying Microsoft Azure, then “Operate Apps” is likely one of the greatest issues to get began as a result of its simplicity. Within the case of “Operate App”, we have to write a only a few strains of codes. So, we are able to full a hands-on lab very simply and shortly. If we want to do hand-on with any service of home windows Azure, then we’d like an lively subscription for Home windows Azure, and for that, there are a number of forms of subscriptions out there, and we are able to select a subscription as per our want.
Why we’d like an “Azure Operate App”?
- Low Value
Operate App is a low-cost internet hosting choice. Every time we take into consideration cloud internet hosting, then pricing is likely one of the first questions that arises in thoughts. As we all know, we all the time want to observe pricing, so it’s all the time higher to decide on your internet hosting options correctly. - Serverless
Operate App is serverless, and we don’t want any Digital machine for internet hosting the Capabilities app. - Much less Infrastructure Administration
Operate App doesn’t require infrastructure administration. We have to configure only a few issues. - Straightforward to create
Because it doesn’t have any Digital Machine and different subtle settings, a developer doesn’t must spend extra time configuring it, however quite, he/she will concentrate on the appliance’s core improvement.
Allow us to get began with “Operate Apps”.
Step 1 – Open Azure Portal
Go to the URL https://portal.azure.com/#house to open the Azure portal. We have to log in earlier than continuing additional.
Step 2 – Create a Useful resource
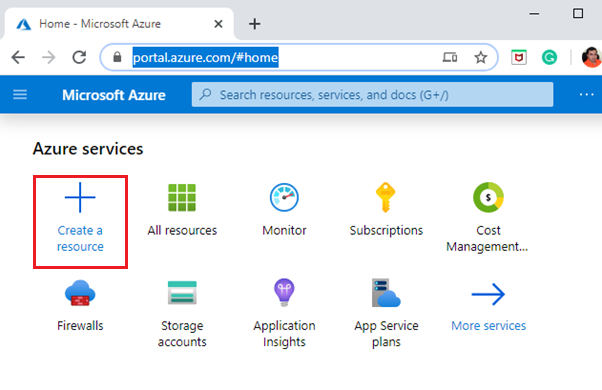
Click on on the “Create a useful resource” choice to create a brand new useful resource.
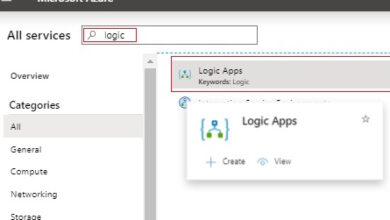
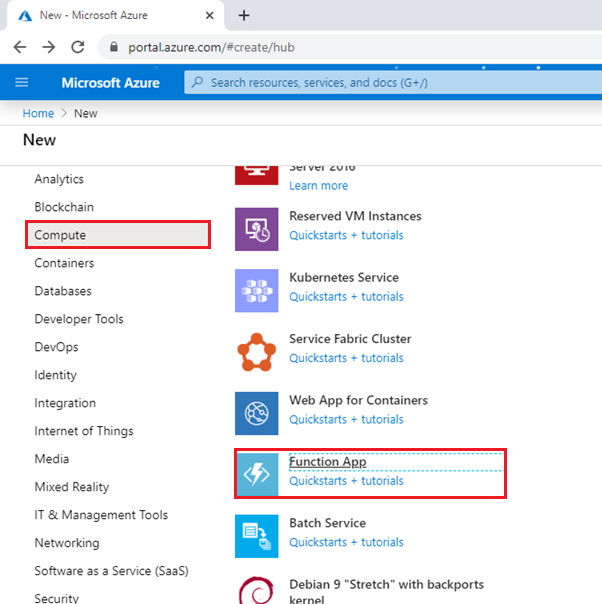
Step 3 – Choose Operate App
Choose the “Compute” choice from the left facet menu after which “Operate App”, as highlighted within the beneath screenshot.
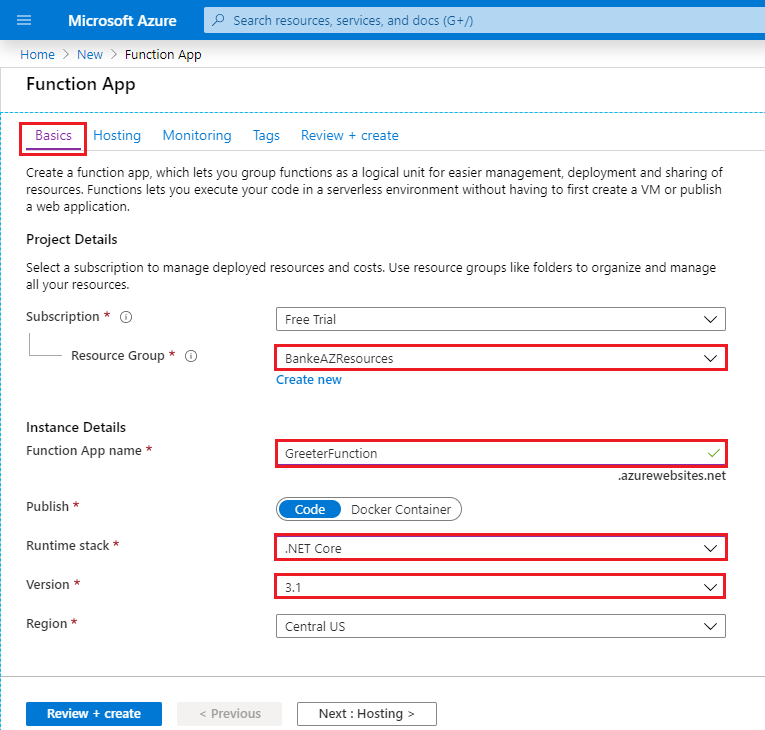
Step 4 – Present Primary Particulars for Operate App
Within the Fundamentals tab, fill out the next particulars:
Step 5 – Evaluation and Create
Click on on the “Evaluation + create” button.
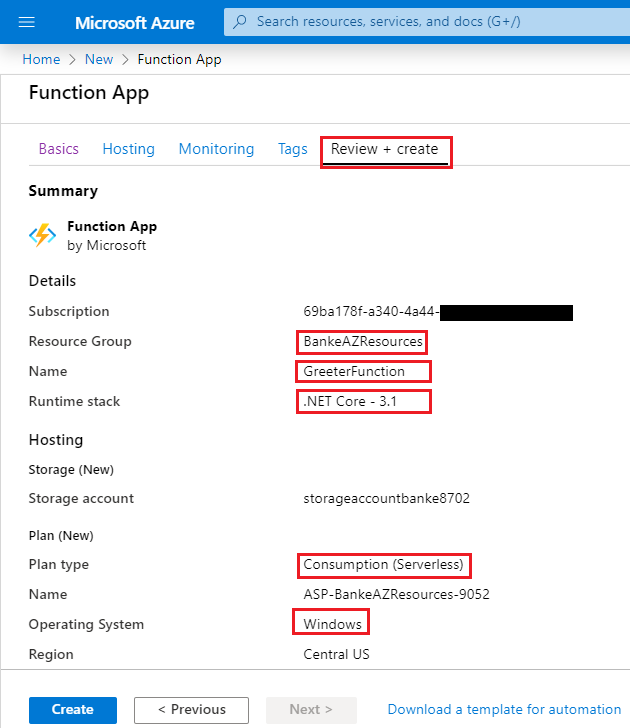
We are able to see that there are a complete of 5 tabs for filling the small print about “Operate App” that are as follows:
Fundamentals Tab
Offers choices for “Subscription”, “useful resource Group”, “Occasion Particulars”, Operate App identify, Publish, Runtime Stack, and “Area”.
Useful resource Group
We are able to use the prevailing useful resource group, or we are able to create a brand new one as nicely. If there isn’t any useful resource group, then click on on the “Create new” hyperlink to create a brand new Useful resource group. Present the useful resource group within the textbox.
App Title
The Azure operate app identify have to be globally distinctive. We have to select the identify with allowed characters. It creates a subdomain identify inside the net URL https://azurewebsites.web/, so the brand new URL for the app identify is created as https://greeterfunction.azurewebsites.web/ together with URL suffix for API and performance identify. In a while, we are able to see how we are able to copy the entire URL.
Runtime stack
We’re going to use Azure operate App model 3.0. We use .NET Core with C# for coding functions. There are different choices out there as nicely, and we are able to go together with different languages as nicely.
Internet hosting Tab
The internet hosting tab offers choices for “Storage account”, “Working System”, and Plan sort.
Monitoring Tab
It offers an choice to decide on if we want to Create Utility Perception or not. By default, the choice for “Allow Utility Insights” is about to “Sure”. So, it creates an software Perception as nicely. It helps us with monitoring the small print. We are able to discover it afterward as soon as the Azure operate app is created.
Tags Tab
Title/worth pair to categorize sources.
Evaluation + Create Tab
Last Evaluation of the entire earlier Tab.
Be aware
To maintain it easy for the primary time, we’re not going to vary any default choices. Depart all of the settings as-is, since we are able to modify these settings afterward.
Step 6 – Click on on the Create button as Highlighted within the earlier screenshot
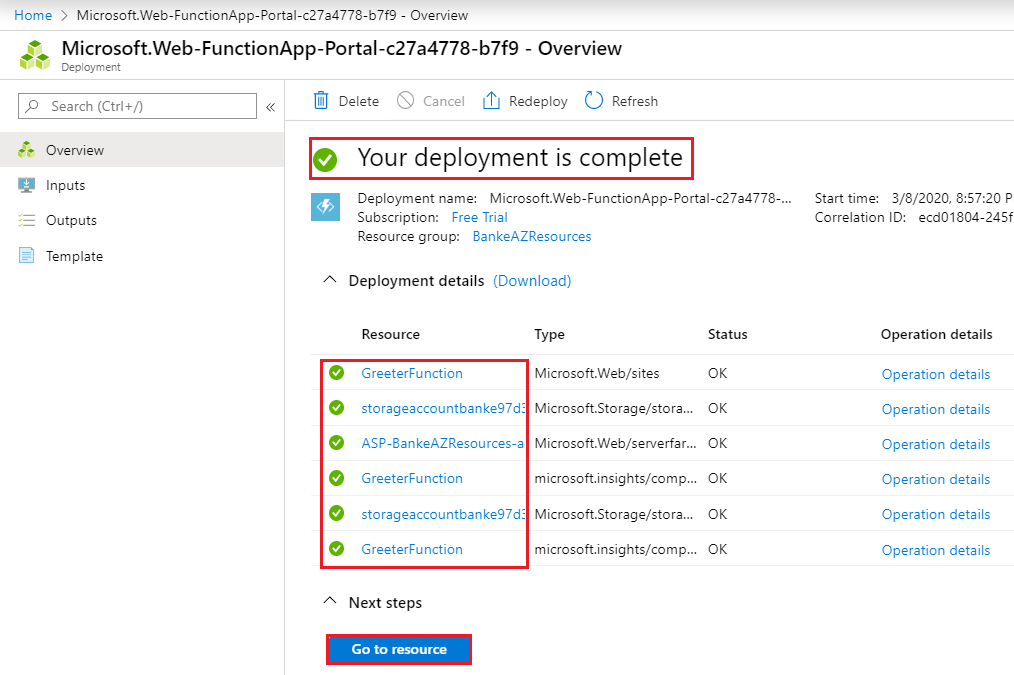
After that, it takes some to create the app. In the meantime, it shows a message like “Your deployment is underway”.
As soon as the deployment completes, then it shows the completion message as nicely.
Step 7 – As soon as the deployment completes, click on on the “Go to useful resource” tab.
As proven within the beneath screenshot:
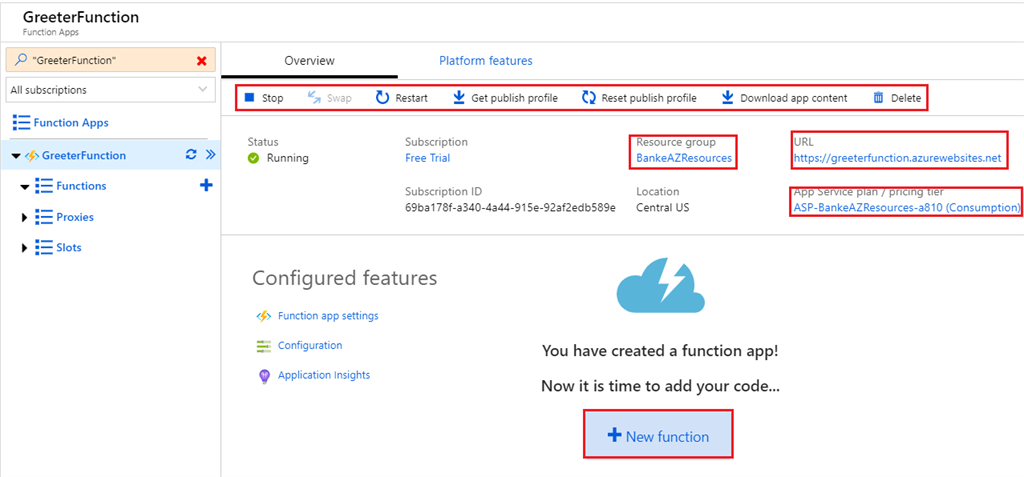
Step 8 – Add New Operate
Click on on the “New Operate” button. As we are able to see, the brand new URL is prepared, and we are able to discover that URL as nicely. However till now, we have now not written even a single line of code. So it’s time to write code for our first operate app. After clicking on the “new operate” button, it creates a brand new operate with the default code.
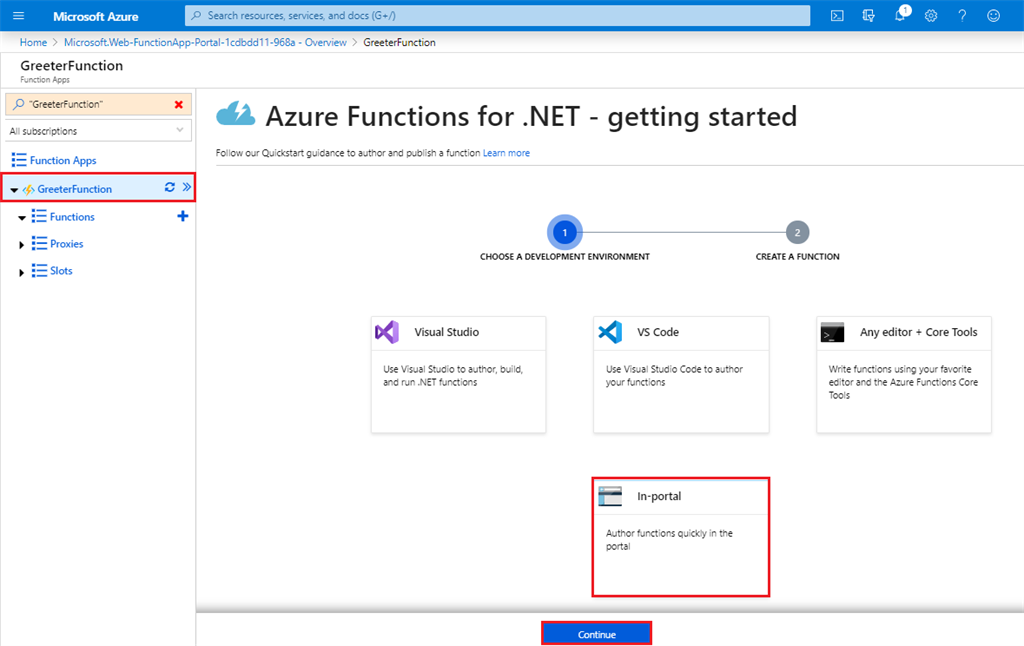
Step 9 – Edit Operate Code On-line
Azure offers a number of choices to Edit code for operate app. Under are Four offers choices. Choose the “In-portal” choice to Edit code on-line. It’s easy to edit code with “Visual Studio” and “VS Code” as nicely. We are able to see these choices in different articles. Proper now, concentrate on enhancing code on-line within the portal.
Choose the “In-portal” choice and click on on the “Proceed” button.
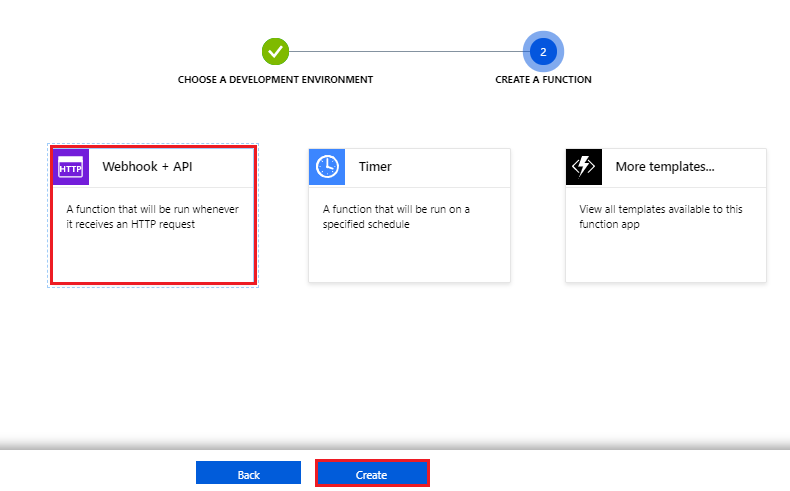
After deciding on the choice for the “In-portal”, it asks for selecting the kind of operate which we want to create. Proper now, we want to create a operate on HTTP primarily based set off, so allow us to select the choice “Webhook + API”. Then click on on the create button.
Following is a default generated code pattern. We are able to edit it, run it, or we are able to create one other operate as nicely.
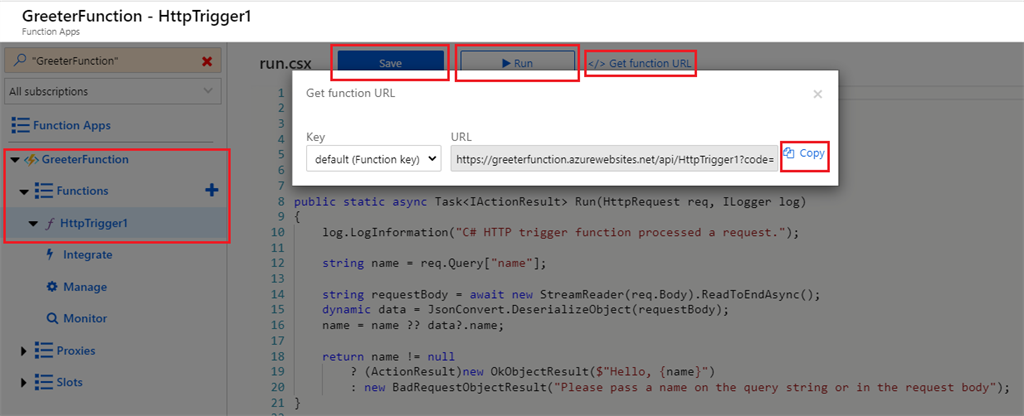
Within the above screenshot, we are able to see that it offers an choice for copying the URL as nicely. We are able to copy this URL after which attempt to open this URL in an online browser to see the outcome.

So lastly, we have now created our first “Azure Operate App,” and it’s working completely wonderful.
Including a brand new Azure Operate
Allow us to add a brand new Azure Operate App.
Step 1
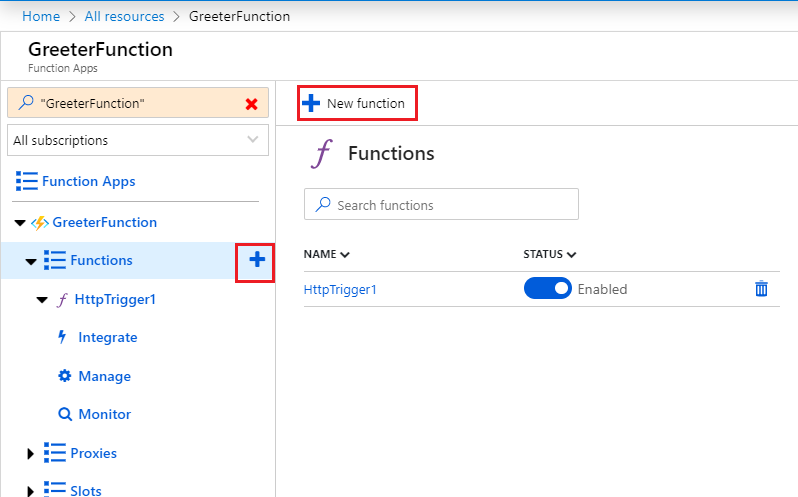
Click on on the “+” button, as highlighted within the beneath screenshot. We are able to click on any of the 2 “+” choices.
Step 2
Particulars for New Operate:
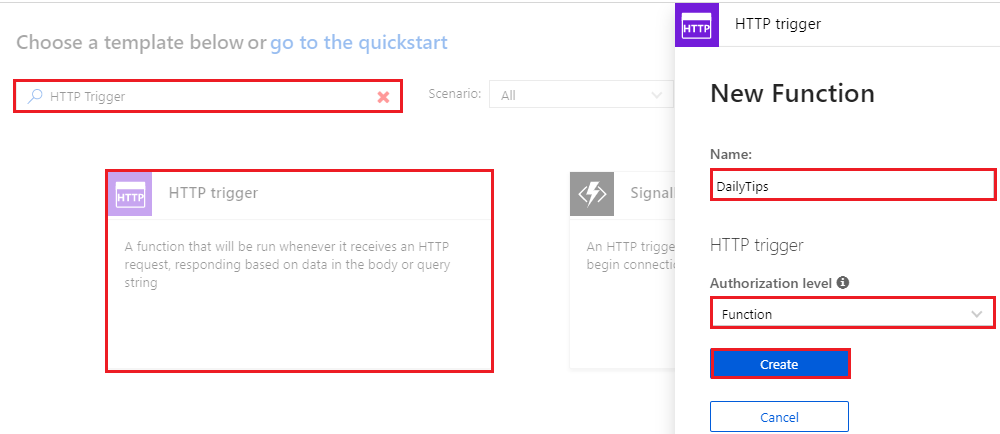
- Kind “HTTP set off” within the search field
- Click on on the “HTTP set off.”
- Present the identify of New operate as “DailyTips”.
- Choose Authorization degree: “Operate”.
- Click on on the “Create” button.
Step 3 – Change the code
Substitute the prevailing code with the next code:
- #r “Newtonsoft.Json”
- utilizing System.Web;
- utilizing Microsoft.AspNetCore.Mvc;
- utilizing Microsoft.Extensions.Primitives;
- utilizing Newtonsoft.Json;
- utilizing static System.DayOfWeek;
- utilizing static System.DateTime;
- public static async Process<IActionResult> Run(HttpRequest req, ILogger log)
- {
- log.LogInformation($“C# HTTP set off operate processed a request at {Now}.”);
- string identify = req.Question[“name”];
- string requestBody = await new StreamReader(req.Physique).ReadToEndAsync();
- dynamic information = JsonConvert.DeserializeObject(requestBody);
- identify = identify ?? information?.identify;
- return identify != null
- ? (ActionResult)new OkObjectResult($“Hello, {identify} it is {GetDailyMessage(At the moment.DayOfWeek)}”)
- : new BadRequestObjectResult(“Please move a identify on the question string or in the request physique”);
- }
- public static string GetDailyMessage(DayOfWeek day) =>
- day swap
- {
- Monday => “Motivational Monday!”,
- Tuesday => “Tech Tuesday!”,
- Wednesday => “Obtain your objectives!”,
- Thursday => “Considerate Thursday!”,
- Friday => “Enjoyable Friday!”,
- _ => “Completely satisfied Weekend!!!”,
- };
Step 4 – Save and Run
Click on on the “Save and run” button.
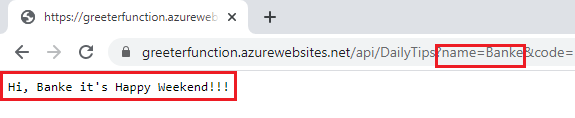
Step 5 – Take a look at in an online browser
- Click on on “</> Get operate URL”
- Copy the URL
- Paste the URL in a browser
- Edit the URL so as to add identify parameter within the question string
- Run the URL within the browser
We are able to check it on the Azure portal as nicely. The Azure portal itself offers an choice for testing these functionalities.
Creating Timer Set off
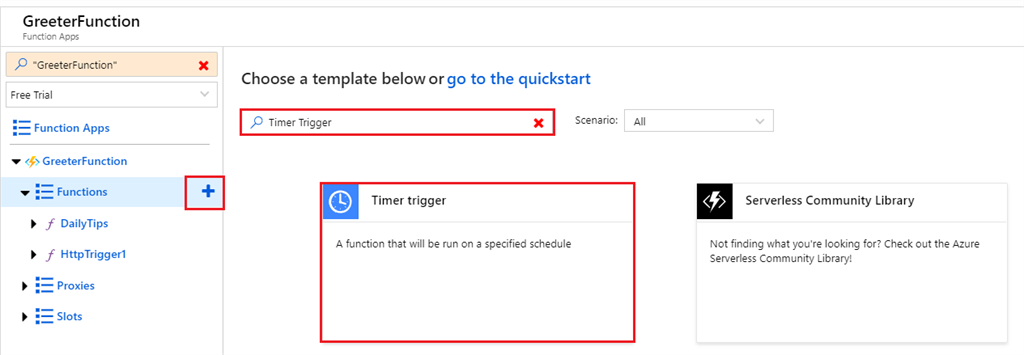
Step 1 – Choose “Timer Set off” Template
- Click on on the “+” button to create a brand new operate.
- Search “Timer Set off” within the search field.
- Click on on the “Timer set off” choice.
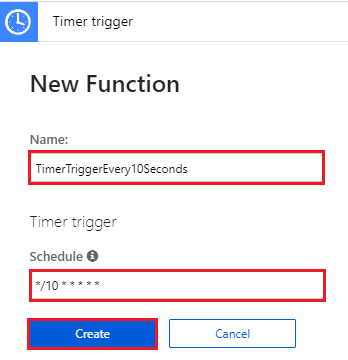
Step 2 – Present Particulars for “Timer Set off”.
- Title: “TimerTriggerEvery10Seconds”
- Schedule: “*/10 * * * * *”
- Click on on the Create button
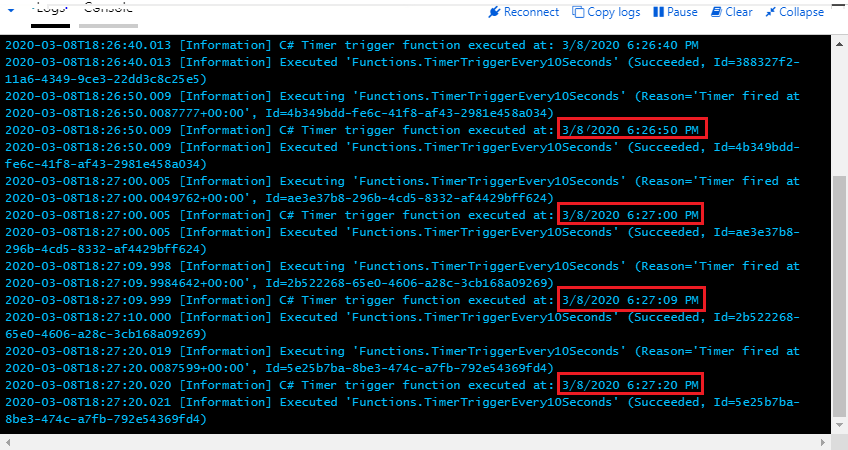
Step 3 – Run the code
Click on on the “Run” button to run the code.
The above examples are some fundamental examples of Azure capabilities. We are able to do way more with the “Azure Operate App”.
Deleting all of the sources
If we realized something on Azure, it is to recollect to delete all the things after your follow is accomplished. Let’s do the identical for Azure operate Apps.
Step 1
Go to “Residence” >> “All Sources.”
Step 2 – Choose All >> Delete
Observe the on-screen directions to delete it as proven within the beneath screenshot.
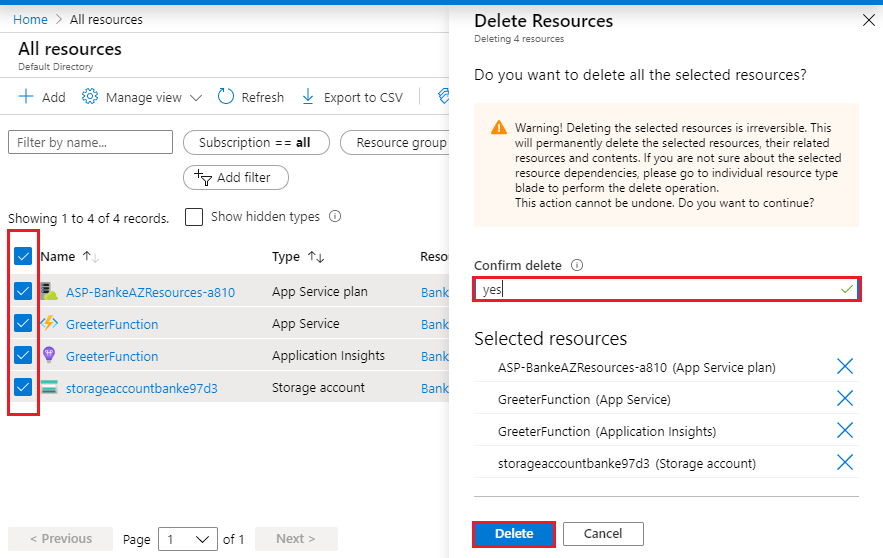
Guarantee that all of the sources have been deleted.