On this article let’s discover about creating an Azure Kubernetes service (AKS) within the Azure portal. Kubernetes is a service supplied by Azure which helps in deploying and managing the clusters. From this text we are going to deploy an AKS cluster utilizing the portal. Let’s make a easy analogy about Kubernetes. Take into account a bicycle store sells a totally practical bicycle and we will experience it too. Now think about the bicycle store as a substitute sells you the cycle components to repair all by your self. So what occurs right here is we are going to completely get screwed up proper? So, Kubernetes is sort of a bicycle store which manages all the deployment and managing is completed simply. Now let’s get to the demo half.
Stipulations
- Lively Azure Subscription.
Step 1
Log in into your Azure portal by utilizing the next hyperlink
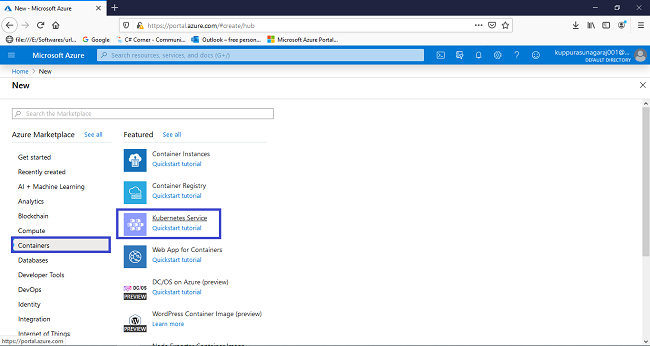
For creating an AKS cluster, choose >> + New useful resource
Choose >> Containers >> Kubernetes service.
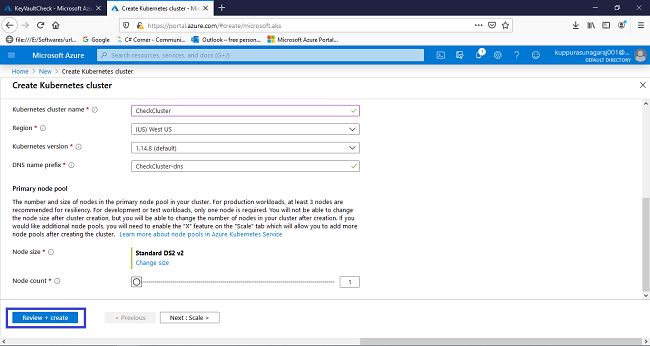
Now we have to present among the fundamental required values akin to:
- We have to present a novel identify for the cluster.
- Choose the subscription in addition to the useful resource group.
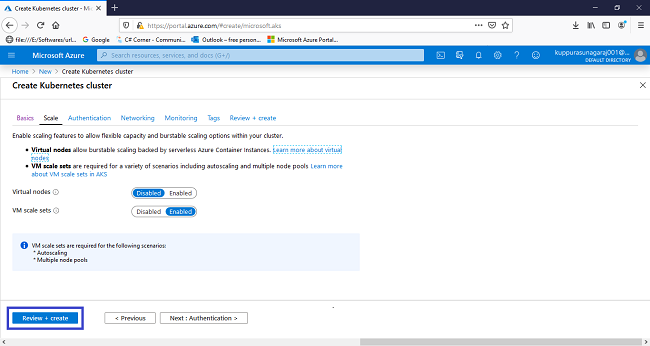
- Choose the area in addition to the Kubernetes model if you wish to, or else depart the default values to be as they’re and eventually click on >> Overview + create and Click on >> Create when the validation completes.

Step 2
It does take a couple of minutes to create an AKS cluster. When the deployment is profitable we will see that the useful resource is operating and for connecting to the cluster simply open Azure PowerShell within the Azure portal itself and execute the next command in it:
- az aks get-credentials –resource-group myResourceGroup –name myAKSCluster
(Substitute the useful resource group with the useful resource group identify you’ve gotten created.)
Execute the next command to confirm the reference to the cluster.

By executing the next instructions we will get the output as talked about beneath and we have now to ensure that the node standing is in prepared place.
Execute the applying
Step 3
Now continuing with the subsequent step, we have to use both nano azure-vote.yaml or the vi azure-vote.yaml command to create a file named as azure-vote.yaml.
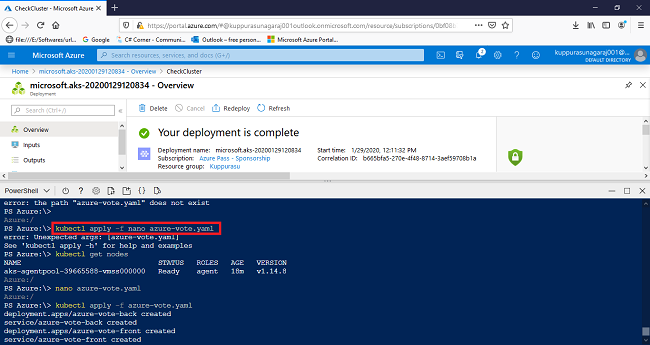
After utilizing nano azure-vote.yaml or vi azure-vote.yaml command open the yaml file definition and paste the next YAML definition.
- apiVersion: apps/v1
- sort: Deployment
- metadata:
- identify: azure-vote-back
- spec:
- replicas: 1
- selector:
- matchLabels:
- app: azure-vote-back
- template:
- metadata:
- labels:
- app: azure-vote-back
- spec:
- nodeSelector:
- “beta.kubernetes.io/os”: linux
- containers:
- – identify: azure-vote-back
- picture: redis
- assets:
- requests:
- cpu: 100m
- reminiscence: 128Mi
- limits:
- cpu: 250m
- reminiscence: 256Mi
- ports:
- – containerPort: 6379
- identify: redis
- —
- apiVersion: v1
- sort: Service
- metadata:
- identify: azure-vote-back
- spec:
- ports:
- – port: 6379
- selector:
- app: azure-vote-back
- —
- apiVersion: apps/v1
- sort: Deployment
- metadata:
- identify: azure-vote-front
- spec:
- replicas: 1
- selector:
- matchLabels:
- app: azure-vote-front
- template:
- metadata:
- labels:
- app: azure-vote-front
- spec:
- nodeSelector:
- “beta.kubernetes.io/os”: linux
- containers:
- – identify: azure-vote-front
- picture: microsoft/azure-vote-front:v1
- assets:
- requests:
- cpu: 100m
- reminiscence: 128Mi
- limits:
- cpu: 250m
- reminiscence: 256Mi
- ports:
- – containerPort: 80
- env:
- – identify: REDIS
- worth: “azure-vote-back”
- —
- apiVersion: v1
- sort: Service
- metadata:
- identify: azure-vote-front
- spec:
- kind: LoadBalancer
- ports:
- – port: 80
- selector:
- app: azure-vote-front
Step 4
Now we have to deploy the applying utilizing the kubectl apply command and must specify the identify of the YAML file.
- kubectl apply -f azure-vote.yaml
By executing the next command, we will get the output efficiently and we will get the output as talked about beneath.
The ultimate a part of the Kubernetes service is to run an utility and the method might take some time to finish, we will watch the progress by executing the next command in –watch argument
- kubectl get service azure-vote-front –watch
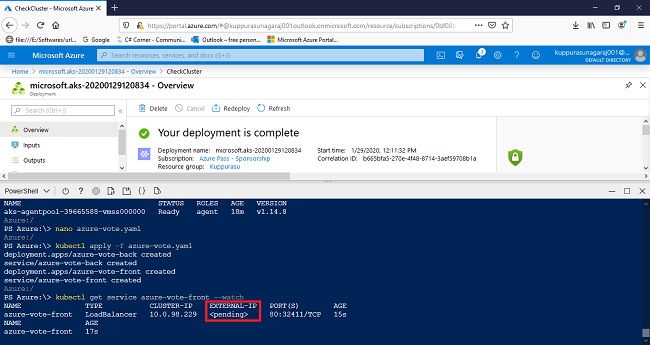
After we execute the above watch command, we will get the next output and after we get the external-IP we will use the IP to see the applying in motion, for that open up the browser and enter the exterior IP handle of the service.
Now we have mentioned find out how to creat Azure Kubernetes service (AKS) in Azure portal and I hope this text will likely be helpful for you. Please remark beneath in case you have any queries and thanks for studying!