This text demonstrates tips on how to delete blob objects utilizing Azure Perform. To implement this, we are going to create a timer set off Azure operate which can periodically take a look at the container and delete blob objects.
Conditions
- Primary Information on Azure Perform.
- Azure storage account already created.
- .NET Core SDK 3.1 put in in your PC.
- Azure storage emulator put in.
Create Time Set off Perform From Visual Studio
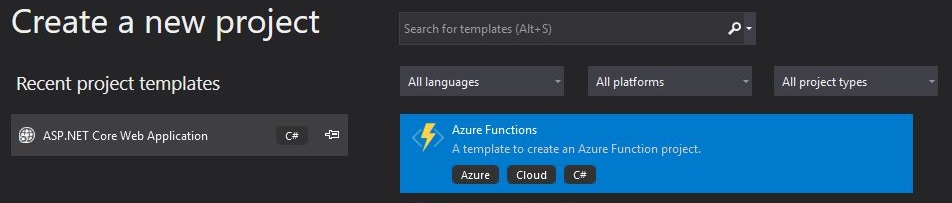
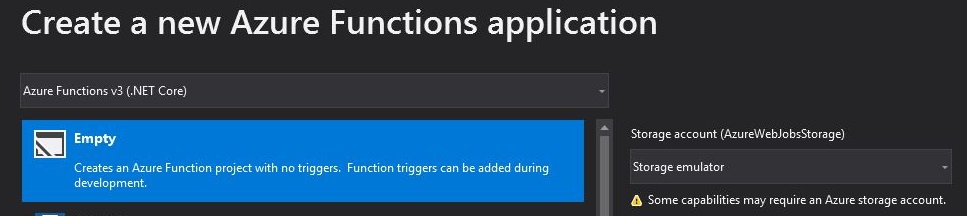
First, we are going to create Azure Perform app empty challenge from visible studio. Give an answer title and challenge title as per your want. Right here, I’ve given challenge title as “AzFunctions”.

Choose Empty template right here.
As soon as newly created resolution is loaded, proper click on on operate challenge => Click on on Add => Click on on New Azure Perform… => Give operate title as “DeleteBlobTimerTriggerFunc.cs” => Click on on Add => Choose “Timer Set off” => Click on on OK.
Set up required NuGet packages into the operate app challenge. For that, proper click on on the challenge => Click on on Handle NuGet Packages… => Browse and set up one after the other.
- Microsoft.Azure.WebJobs
- Azure.Storage.Blobs
Add further parameter into operate. Run methodology as ExecutionContext which can give the likelihood to make use of of ConfigurationBuilder in order that Azure operate can learn storage connection string from JSON file or from operate configuration settings on Azure.
Under sequential actions might be carried out by this operate,
- Learn configuration values.
- Get BlobContainerClient reference primarily based on the storage account connection string and container title (right here container title is “dummy-messages”).
- Get All blobs and delete blob merchandise one after the other if exists.
DeleteBlobTimerTriggerFunc.cs
- utilizing System;
- utilizing Azure.Storage.Blobs;
- utilizing Azure.Storage.Blobs.Fashions;
- utilizing Microsoft.Azure.WebJobs;
- utilizing Microsoft.Extensions.Configuration;
- utilizing Microsoft.Extensions.Logging;
- namespace AzFunctions
- {
- public static class DeleteBlobTimerTriggerFunc
- {
- [FunctionName(“DeleteBlobTimerTriggerFunc”)]
- public static void Run([TimerTrigger(“%TimerSchedule%”)] TimerInfo myTimer,
- ILogger log,
- ExecutionContext context)
- {
- log.LogInformation($“C# Timer set off operate executed at: {DateTime.Now}”);
- var config = new ConfigurationBuilder()
- .SetBasePath(context.FunctionAppDirectory)
- .AddJsonFile(“native.settings.json”, true, true)
- .AddEnvironmentVariables().Construct();
- BlobContainerClient blobContainerClient =
- new BlobContainerClient(config[“CloudStorageAccount”], “dummy-messages”);
- var blobs = blobContainerClient.GetBlobs();
- foreach (BlobItem blobItem in blobs)
- {
- blobContainerClient.DeleteBlobIfExistsAsync(blobItem.Identify);
- log.LogInformation($“Blob Identify {blobItem.Identify} is deleted efficiently.”);
- }
- }
- }
- }
On this operate we configured TimerSchedule and this worth will learn from configuration.
Add TimerSchedule worth as “0 */3 * * * *” into native.settings.json for native testing.
Add CloudStorageAccount values into native.settings.json as nicely which can required to learn storage account connection string
This worth you may be discovered out of your Azure storage account. For that, login to Azure account => Go to storage account => Click on on Entry Keys below settings on left menu => You will note two keys there => Copy anybody of the connection sting => Paste that into native.settings.json
- “Values”: {
- “AzureWebJobsStorage”: “UseDevelopmentStorage=true”,
- “FUNCTIONS_WORKER_RUNTIME”: “dotnet”,
- “CloudStorageAccount”: “DefaultEndpointsProtocol=https;AccountName=;AccountKey=;EndpointSuffix=core.home windows.web“,
- “TimerSchedule”: “0 */3 * * * *”
- }
Take a look at Azure Perform in localhost
Let’s add some blobs merchandise into container known as “dummy-messages”, if it doesn’t exist.
Now construct and run the operate and check in native. You will note the under console window open.
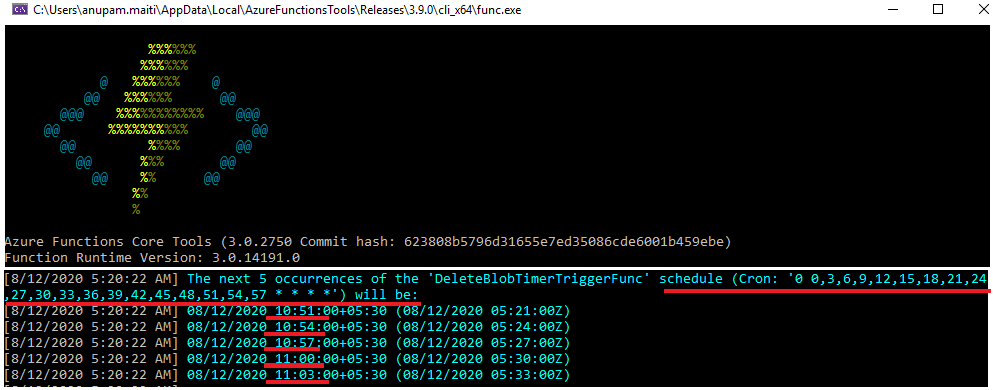
As TimerSchedule set as 0 */3 * * * * which means each Three minute(s) beginning at minute 0, this operate will execute. Within the console, you will notice the following 5 scheduled occasions when operate will execute.
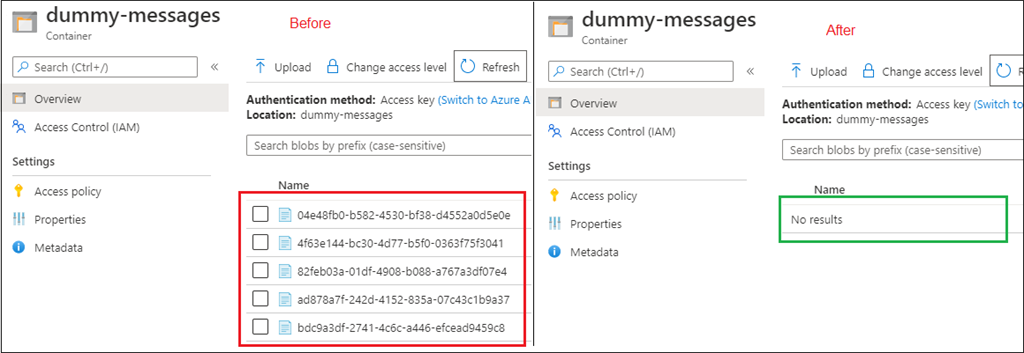
Let’s look forward to Three minutes, and after that you will notice that operate is executed. You’ll be able to see the respective delete log data within the operate console window. Right here I added 5 blobs into container. That’s why 5 blobs deleted efficiently.

Now test the container in Azure portal, you will notice that each one blobs are deleted.
Superior! Timer set off operate is working as anticipated.
Deploy Azure Perform from Visual Studio
Do bear in mind one factor, as soon as publish is profitable from VS, you will notice newly created operate in Azure portal after which you should configure new app settings key known as – TimerSchedule and CloudStorageAccount in operate app.
As soon as the configuration is finished, you will notice operate is executing as per the outlined schedule.
Conclusion
On this article, we deleted pattern blob although Azure timer set off operate utilizing .NET Core. Additionally we examined the operate on localhost and deployed to Azure portal. Hope you discover this text helpful!


