Introduction
Completely different Methods of Creating Azure Kubernetes Service Cluster
Through the use of the Azure portal
The Azure portal offers you a graphical interface of deploying your cluster by means of a wizard. It is a nice strategy to deploy your first cluster. For a number of deployments or automated deployments, one of many following strategies is advisable.
Through the use of the Azure CLI
The Azure command-line interface (CLI) is a cross-platform CLI for managing Azure sources. Azure CLI, an interactive shell setting that you should use by means of your browser. In Azure CLI there may be the choice of Bash or PowerShell to work with Azure providers. Azure CLI lets you script your cluster deployment, which could be built-in into different scripts.
Utilizing Azure PowerShell
Azure PowerShell is a set of PowerShell instructions for managing Azure sources instantly from PowerShell. It may also be used to create a Kubernetes cluster.
Through the use of ARM templates
Azure Useful resource Supervisor (ARM) templates are an Azure native infrastructure-as-code (IaC) language. They will let you declaratively deploy your cluster. This lets you create a template that may be reused by a number of groups.
Through the use of Terraform for Azure
Terraform is an open-source IaC instrument developed by HashiCorp. The instrument may be very standard within the open-source group to deploy cloud sources, together with AKS. Like ARM templates. Terraform additionally makes use of declarative templates to your cluster.
Create an Azure Kubernetes Service Cluster
Step 1
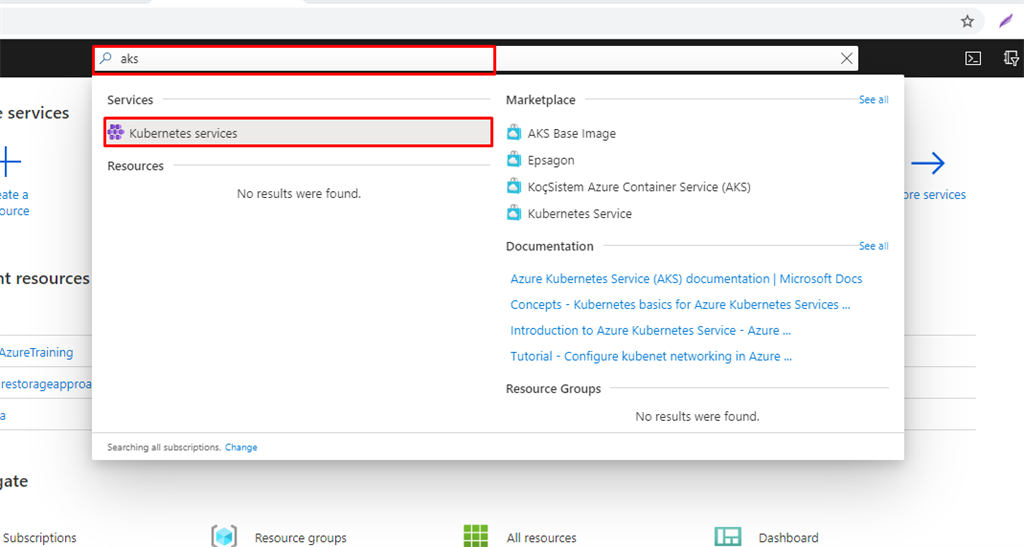
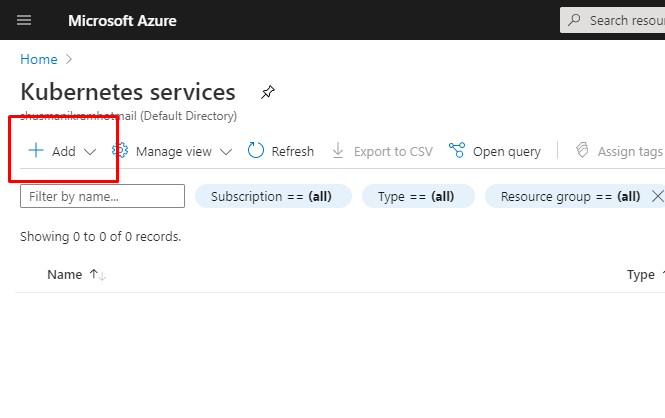
Enter the aks key phrase within the search bar on the high of the Azure portal. Click on on Kubernetes providers underneath the Companies class.
Step 2
It can take you the Azure Kubernetes Service blade click on on the Add button to create a brand new AKS Cluster.
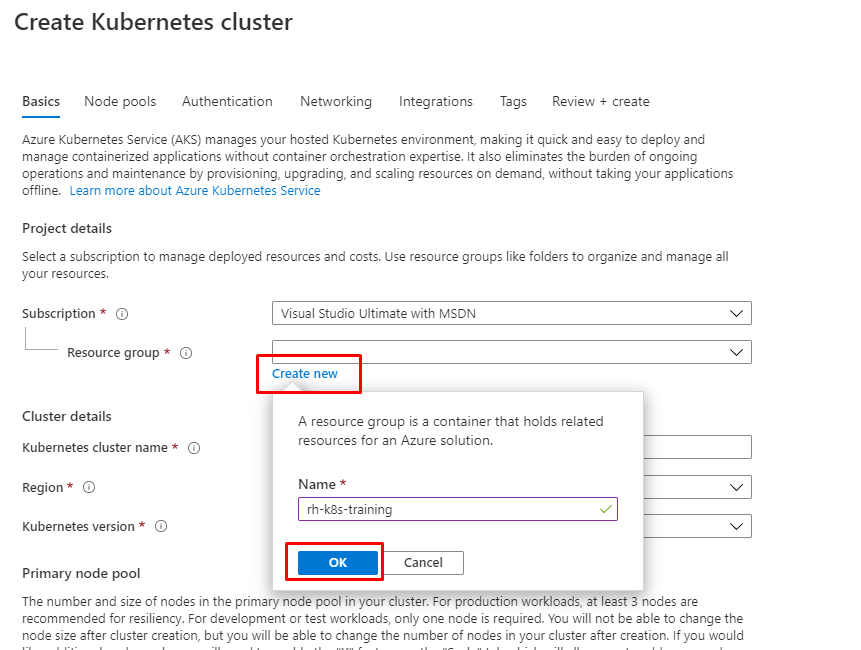
Step 3
The add button will take you thru the creation wizard blade to create your first AKS cluster. Step one right here is to create a brand new useful resource group. Hit the Create New button, give your useful resource a reputation, and hit OK. In my case, I give the useful resource group the title rh-K8s-training. It can present the Inexperienced tick if the title is legitimate.
Step 4
When you click on the Okay button you’ll present cluster particulars.
- Kubernetes cluster title
- Area
- The area we are going to use is (Center East) UAE North, however you can use another area of selection near your location.
- Kubernetes cluster model
- We are going to use the default Kubernetes model 1.16.3 (default), however you should use the most recent one or later replace the model.
- Node measurement
- We might want to change the node measurement and node rely. we are going to use a digital machine (VM) with two core with out premium storage and deploy a two-node cluster. If you’re not utilizing the free trial, you can select a extra highly effective VM measurement as I did, Now hit the Change Dimension button beneath the machine title. It can present the Choose a VM Dimension window blade choose a VM DS1_v2 or DS2_v2. In my case, I choose the DS2_V2 however it’s important to select DS1_v2 if you’re utilizing the azure free trial and click on the choose button.
- Node Depend
- Change the slider for Node rely to 2
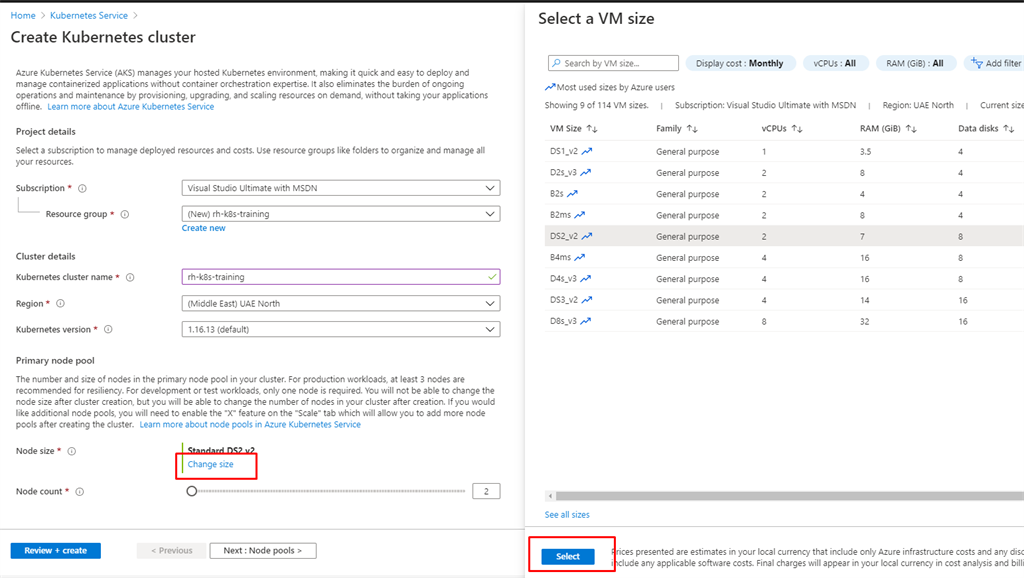
After including the cluster particulars click on the Evaluation + create button now to do a ultimate evaluate and create your cluster.
Step 5
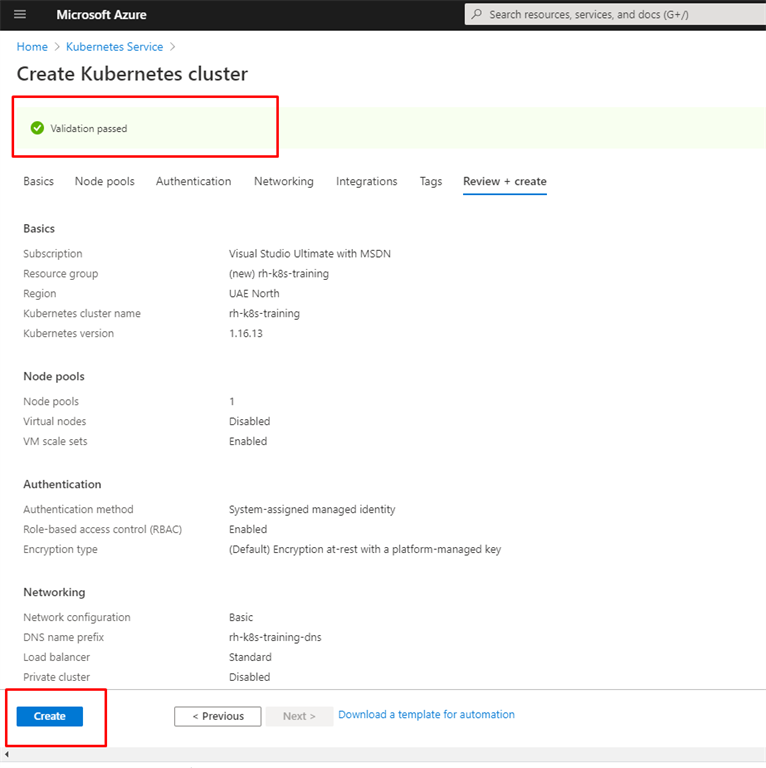
When you click on the Evaluation + create button, Azure will validate the configuration that was utilized to your first cluster. If the validation handed it’ll present on the highest with a inexperienced tick after which click on on Create:
Step 6
Deploying your cluster it’ll take 10 to 15 minutes As soon as the deployment is full, you may test the deployment particulars as proven:
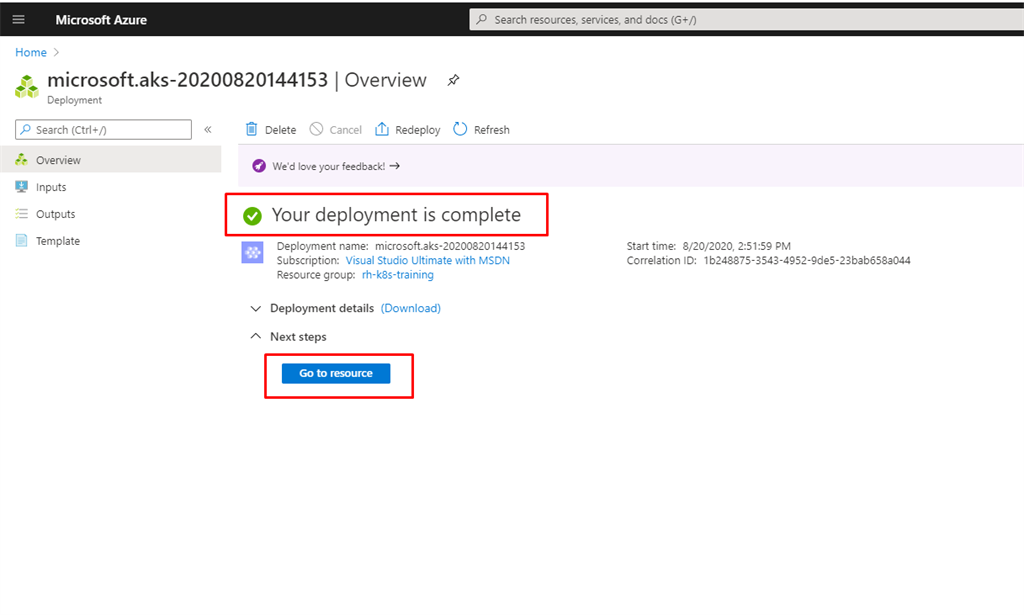
Congratulations your deployment is full!
Overview of Azure Kubernetes Service Cluster within the Azure Portal
After profitable deployment, let’s transfer to the second a part of our article to overview the AKS Cluster within the Azure Portal. Hit the Go to useful resource button on step 6, It can take you to the AKS blade within the portal. you need to now see the overview of your cluster within the Azure portal. The portal reveals a fast overview of your cluster. It gives the title, the situation, and the API server tackle. The left-hand navigation menu gives completely different choices to manage and handle your cluster.
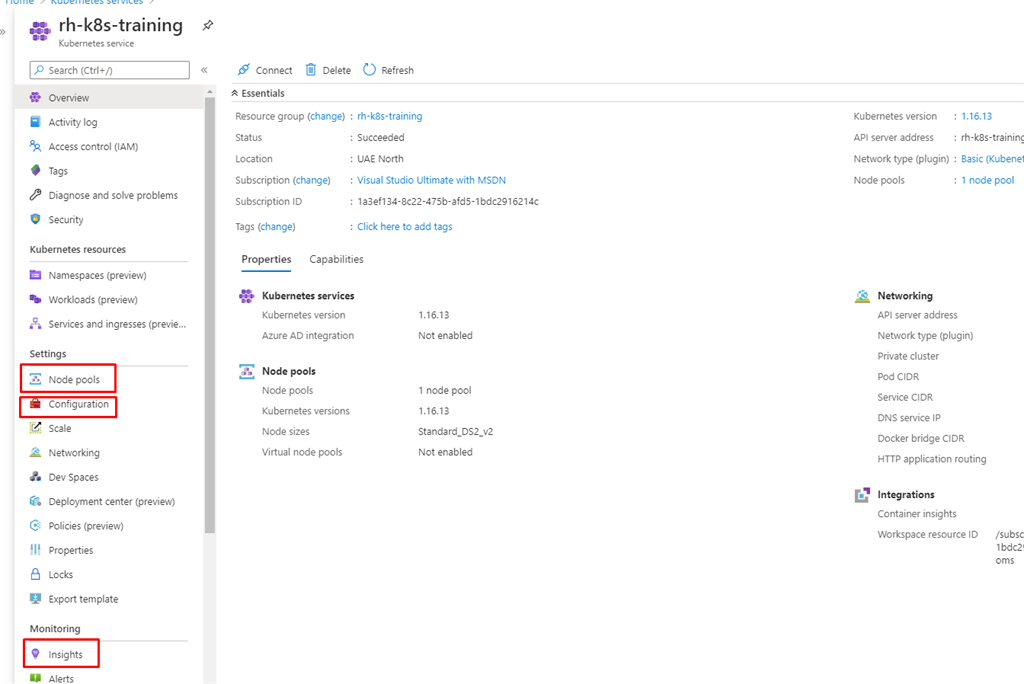
Let’s stroll by means of a few fascinating choices the portal presents.
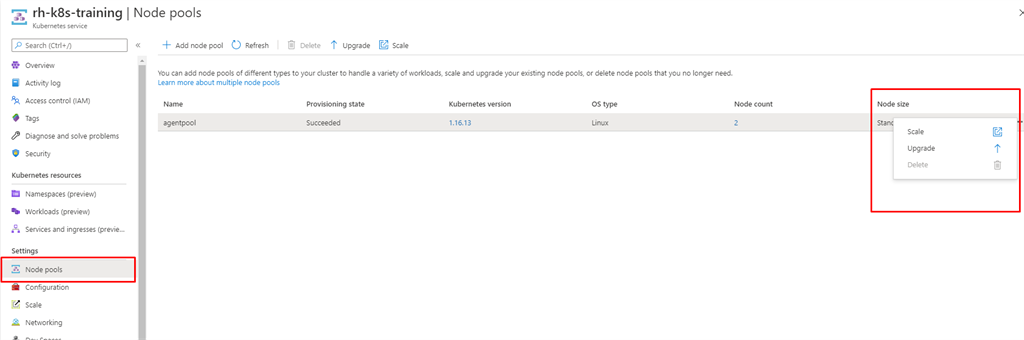
Node Swimming pools
The primary fascinating possibility is the Node swimming pools possibility. Within the node swimming pools view, you scale your current node pool (that means the nodes or servers in your cluster) both up or down by including or eradicating nodes; you may add a brand new node pool, probably with a distinct server measurement, and you may also improve your node swimming pools individually. Within the talked about picture, you may see the Add node pool possibility on the high left, and the choices to Scale or Improve within the menu on the proper.
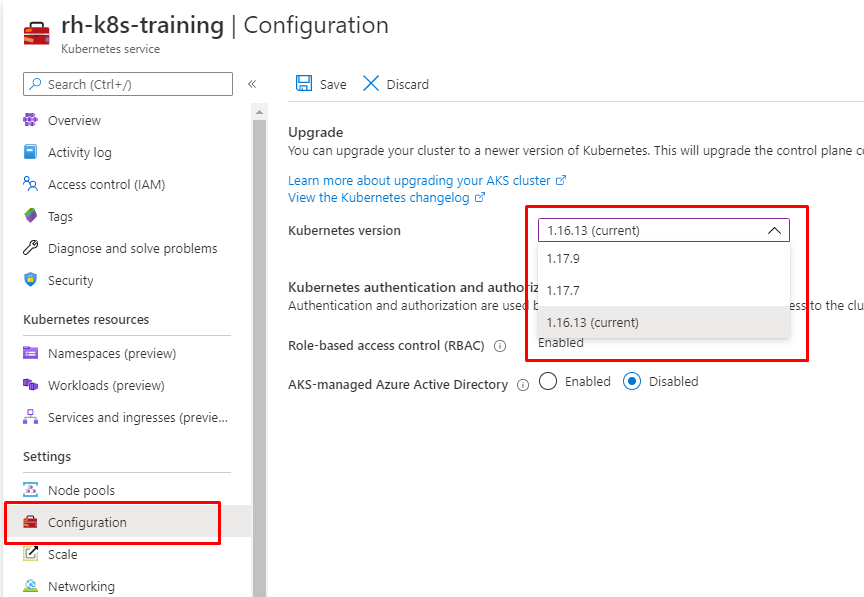
Configurations
The second fascinating blade is the Improve blade. Right here, you may instruct AKS to improve the administration airplane to a more recent model. As I discussed above in Step 6 you may select the default one or later you may improve your AKS Cluster, from configuration blade you may improve it Sometimes, in a Kubernetes improve, you first improve the grasp airplane, after which the person node swimming pools individually,
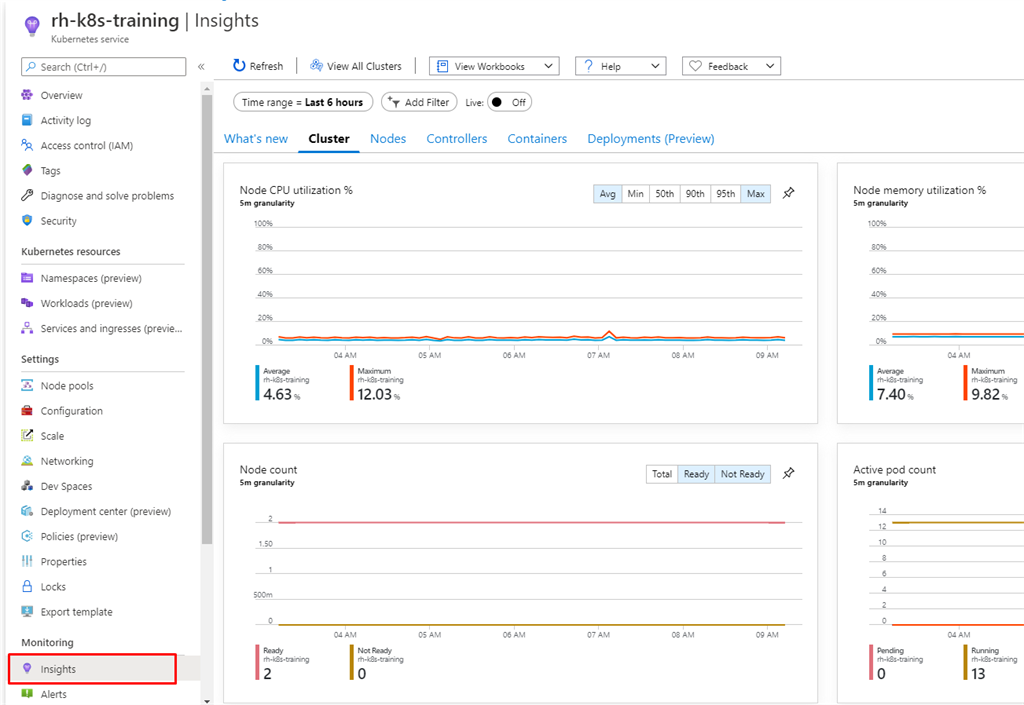
Insights
The Insights possibility gives you with monitoring of your cluster infrastructure and the workloads operating in your cluster. Since our cluster is model new, there is not plenty of information to analyze.