Introduction
On this article, I’ll stroll you thru an “Azure SignalR Service” utilizing a Purchaser-Provider pattern software. Azure SignalR service supplies an actual time communication between your software/pages.
- We’ll cowl a pair extra Azure Providers like Azure Features, Azure Service Bus & Azure SQL Database.
- We may have one Purchaser software in Asp.web core Razor Varieties and ONE Provider software in Asp.web core MVC.
Prerequisites
- Azure Account for establishing Azure Providers (SignalR, Features, Service Bus and so on)
- Visual Studio 2019 (For purchaser and provider software)
Software Circulate
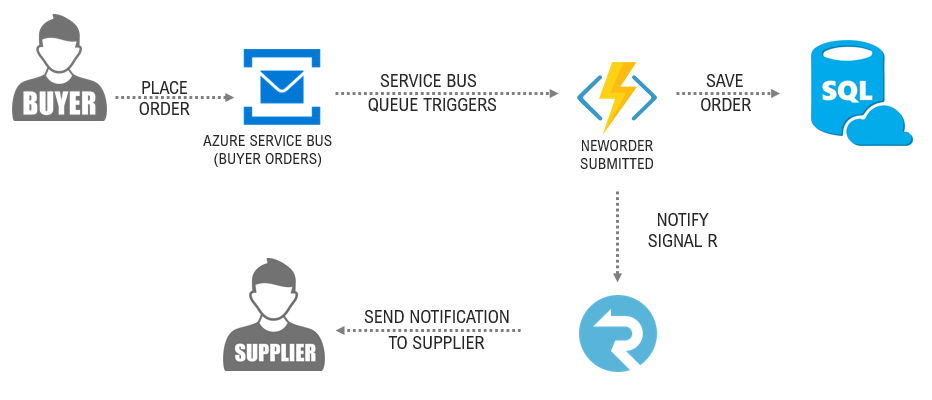
- Purchaser Software – Purchaser will create an order for an merchandise with amount.
- Provider Software – Provider will get notified (A immediate message on his display screen) {that a} purchaser has added a brand new order.
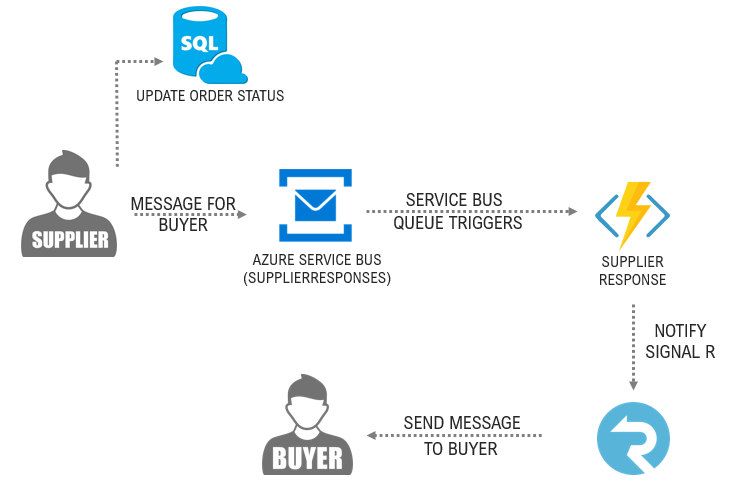
- Provider Software – Provider will settle for or reject the customer orders.
- Purchaser Software – Purchaser will get notified on his display screen that provider has accepted/rejected his order.
The notification(Purchaser/Provider) will get triggered by Azure SignalR Service. It means, we will probably be registering our software/pages to the SignalR service.
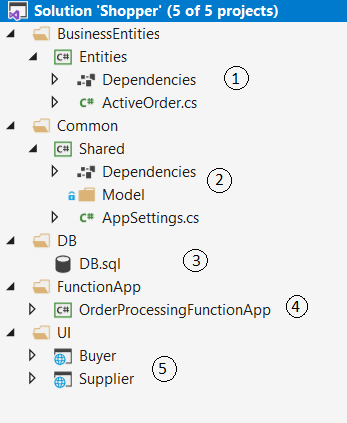
Venture Construction
.
- 1. Entities – Comprises a category “ActiveOrder” which is used for storing the energetic orders object from UI and Database
- 2. Frequent – Right here we now have AppSettings.cs class, it used for storing the appSettings values from app.config recordsdata in #5 UI initiatives
- 3. DB – DB Schema and Saved Procedures utilized in software
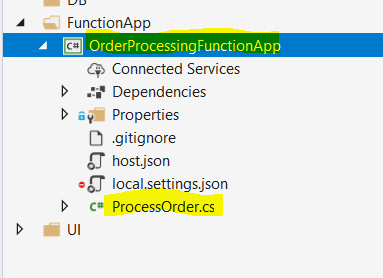
- 4. OrderProcessingFunctionApp – Azure Operate software
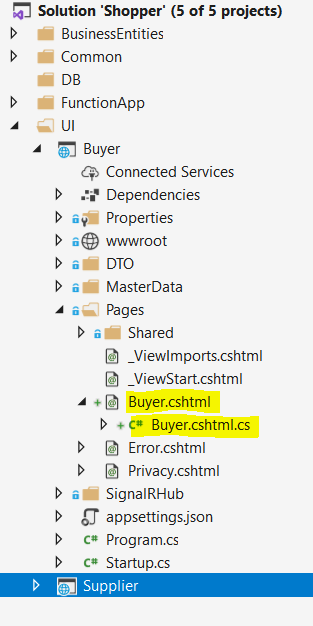
- 5. UI – Purchaser and Provider – Consumer purposes, one is for purchaser and one is for provider
Design/Circulate
Azure SignalR Service
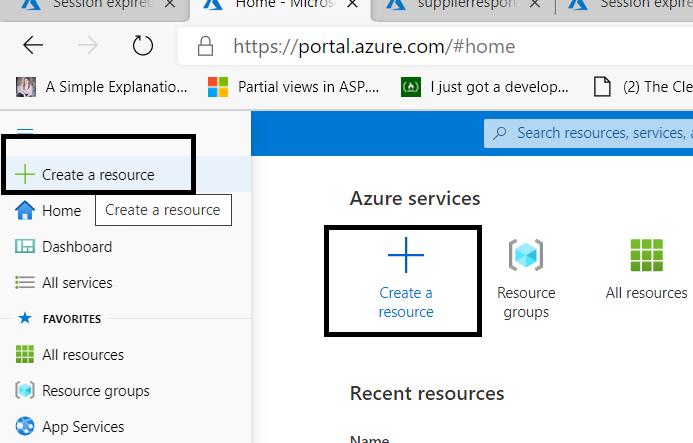
- Login to “portal.azure.com“
- Click on on “Create a useful resource” hyperlink
- Seek for “SignalR Service” in Azure market place:
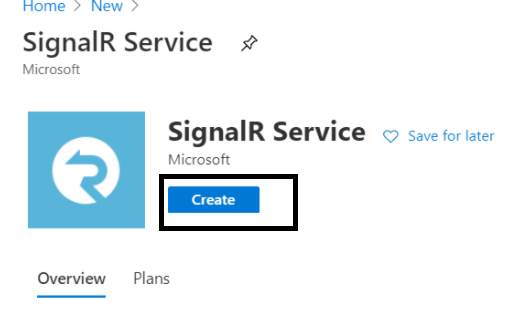
- Click on on “Create“
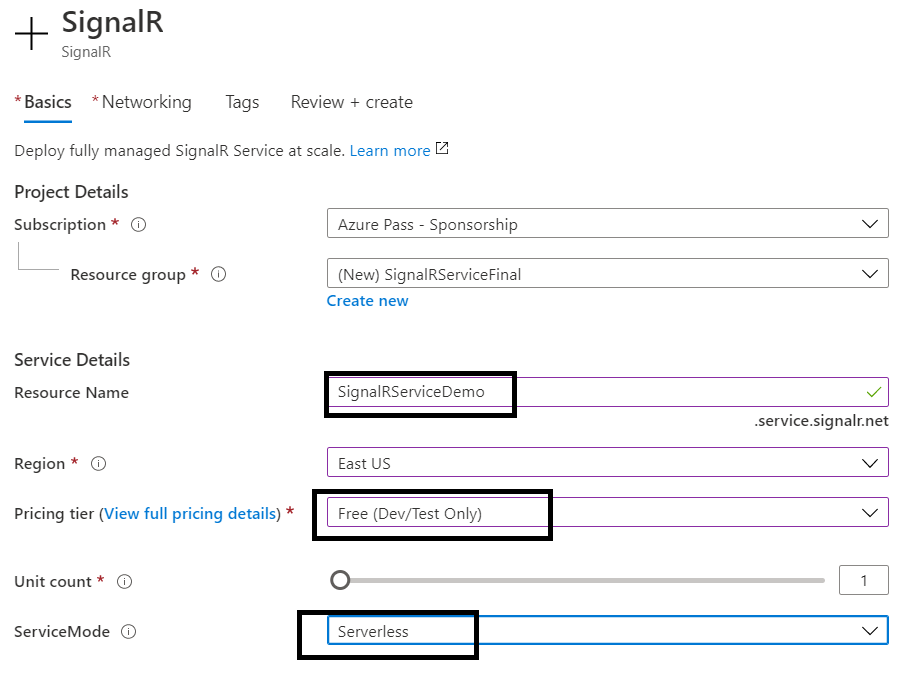
- Present the small print as proven under and click on on “Subsequent Networking“
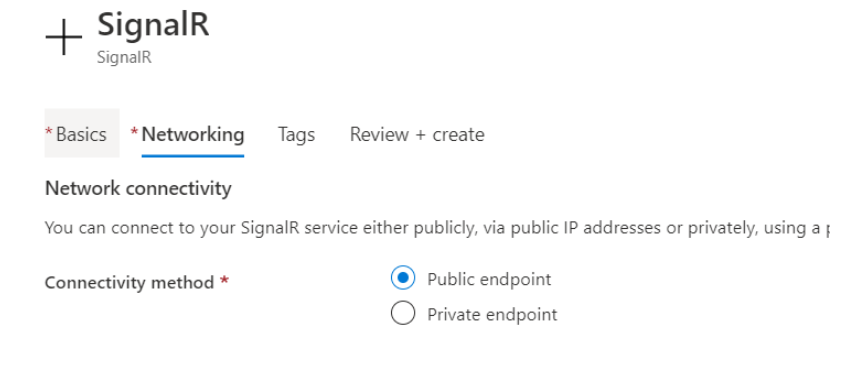
- Maintain the end-point public for our demo:
- Click on on “Overview and Create” after which “Create“. As soon as your “SignalR Service” deployment is completed, then confirm it in your Useful resource Group that it’s added there.
Azure Service Bus
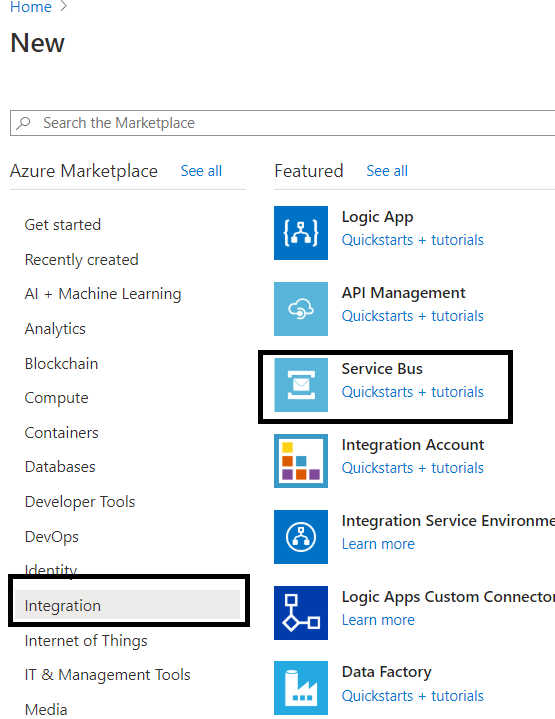
- Go to Azure market place and seek for Service Bus Or you may get it beneath “Integration” part on left:
- Fill the small print like Useful resource Group, Service bus title and so on:
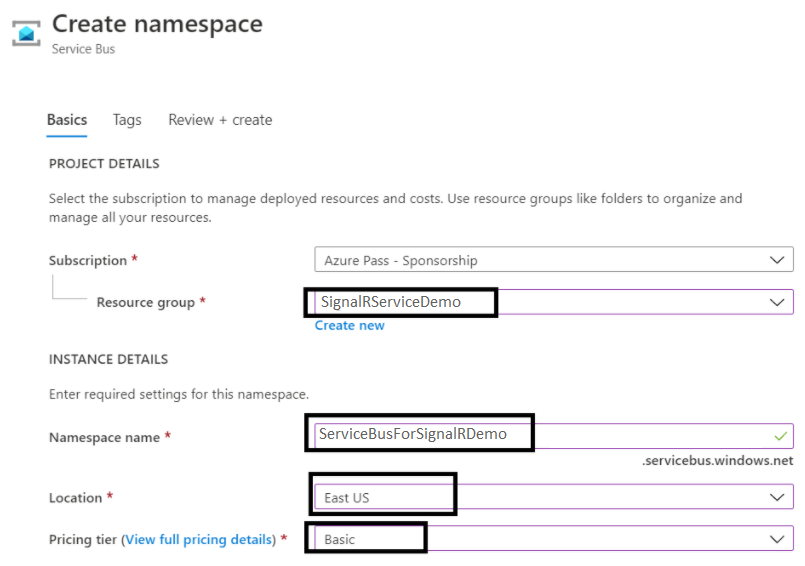
- Click on on “evaluate + create” and “create“.
Create Queues beneath the created Service bus
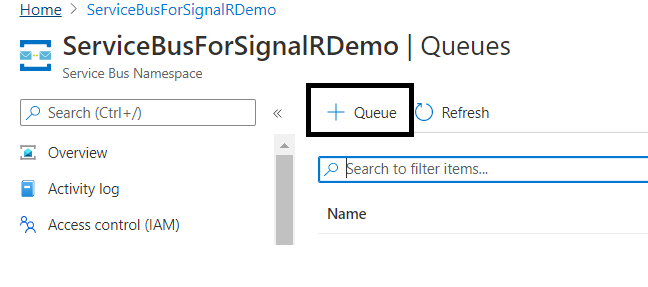
As soon as your deployment is completed, then go to your “Useful resource Group” and click on in your newly created “Service Bus” useful resource.
On this service bus, we are going to create 2 queues, which is able to get the information/message from Purchaser internet software and Provider internet software.

- Click on on “+ Queue“, It is going to open a “add new queue” wizard:
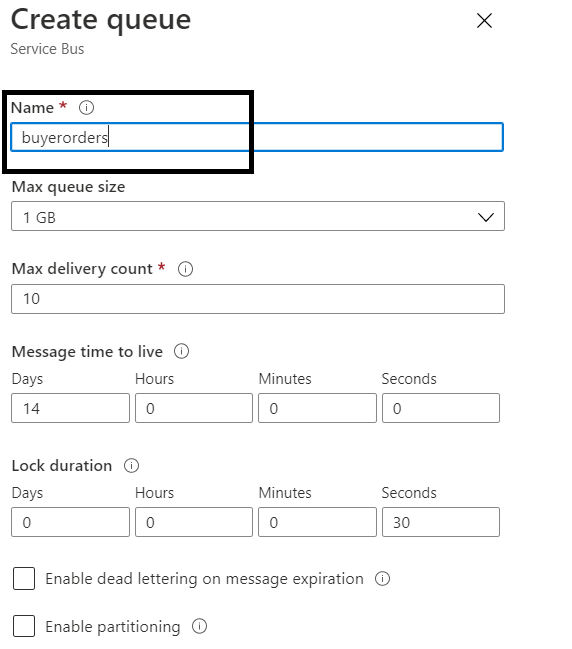
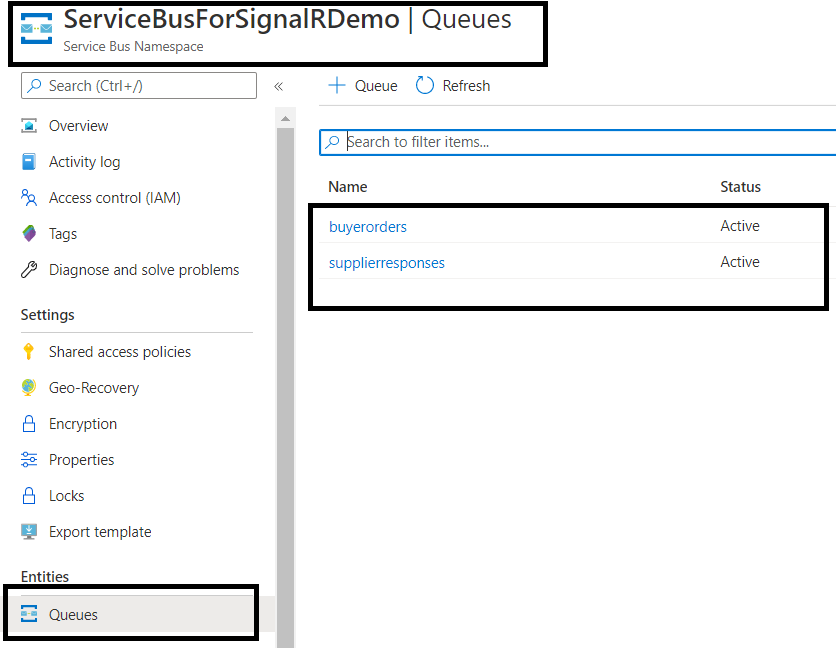
- Create a queue “buyerOrders” as under (It is going to receieve message/knowledge/object associated to purchaser order particulars):
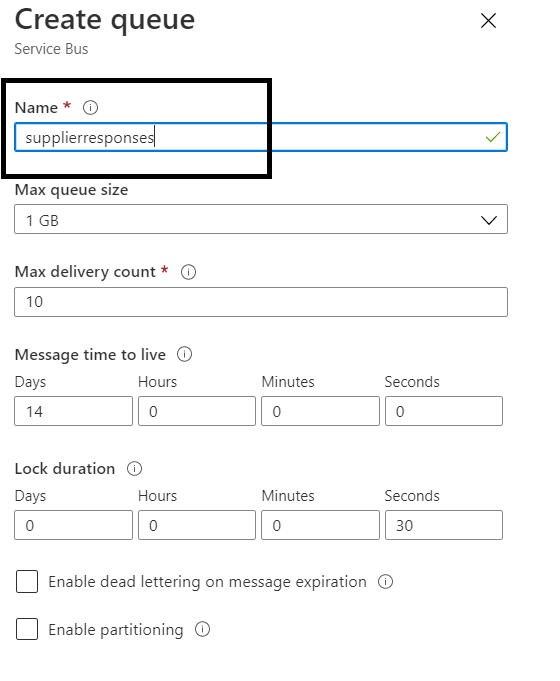
- Create a queue “supplierResponses” as under (It is going to used to recieve the provider response towards purchaser order):
- You possibly can see that each queues are created beneath service bus:
Create Azure SQL database
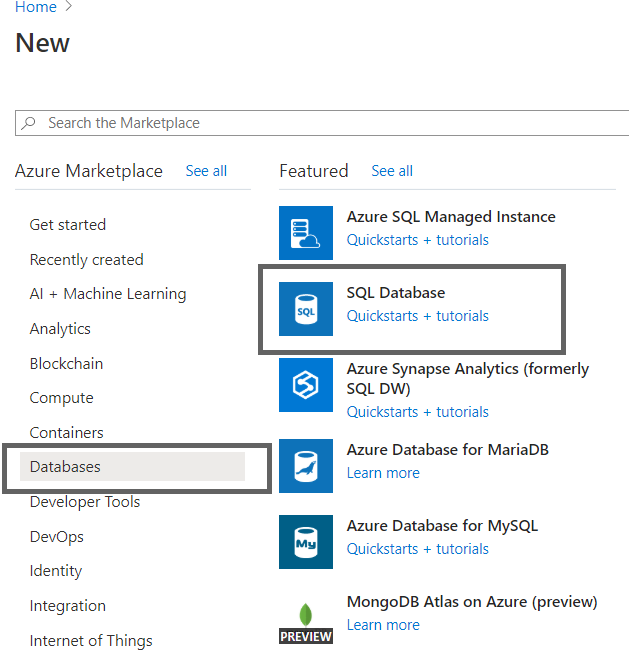
- Go to Azure market place and choose “SQL Database” beneath “Databases” part:
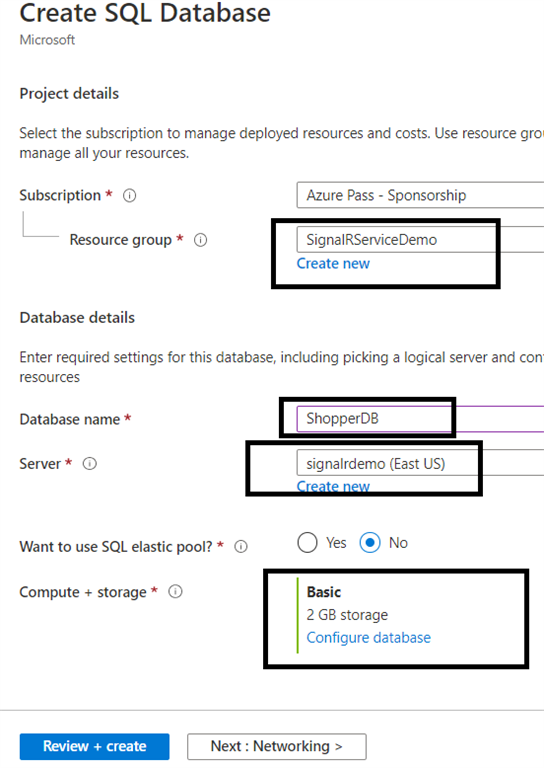
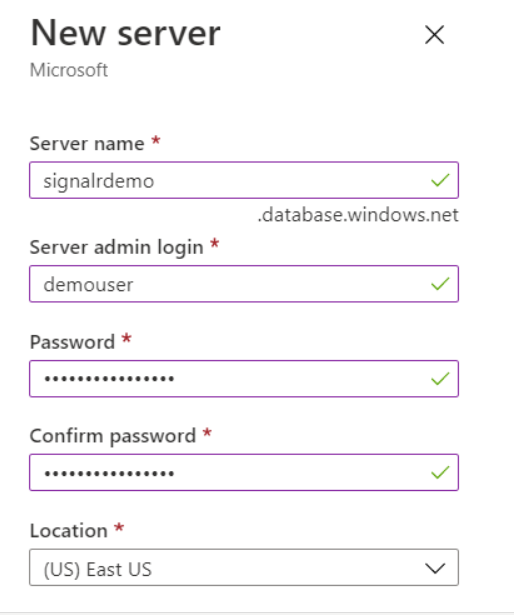
- Fill the database particulars and click on on “Create New” server:
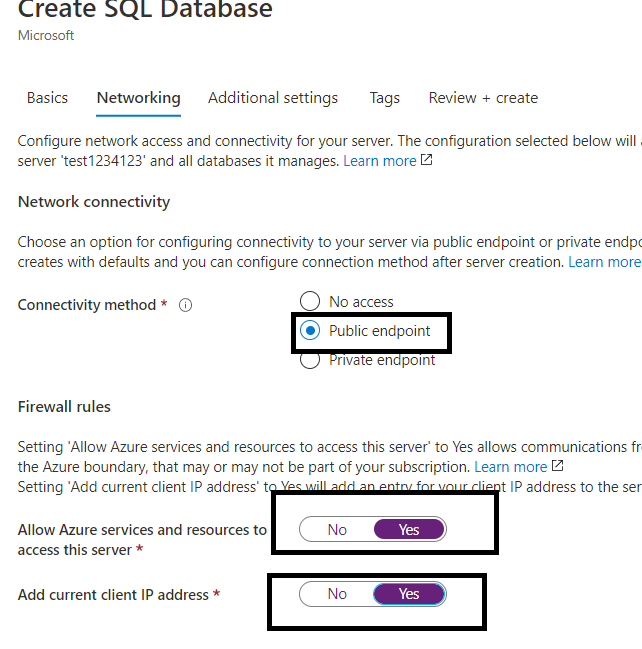
- On Networking tab, make choices as under, to attach db out of your native machine and so different Azure service may join DB:
- Click on on Create.
- Create a desk within the database as “Orders” (Script is out there connected code in DB Folder, Execute the saved procedures additionally)) :
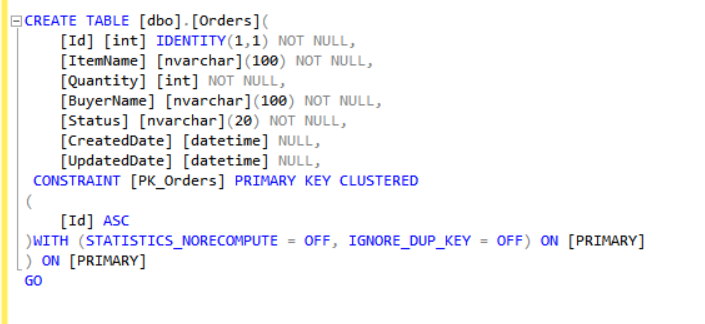
On this desk, The “ItemName“, “Amount” and “BuyerName” will get inserted when purchaser creates an order and the “standing” will probably be saved as “Draft”.
When provider supplies a response, we simply replace the standing subject with both “Accepted” or “Rejected“, based mostly on the provider enter.
Create Azure Operate App in Visual Studio and title it as “OrderProcessingFunctionApp” (Already obtainable in supply code, simply masking so if anybody desires to know),
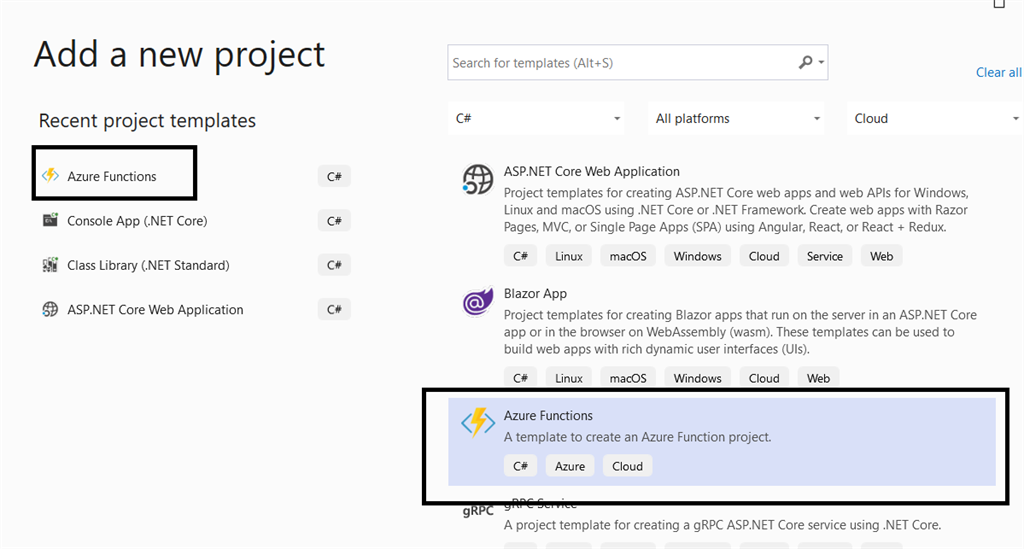
- Choose “Service Bus Queue Set off” and click on on “create”:
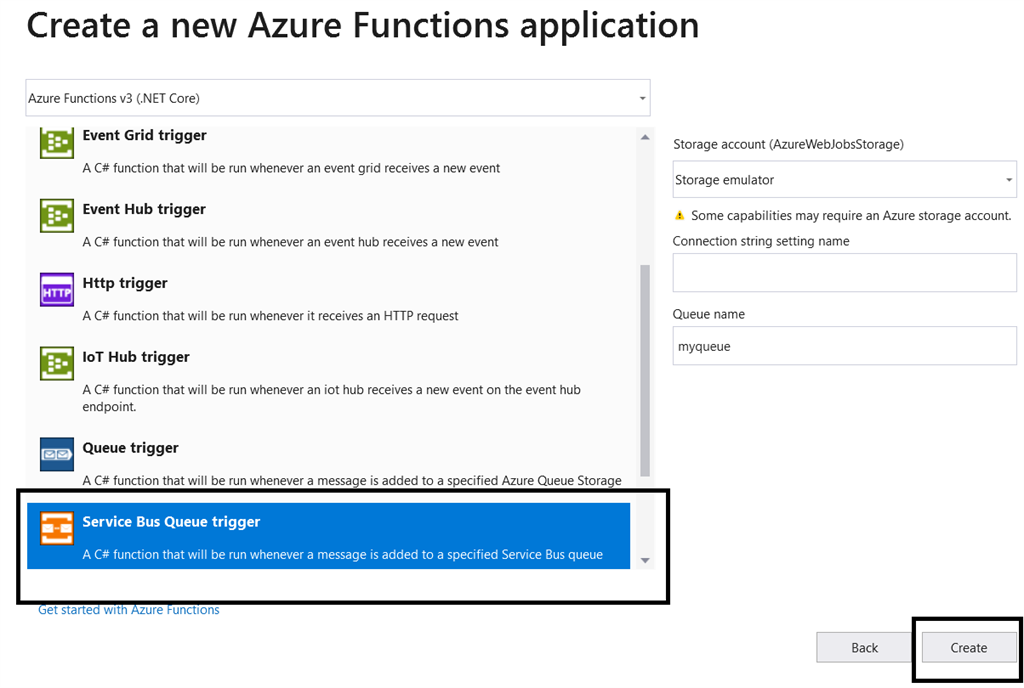
- It is going to create an Azure perform challenge in your resolution (I renamed perform.cs to ProcessOrder.cs)
- Open ProcessOrder.cs file, you’ll be able to see that we now have applied Three capabilities,
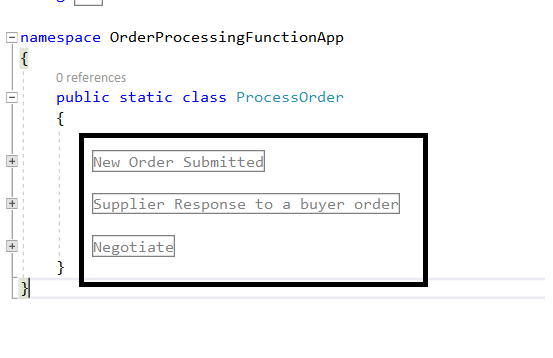
- NewOrderSubmitted – This perform will get known as at any time when a purchaser submits a brand new order utilizing purchaser internet software. So, it recieves the order particulars and we put it aside within the database and cross it to SignalR. Right here is our perform
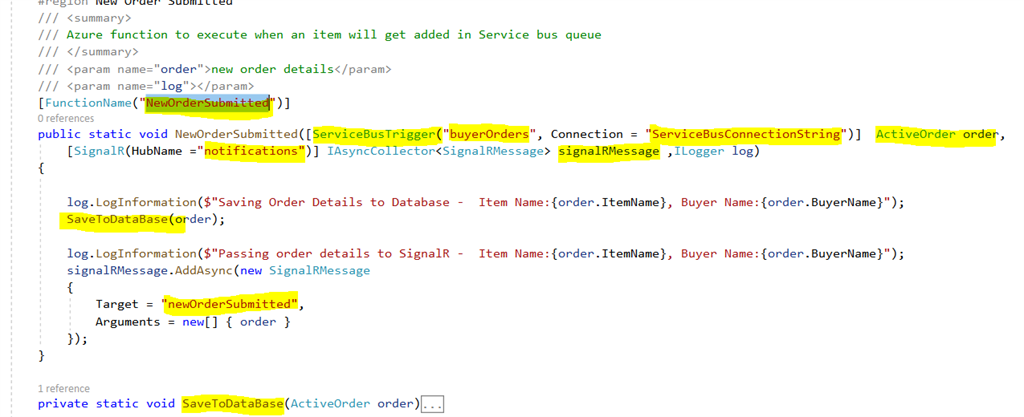
- Right here the perform title is “NewOrderSubmitted” set it in attribute “FunctionName(“NewOrderSubmitted”)“
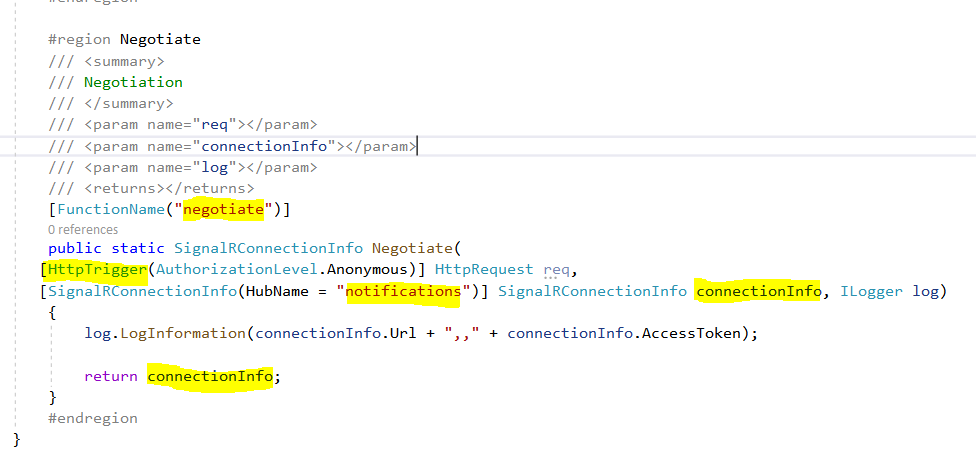
- “ServiceBusTrigger” – This perform will get triggered after we ship any knowledge/message to Service bus queue named “buyerOrders“, service bus connection string secret is “ServiceBusConnectionString” and the customer order knowledge is available in parameter order of dataType “ActiveOrder“.
- SignalR hub title is “notifications”, we are going to use it in purchaser software (In startup.cs file) later.
- SaveToDatabase – Operate which saves the brand new order particulars into database
- SignalRMessage – Message which we will probably be sending to signalR
- Goal – It’s the title of the shopper motion, which is registerted to SignalR, in our case its a Provider software web page. All these shoppers will get notified {that a} new order has been added into system
- Arguments – The info which we have to ship to sign R, in our case it is order particulars
- SupplierResponse – This perform will get triggered when Provider accepts/rejects purchaser order. So we are going to notify to purchaser that your order is accepted or rejected.
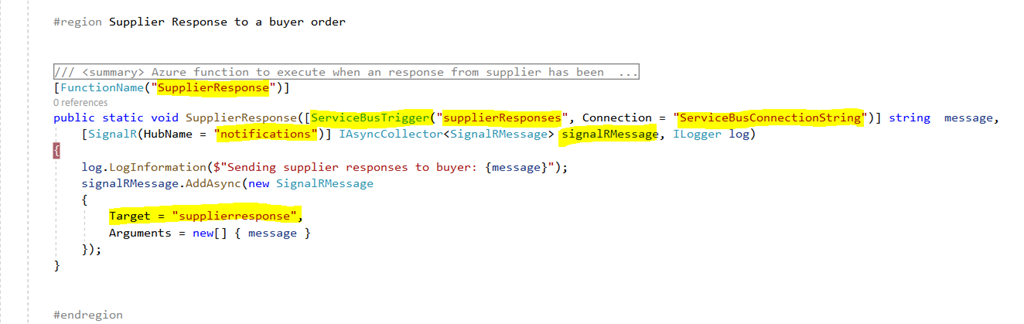
- Right here the perform title is “SupplierResponse” set it in attribute “FunctionName(“SupplierResponse“)”
- “ServiceBusTrigger” – This perform will get triggered after we ship any knowledge/message to Service bus queue title “supplierResponse“, service bus connection string secret is “ServiceBusConnectionString” and the message is available in parameter of dataType “string“.
- SignalR hub title is notifications
- SignalRMessage – Message which we will probably be sending to signalR
- Goal – It’s the title of the shopper motion, which is registerted to SignalR, in our case its a Purchaser software web page. Purchaser will get notified that provider both accepted or rejected his order.
- Arguments – The info which we have to ship to sign R, in our case its a string message containing Accepted/Rejected element
- Negotiate : This may discuss to Azure SignalR service and supply a API key that will probably be utilized in additional communication in sending messages.
- Deploy Azure perform software on Azure:
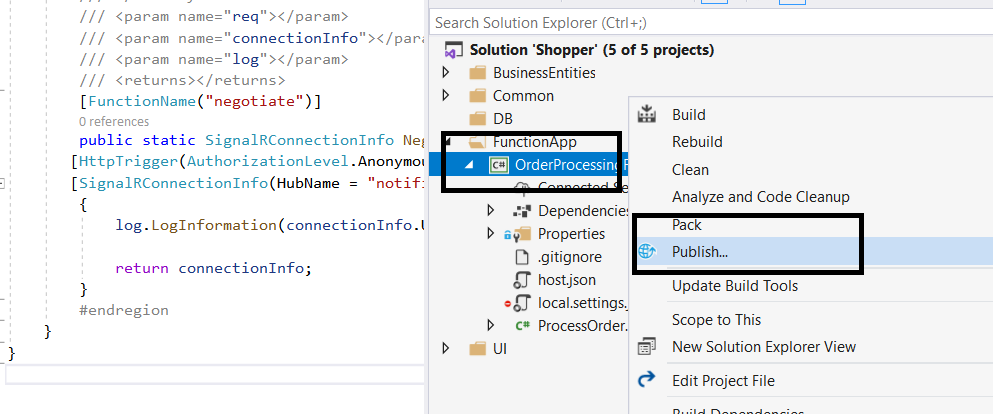
- Proper click on on perform app challenge and click on on Publish
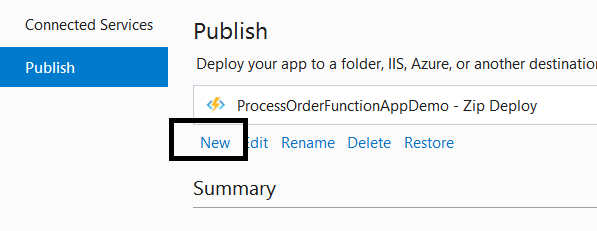
- It is going to open a publish wizard, Click on on New:
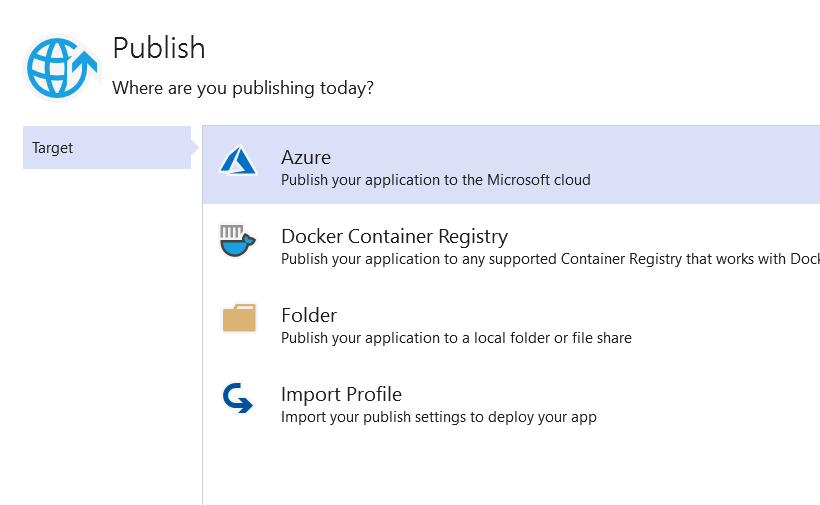
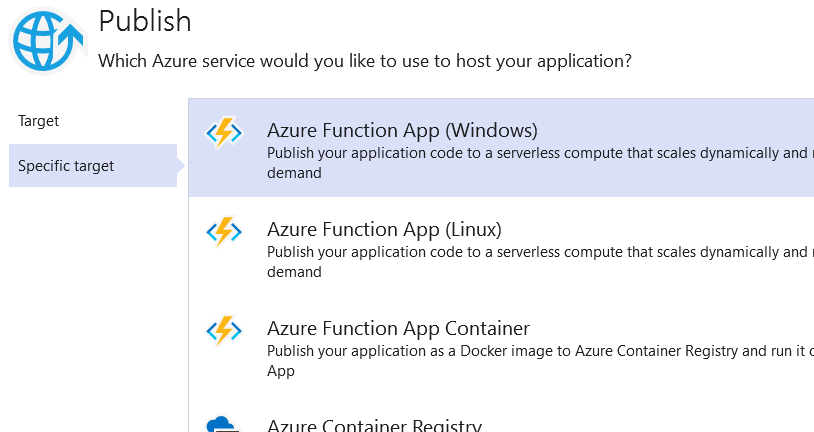
- Choose goal as Azure:
- Particular Goal as Azure Operate App (Home windows):
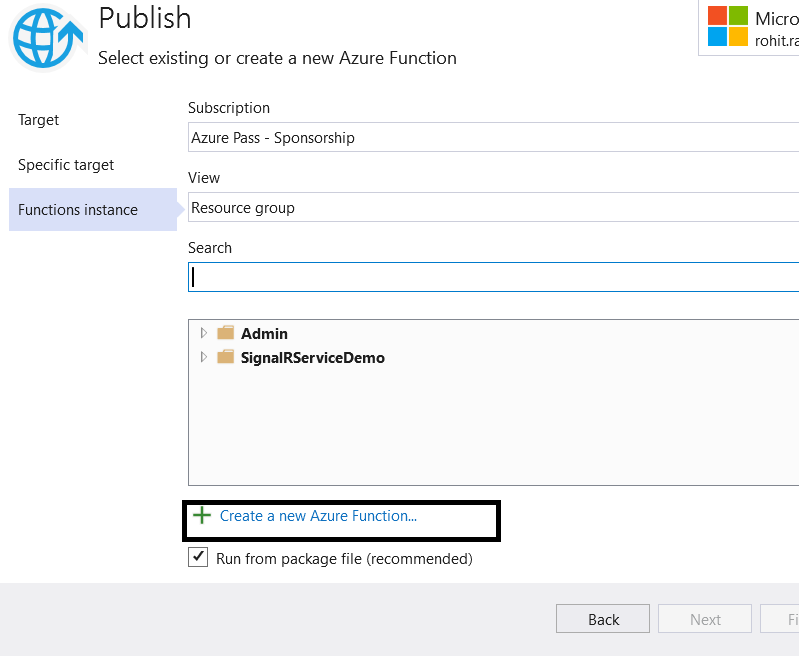
- Click on on “Create a brand new azure perform“:
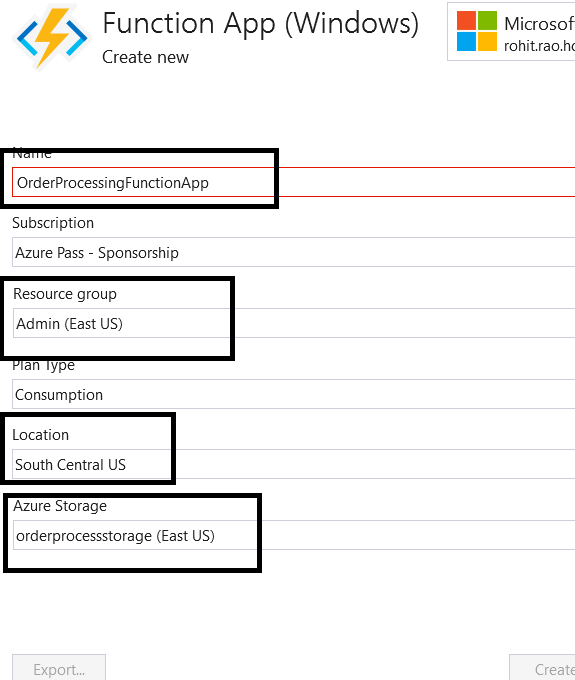
- Present Title, Useful resource Group, Location and so on and click on on Create:
- Click on on End on mother or father window.
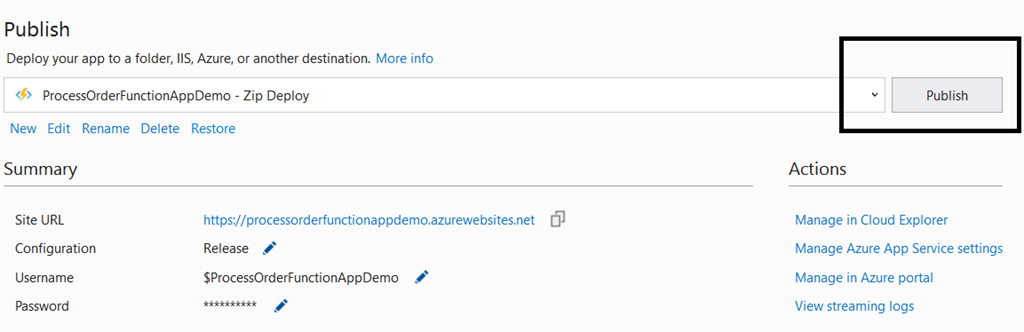
- Click on on Publish to deploy it on Azure :
- After Deployment, your Operate app will probably be obtainable on Azure in your useful resource group:
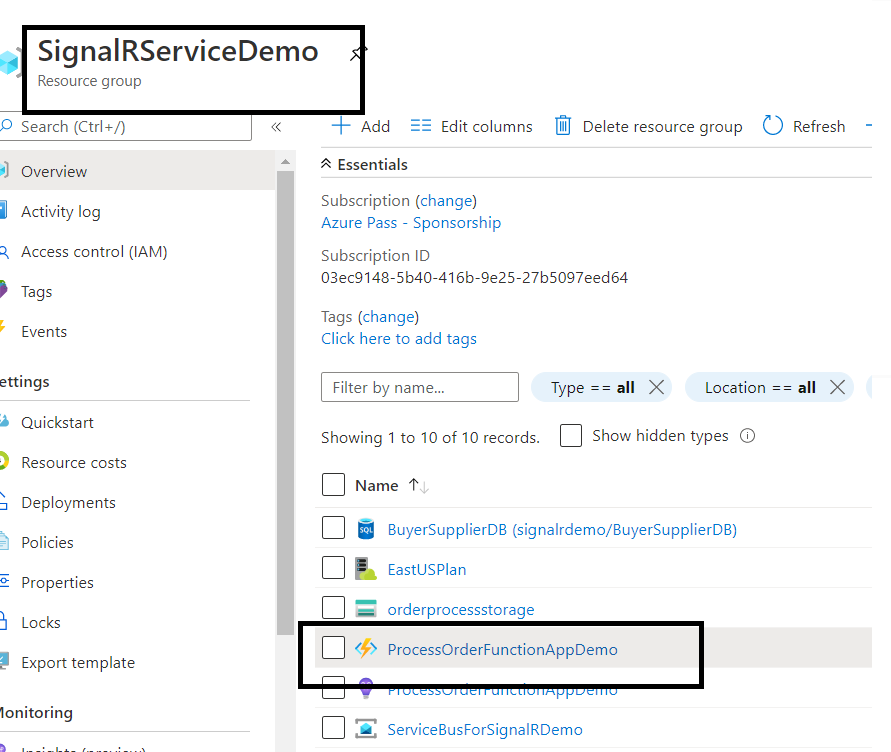
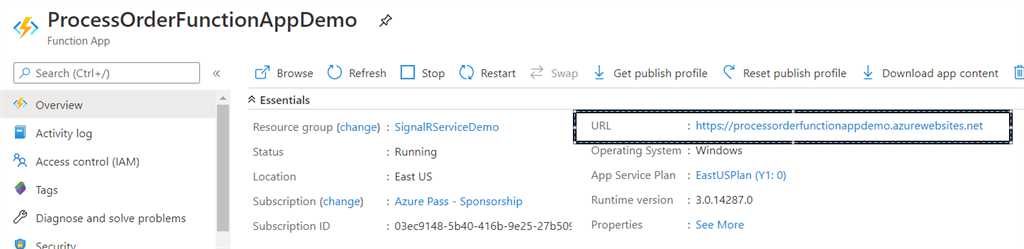
- Click on in your perform app, Examine the URL, we are going to use it in our purchaser and provider purposes (in doc.prepared() occasion on UI)
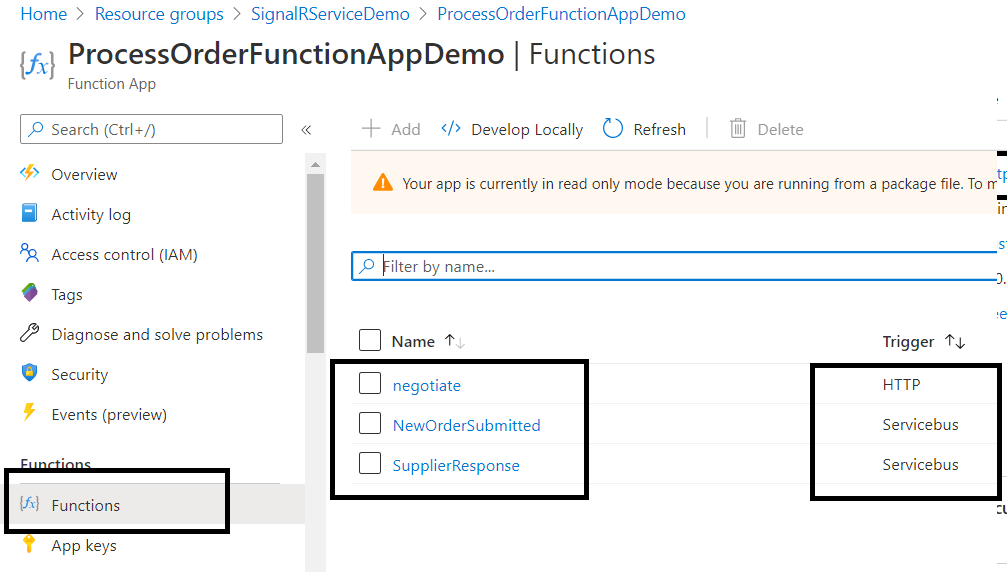
- Click on on the Features on left to get all three capabilities we created in perform app:
- Setting Connection String in Operate App for ServiceBus, SignalR and SQL database
- Open portal.azure.com and go to your Useful resource Group. We have to get the connection info of the under marked sources:
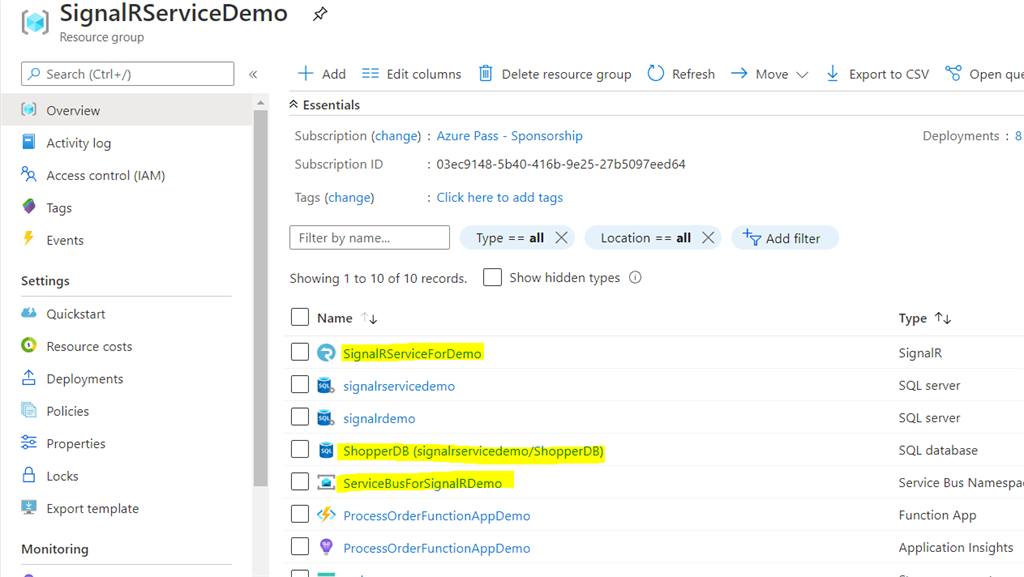
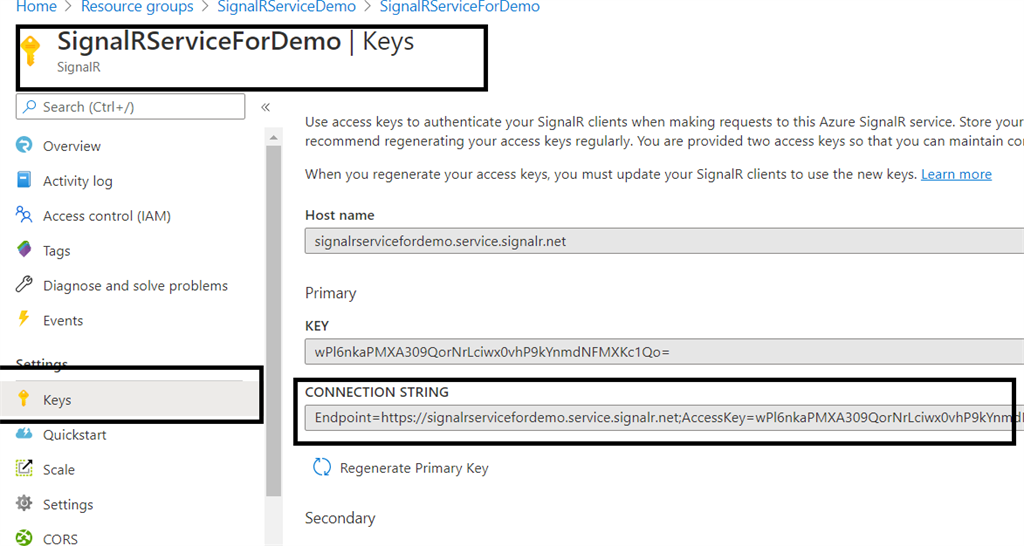
- Get the connection string of SignalR Service. Copy the under Connection String and duplicate it in a single notepad file (We’ll use it later):
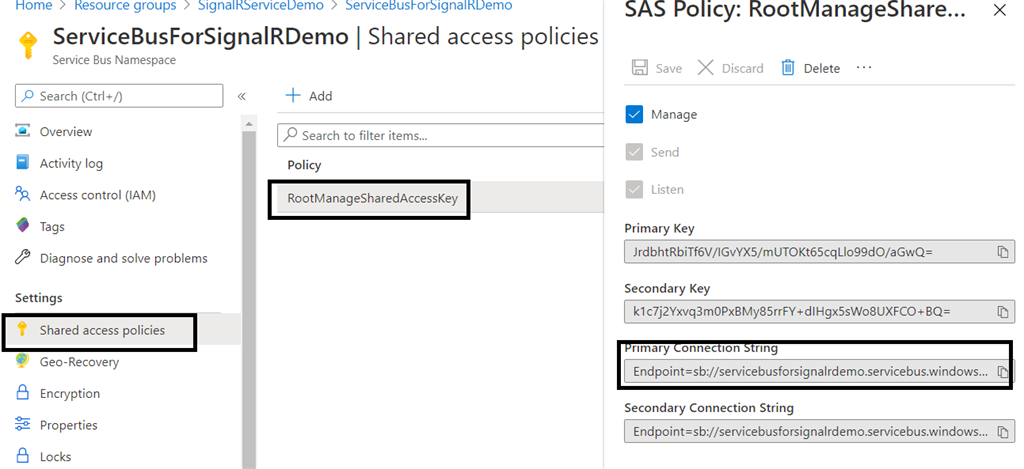
- Get the connection string of Service Bus. Copy the worth og Main connection string(proper), and hold it in notepad
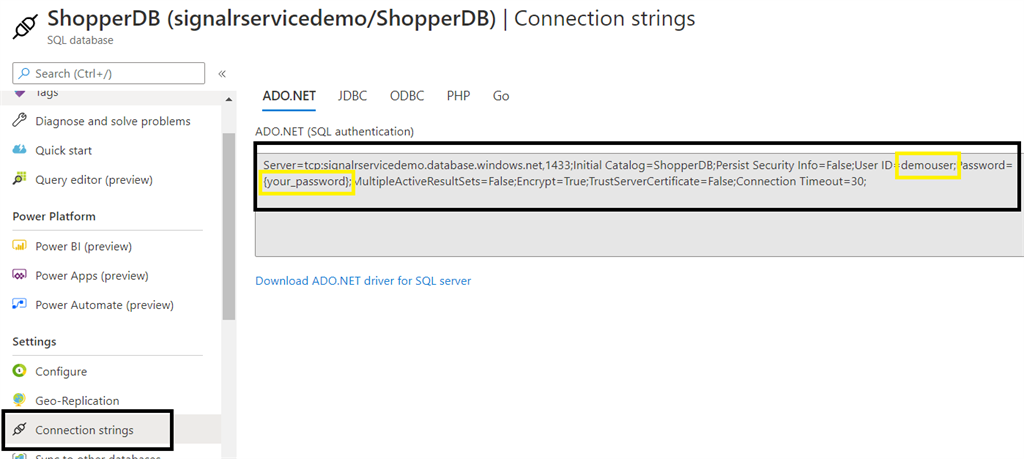
- Get the SQL connection string and keept it in notepad:
- Go to your Azure perform and add new software settings as under (Set the respecticve values for these settings you copied from earlier Three steps):
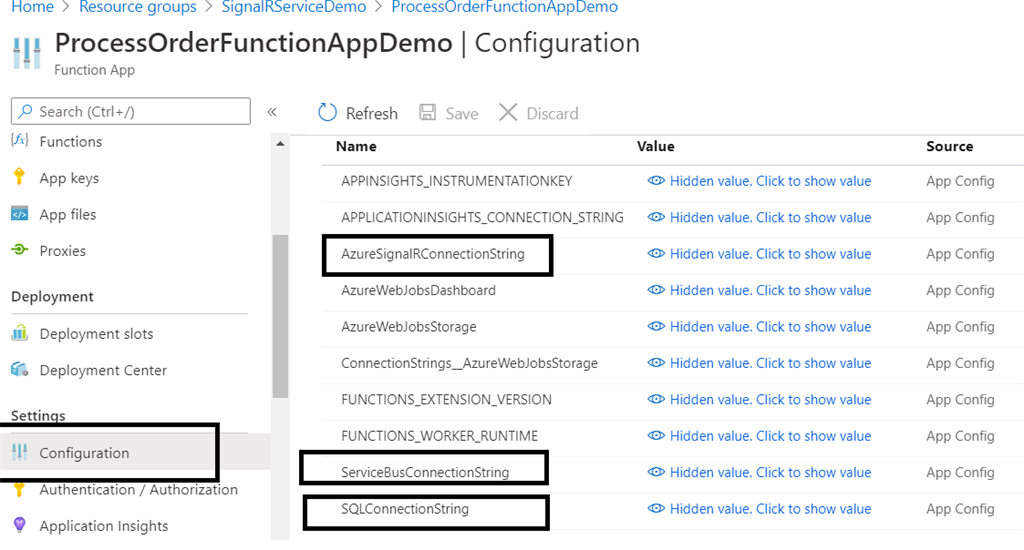
- Go to your Azure perform and add connection string for Service Bus (In earlier step we added it as software setting), as under:

Internet software (Purchaser and Provider)
- Setup Purchaser software (Razor Varieties)
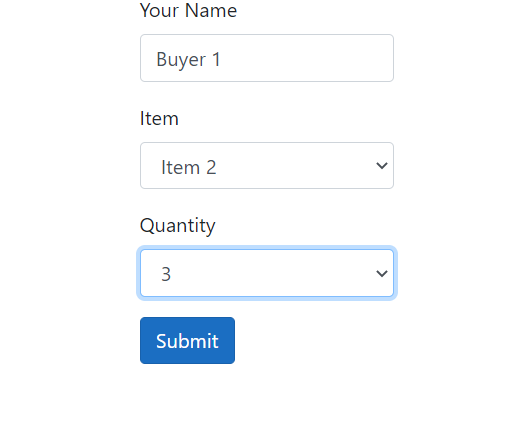
- UI of purchaser software. We’ve got three fields, Purchaser Title, Merchandise and Quanity, on Click on of submit this info will probably be going to Service Bus. The Service bus will set off the Azure perform, the place we’re saving it into database and sending the message to SignalR hub, so sign hub will ship out the notification to all of the linked shoppers (Provider software):
- If you happen to look the Purchaser.cshtml web page, you’ll discover code block under:
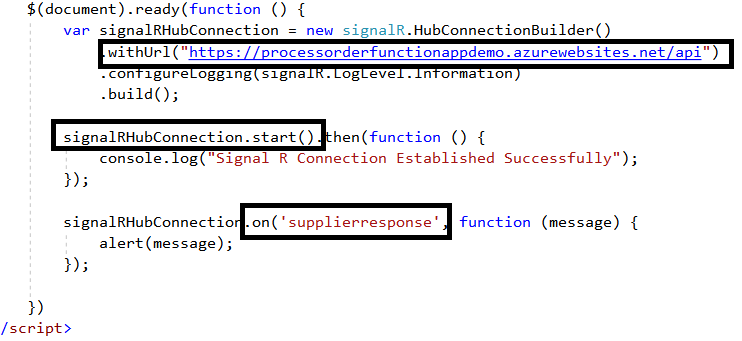
- withUrl – We’re creating SignalR connection utilizing your perform app URL. That is your perform app URL.
- signalRHubConnection.begin() – It is going to execute when SignalR connection is created
- signeRHubConnection.on(‘supplierResponses’, – It’s the goal which we setup in out perform app capabilities, So, when provider present response, the SignalR will get the message and appears for shoppers registered with ‘supplierResponses’ as goal. So, all these shoppers will get notified. In our logic, purchaser will get notified.
- If you happen to take a look at the Purchaser.cshtml.cs file, here’s what we’re doing on submit button click on:
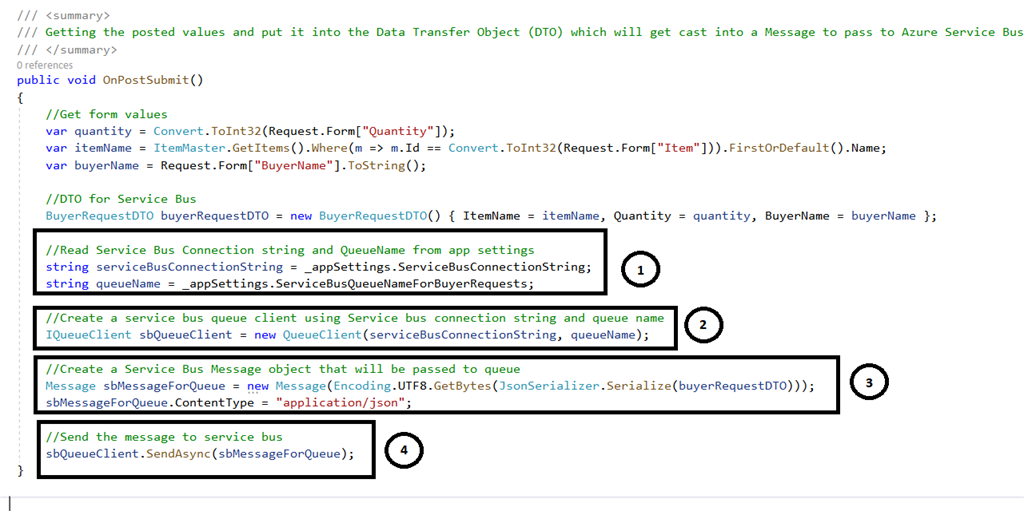
- 1. We’re studying Service Bus Connection String and Queue Title from apsettings.json (It’s copied from Azure Service bus):
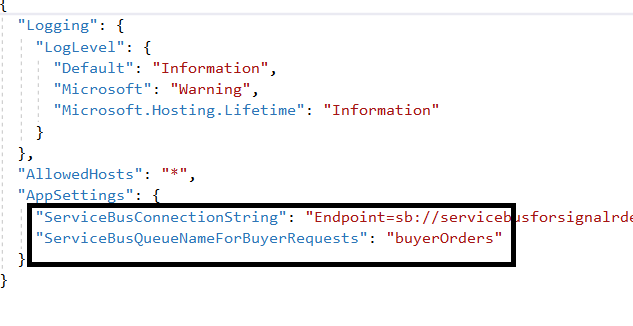
- 2. Making a queue shopper, utilizing the Service bus connection string and Queue title.
- 3. Making a message for Service bus with purchaser order particulars
- 4. Sending knowledge to Service Bus
- Service bus queue will set off our NewOrderSubmitted Azure Operate
- That perform will save the information on to database and cross the article to Sign R service
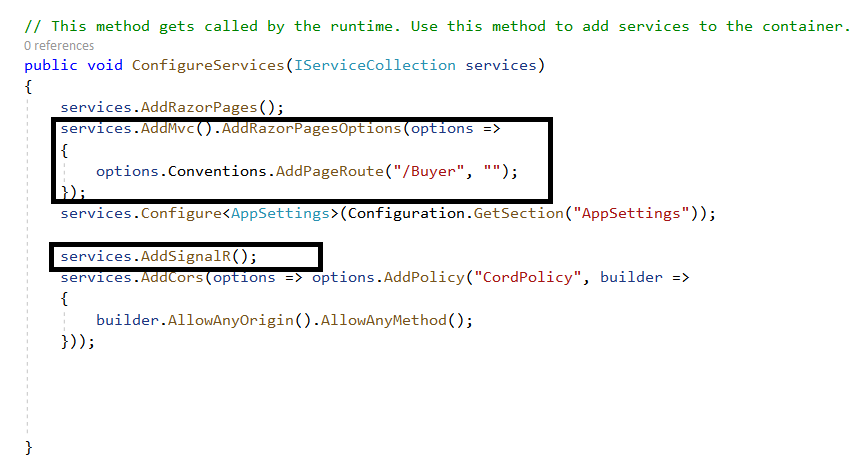
- Startup.cs file. We’ve got configured the SignalR and the default web page as Purchaser:
- Setup provider software (MVC)
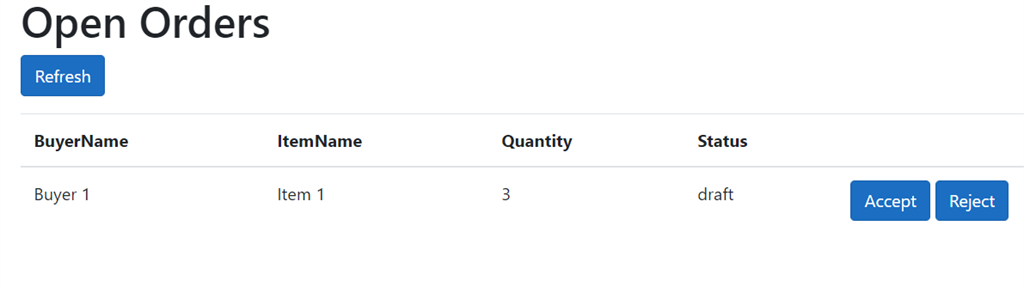
- UI of provider software. We’ve got a desk, the place we are going to present all the customer orders, and provider can both settle for or reject the order. There’s a refresh button which provider will click on, when he’ll get notification for brand new orders added within the system,
- If you happen to look in Views/Provider/index.cshtml file, you’ll be able to see that if has certain a few occasions:
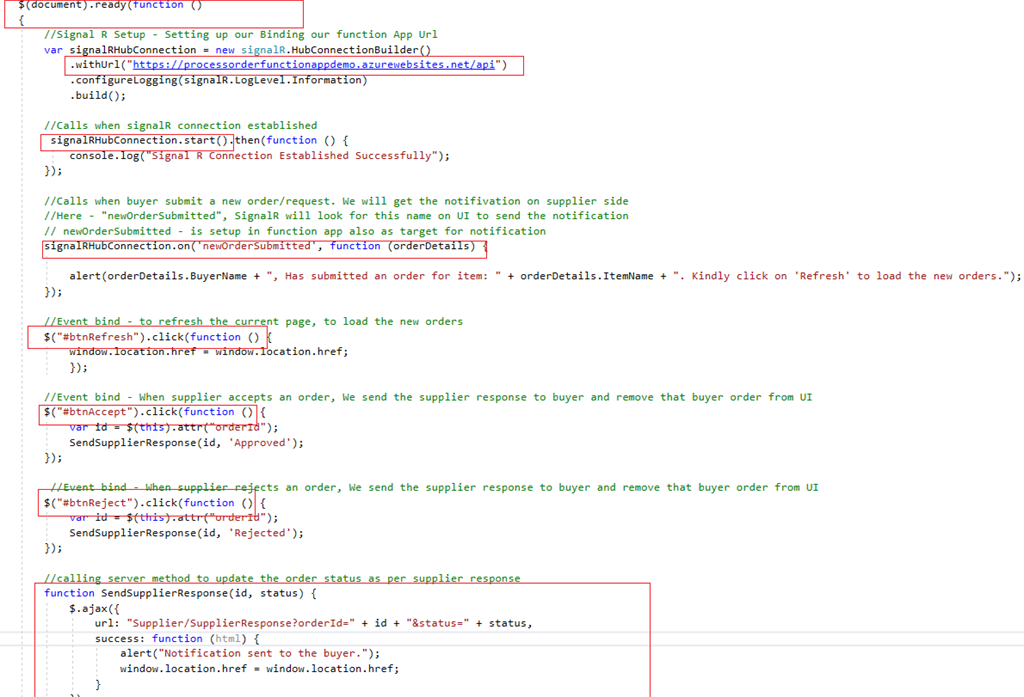
- In doc.prepared occasion on shopper facet, we’re setting the signalR hub connection by passing the url of azure perform app.
- When signalR hub connection initializes, we log that in browser console.
- signalRHubConnection.on(‘newOrderSubmitted’, perform (orderDetails) – This may execute after we cross message to signalR and the goal is ready to newOrderSubmitted. In our code, it’s used at azure perform app [FunctionName(“NewOrderSubmitted”)]
- #btnRefresh click on occasion – It simply reloads the present web page so we are able to load different new orders
- #btnAccept and #btnReject click on occasion – It calls one methodology laid out in “Controll/SupplierController.cs”, which updates the standing of the order and passes a message to service bus queue “supplierresponses”, which triggers the Azure perform [FunctionName(“SupplierResponse”)], and from this perform we ship a message to SiganlR service, which is able to notify all of the patrons because the taget is ready to “supplierresponse”
- If you happen to look into Controllers/SupplierController.cs, you’ll be able to see how we’re loading the information and the way we’re updating the patrons order standing:

- Provider Controller – Provider web page controller
- Motion –Index – It is going to get known as as default web page and it’ll fetch all of the energetic orders and cross that to UI
- Technique – SupplierResponse – It is going to get known as on click on of Settle for/Reject buttons and it updates the standing of order in database
- Contructs Message for Service Bus – For queue “supplierresponses”. The service bus connection string, queue title and SQL connection string, we’re studying from appsettings.json file
- Ship the message to the queue. So purchaser will get notified that order has been accepted or rejected
- These two purposes run on https domestically on port 44343 and 44322 , So, we have to permit these URLs within the CORS (Cross Origin Requests) settings of your perform app,
- Go to purchaser and provider software, proper click on and choose properties, then go to Debug
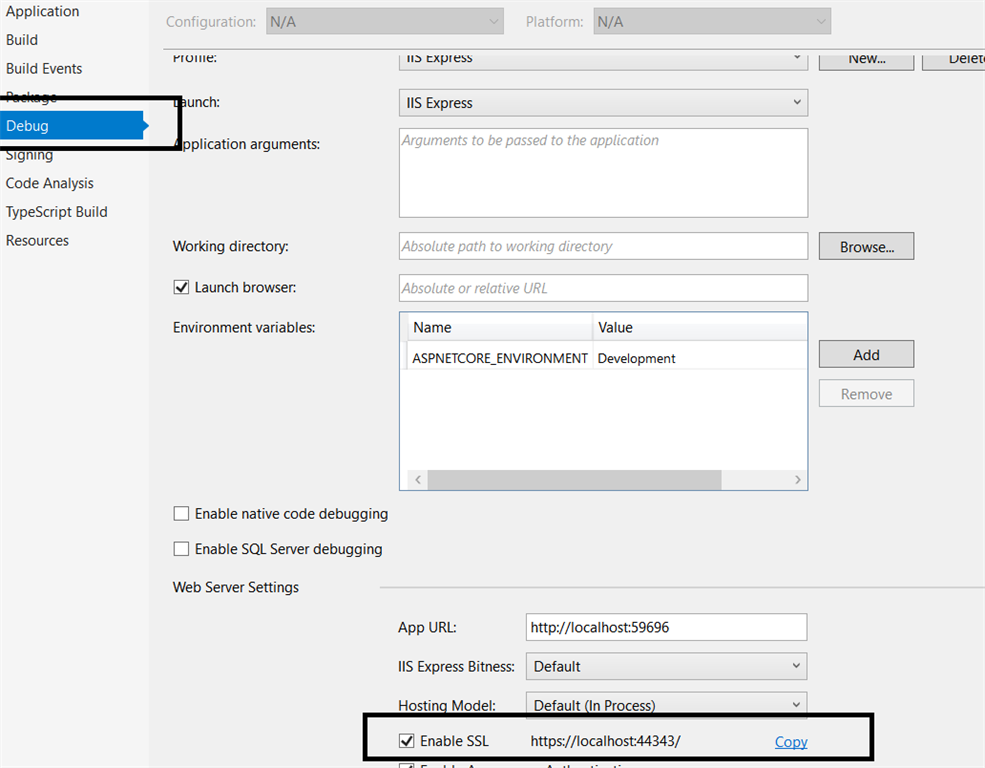
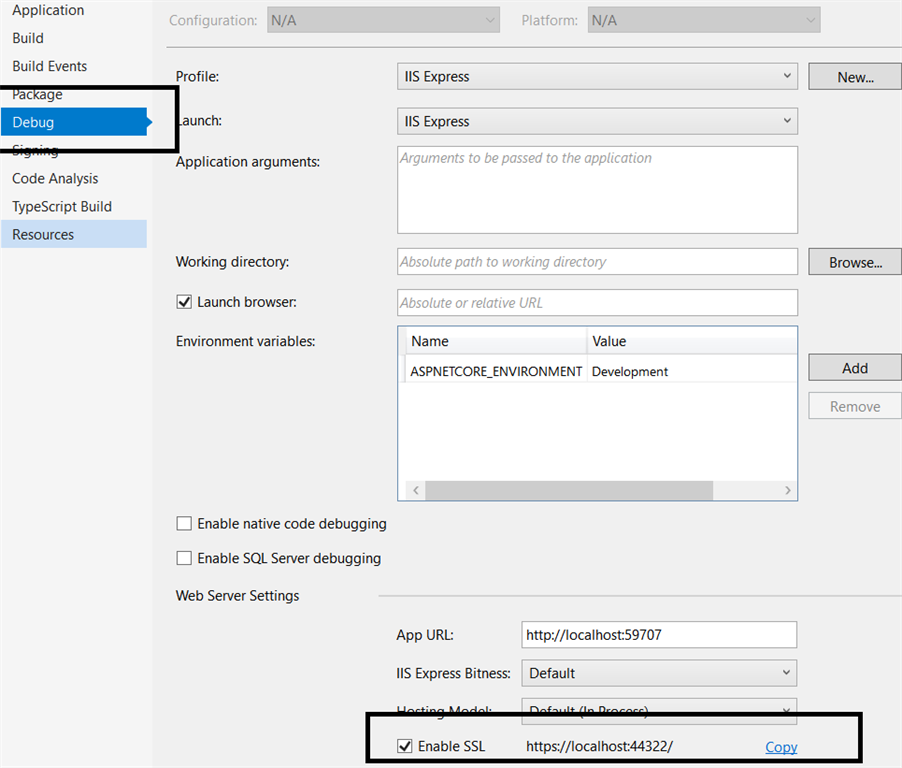
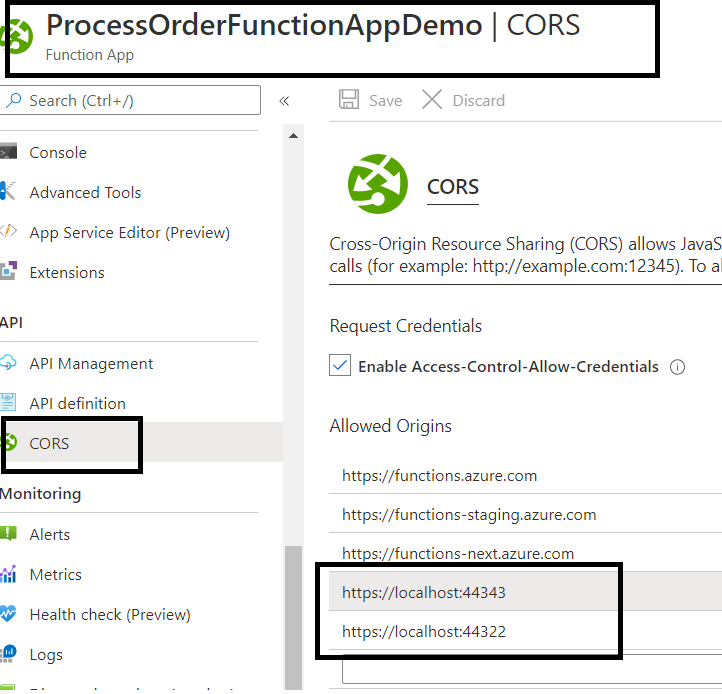
- So, the URLs, mapped with allow SSL on each the purposes, we have to add these to the CORS listing in Azure perform app as:
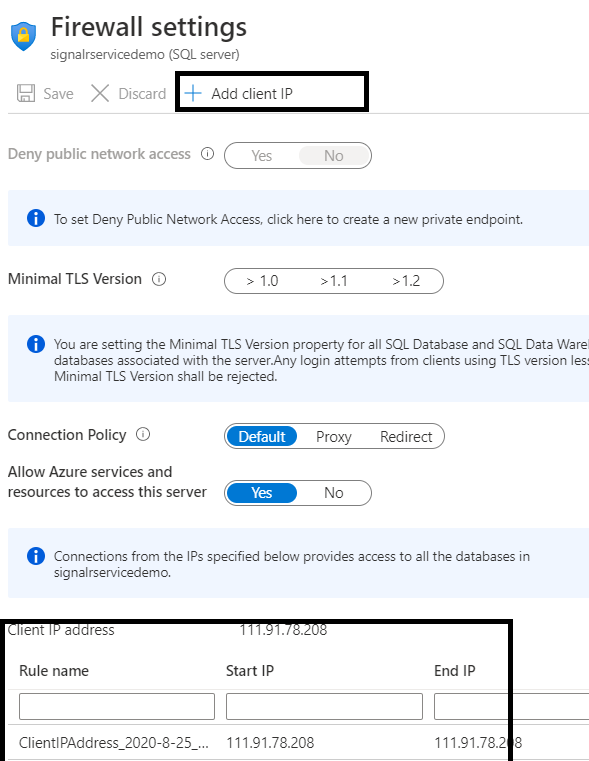
- Be aware: If you happen to get an error, whereas connecting SQL databse from native, then be sure that your native ip is allowed to attach with SQL database on Azure. Go to the SQL database on Azure and click on on Set firewall rule:
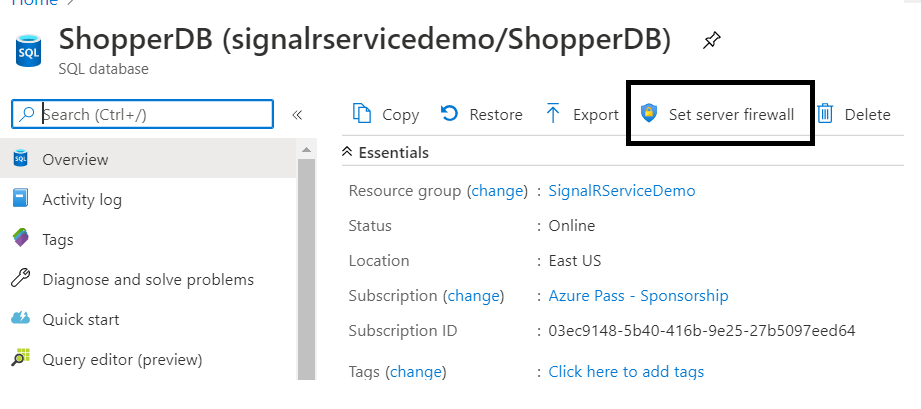
- Click on on Add shopper IP and Save:
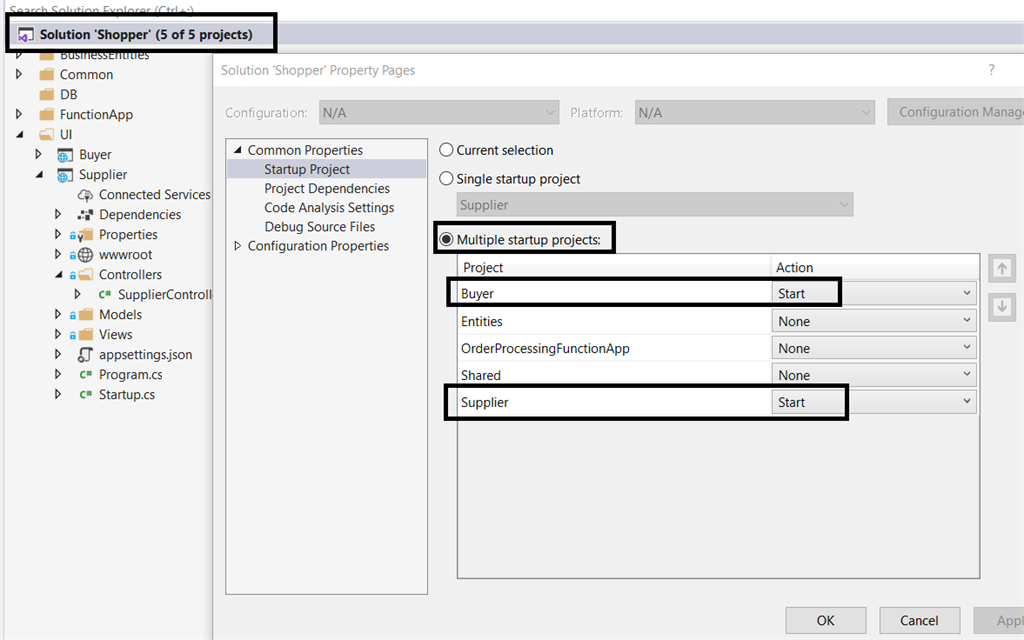
- To debug, make each the customer and provider software as startup purposes. Go to challenge resolution (left), proper click on and choose properties, then make the adjustments as proven under:
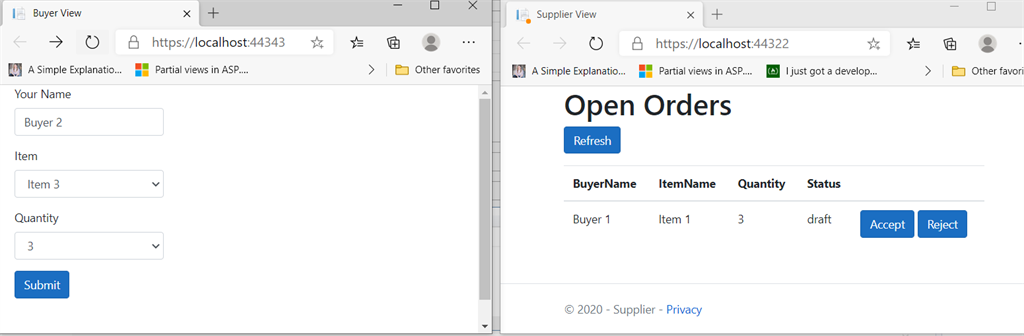
- Run the applying in visible studio, and you will notice that it’ll open two browsers, one is for purchaser view, and one is for provider view:
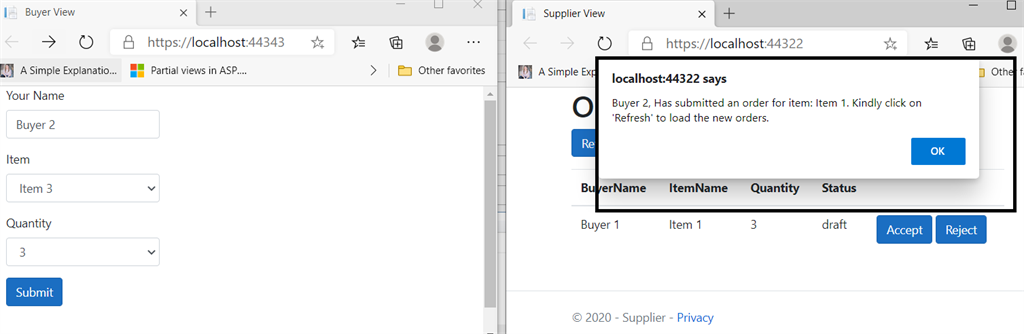
- When purchaser fills a type and clicks on submit, you will notice that provider will get notification as under:
- When provider supplies the response, by clicking on Settle for /Reject, you’ll be able to see that the customer will get notified that the provider has accepted/rejected his order:

Conclusion
We’ve got seen how we are able to use Azure SignalR service and the way we are able to combine it with different Azure companies like Service Bus and Azure Features. It is extremely a easy detailed instance the place we now have two fastened shoppers however we are able to discover extra from right here to ship the notification to single customers when we now have multi tenant purposes.


