This text discusses the Azure Redis Cache fundamentals and their implementation utilizing .NET Core Net API.
Agenda
- Introduction
- What’s a Cache?
- Forms of Cache
- Redis Cache
- Azure Redis Cache Setup
- Step-by-step Implementation
Stipulations
- Visual Studio 2022
- Azure Account
- .NET Core 6
Introduction
Caching may be very well-liked these days within the software program trade as a result of it should enhance the efficiency and scalability of the applying. We use many internet purposes like Gmail and Fb and see how responsive they’re and we’ve got an excellent consumer expertise. There are a variety of customers utilizing the web and if an utility has large community site visitors and demand, we have to maintain many issues which assist us to enhance the efficiency and responsiveness of the applying. So, due to that, there may be the answer of caching and that’s why caching comes into the image.
What’s a Cache?
The cache is the reminiscence storage that’s used to retailer the frequent entry knowledge into the non permanent storage, it should enhance the efficiency drastically and keep away from pointless database hit and retailer continuously used knowledge into the cache.
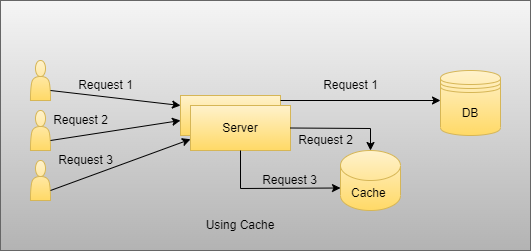
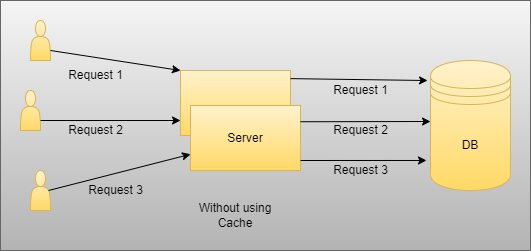
As you see within the above picture there are two situations, one is with out utilizing the cache and one other is with the cache. So right here when we don’t use the cache, in that case, suppose customers need knowledge then they are going to hit every time database and it’ll improve the time complexity and scale back efficiency in case there may be some static knowledge that customers need and it’s the similar for all customers. When we don’t use the cache, every one hits the pointless database to fetch knowledge. On the opposite facet. you possibly can see we use the cache, and in that, the case if there is identical static and the identical knowledge for all customers then solely the primary consumer will hit the database and fetch knowledge and retailer it into the cache reminiscence, after which different two customers used that from the cache with out unnecessarily hit database to fetch knowledge.
Forms of Cache
Principally, there are two kinds of caching .NET Core helps
- In-Reminiscence Caching
- Distributed Caching
After we use In-Reminiscence Cache, knowledge is saved within the utility server reminiscence; every time we want it, we fetch knowledge from that and use it wherever we want it. And in Distributed Caching there are a lot of third-party mechanisms like Redis and plenty of others. However on this part, we glance into the Redis Cache intimately and the way it works within the .NET Core
Distributed Caching
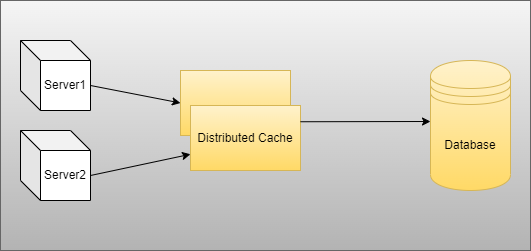
- Principally, in distributed caching knowledge are saved and shared between a number of servers
- Additionally, it’s straightforward to enhance the scalability and efficiency of the applying after managing the load between a number of servers after we use a multi-tenant utility
- Suppose, sooner or later, if one server is crashed and restarts then the applying doesn’t have any influence as a result of a number of servers are as per our want if we wish
Redis is the most well-liked cache which is utilized by many firms these days to enhance the efficiency and scalability of the applying. So, we’re going to focus on Redis and its utilization one after the other.
Redis Cache
- Redis is an Open Supply (BSD Licensed) in-memory Information Construction retailer used as a database.
- Principally, it’s used to retailer the continuously used and a few static knowledge contained in the cache and use and reserve that as per consumer requirement.
- There are a lot of knowledge buildings current within the Redis that we will use like Checklist, Set, Hashing, Stream, and plenty of extra to retailer the information.
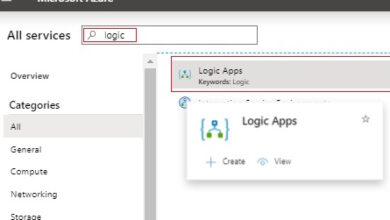
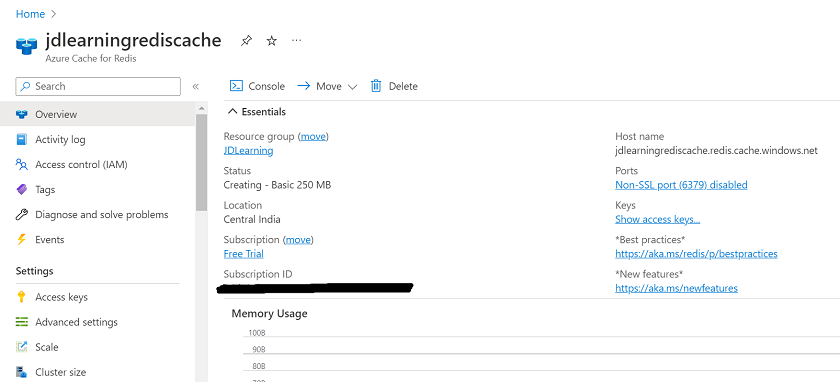
Azure Redis Cache Setup
Step 1
Log in to the Azure portal.
Step 2
Search Azure Cache for Redis within the market and open it.
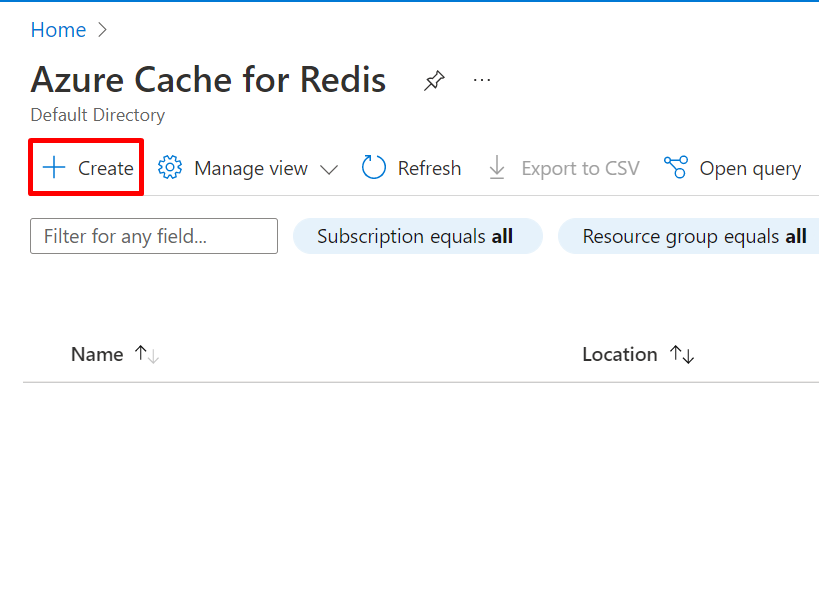
Step 3
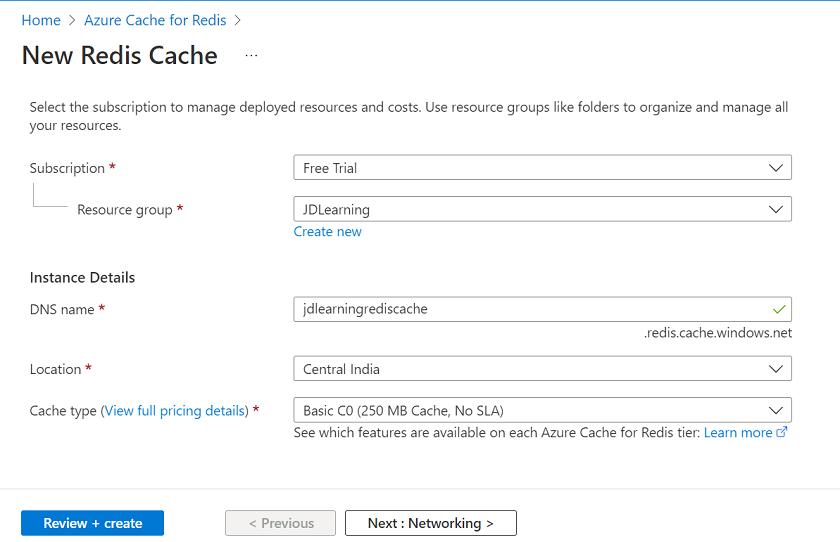
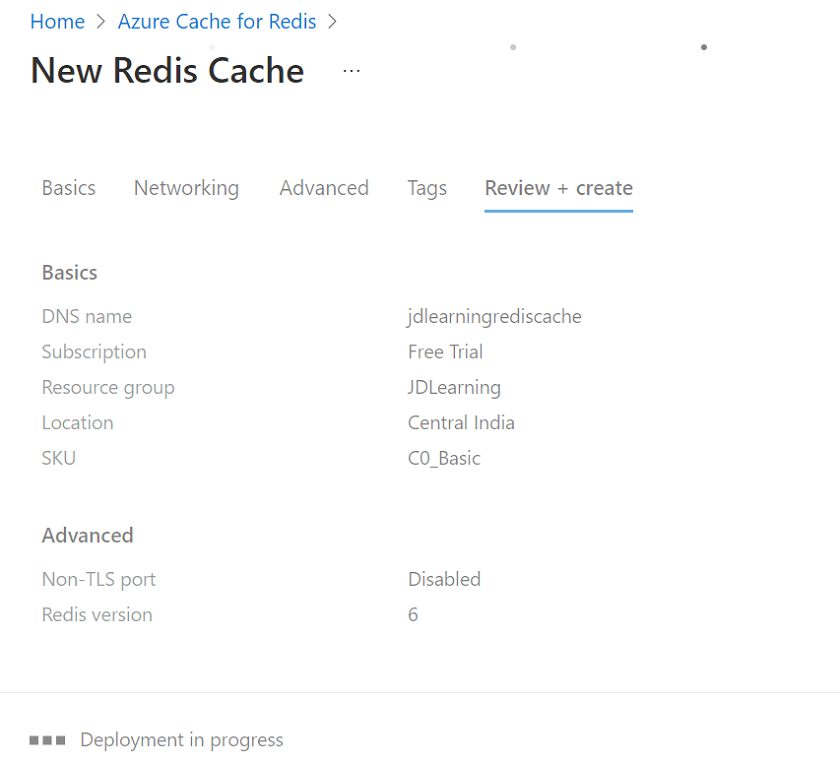
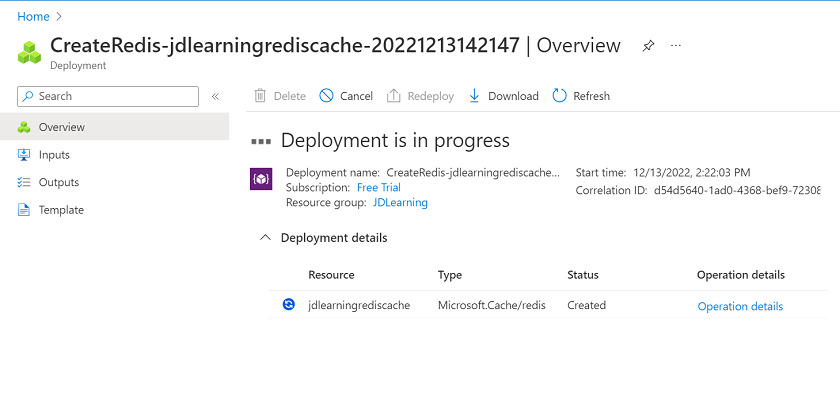
Click on on create and supply the opposite info.
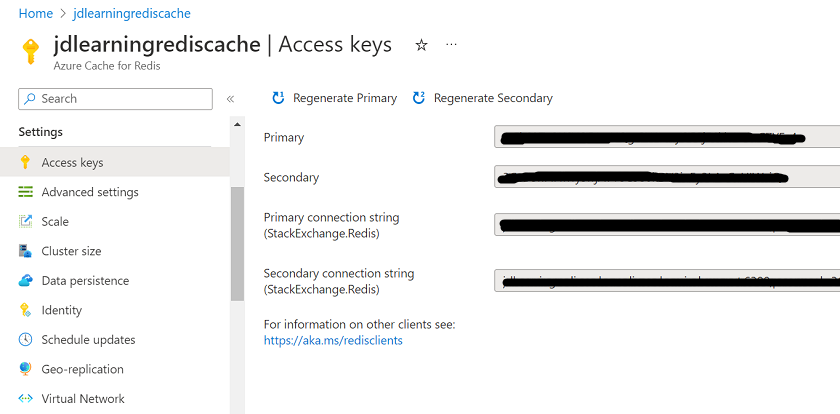
Step 4
After that go to the Entry keys part contained in the cache which we created earlier and duplicate the first connection string that we want contained in the .NET Core Net API.
Step-by-step Implementation
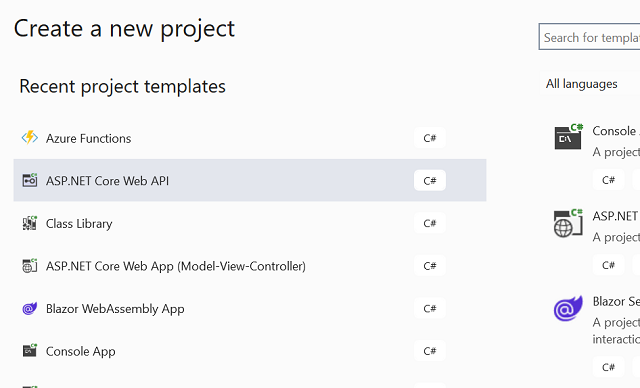
Step 1
Open the visible studio and create a brand new .NET Core Net API challenge.
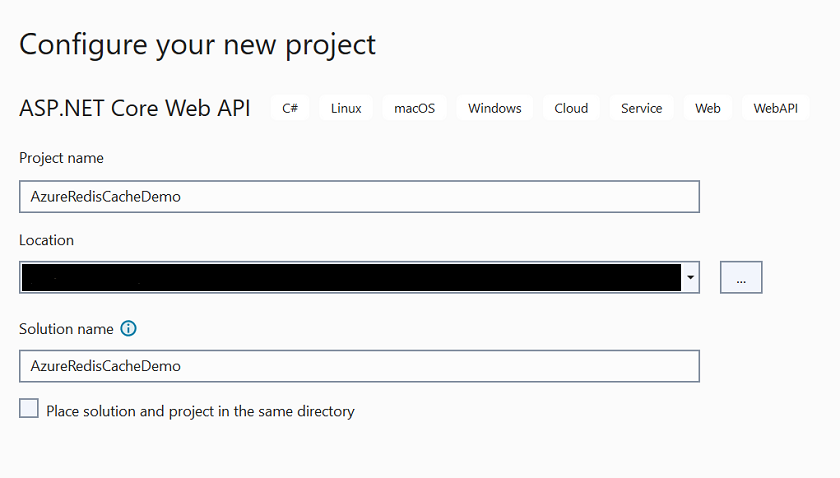
Step 2
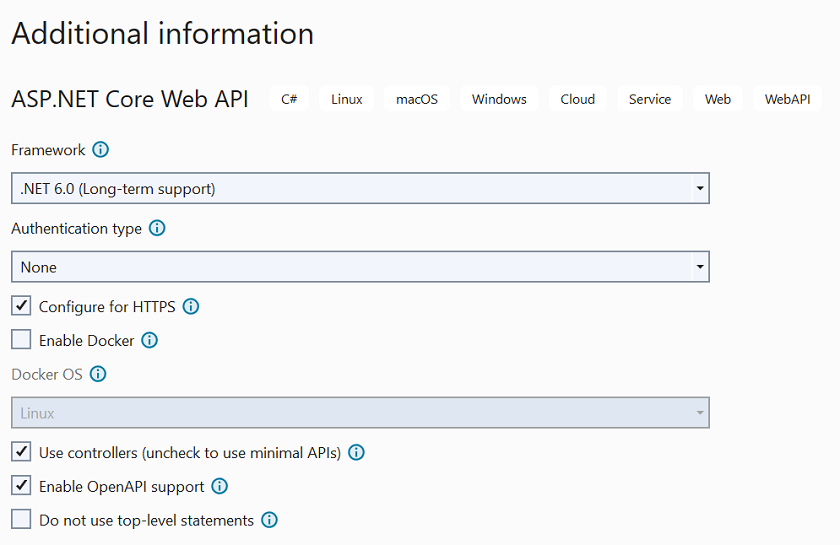
Configure a brand new challenge.
Step 3
Present further particulars.
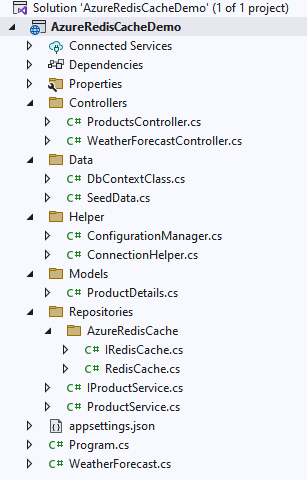
Step 4
Challenge Construction.
Step 5
Create the product particulars class.
namespace AzureRedisCacheDemo.Fashions {
    public class ProductDetails {
        public int Id {
            get;
            set;
        }
        public string ProductName {
            get;
            set;
        }
        public string ProductDescription {
            get;
            set;
        }
        public int ProductPrice {
            get;
            set;
        }
        public int ProductStock {
            get;
            set;
        }
    }
}
Step 6
Subsequent, add Db Context Class contained in the Information folder.
utilizing AzureRedisCacheDemo.Fashions;
utilizing Microsoft.EntityFrameworkCore;
utilizing Microsoft.Extensions.Internet hosting;
namespace AzureRedisCacheDemo.Information {
    public class DbContextClass: DbContext {
        public DbContextClass(DbContextOptions < DbContextClass > choices): base(choices) {}
        public DbSet < ProductDetails > Merchandise {
            get;
            set;
        }
    }
}
Step 7
After that, add the Seed Information class which we use to insert some knowledge initially.
utilizing AzureRedisCacheDemo.Fashions;
utilizing Microsoft.EntityFrameworkCore;

namespace AzureRedisCacheDemo.Information
{
    public class SeedData
    {
        public static void Initialize(IServiceProvider serviceProvider)
        {
            utilizing (var context = new DbContextClass(
                serviceProvider.GetRequiredService<DbContextOptions<DbContextClass>>()))
            {
                if (context.Merchandise.Any())
                {
                    return;
                }

                context.Merchandise.AddRange(
                    new ProductDetails
                    {
                        Id = 1,
                        ProductName = "IPhone",
                        ProductDescription = "IPhone 14",
                        ProductPrice = 120000,
                        ProductStock = 100
                    },
                    new ProductDetails
                    {
                        Id = 2,
                        ProductName = "Samsung TV",
                        ProductDescription = "Good TV",
                        ProductPrice = 400000,
                        ProductStock = 120
                    });
                context.SaveChanges();
            }
        }
    }
}
Step 8
Configure the Azure Redis Cache connection string contained in the appsettings.json file.
{
  "Logging": {
    "LogLevel": {
      "Default": "Data",
      "Microsoft.AspNetCore": "Warning"
    }
  },
  "AllowedHosts": "*",
  "RedisURL": "<valuefromportal>"
}
Step 9
Create Configuration Supervisor and Connection Helper class contained in the Helper folder which we use for connection functions.
Configuration Supervisor
namespace AzureRedisCacheDemo.Helper {
    static class ConfigurationManager {
        public static IConfiguration AppSetting {
            get;
        }
        static ConfigurationManager() {
            AppSetting = new ConfigurationBuilder().SetBasePath(Listing.GetCurrentDirectory()).AddJsonFile("appsettings.json").Construct();
        }
    }
}
Connection Helper
utilizing StackExchange.Redis;
namespace AzureRedisCacheDemo.Helper {
    public class ConnectionHelper {
        static ConnectionHelper() {
            ConnectionHelper.lazyConnection = new Lazy < ConnectionMultiplexer > (() => {
                return ConnectionMultiplexer.Join(ConfigurationManager.AppSetting["RedisURL"]);
            });
        }
        non-public static Lazy < ConnectionMultiplexer > lazyConnection;
        public static ConnectionMultiplexer Connection {
            get {
                return lazyConnection.Worth;
            }
        }
    }
}
Step 10
Subsequent, add IProductService contained in the Repositories.
utilizing AzureRedisCacheDemo.Fashions;
namespace AzureRedisCacheDemo.Repositories {
    public interface IProductService {
        public Job < Checklist < ProductDetails >> ProductListAsync();
        public Job < ProductDetails > GetProductDetailByIdAsync(int productId);
        public Job < bool > AddProductAsync(ProductDetails productDetails);
        public Job < bool > UpdateProductAsync(ProductDetails productDetails);
        public Job < bool > DeleteProductAsync(int productId);
    }
}
Step 11
Subsequent, create ProductService class and implement the IProductService interface inside that.
utilizing AzureRedisCacheDemo.Information;
utilizing AzureRedisCacheDemo.Fashions;
utilizing Microsoft.EntityFrameworkCore;
utilizing System.Linq;
namespace AzureRedisCacheDemo.Repositories {
    public class ProductService: IProductService {
        non-public readonly DbContextClass dbContextClass;
        public ProductService(DbContextClass dbContextClass) {
            this.dbContextClass = dbContextClass;
        }
        public async Job < Checklist < ProductDetails >> ProductListAsync() {
            return await dbContextClass.Merchandise.ToListAsync();
        }
        public async Job < ProductDetails > GetProductDetailByIdAsync(int productId) {
            return await dbContextClass.Merchandise.The place(ele => ele.Id == productId).FirstOrDefaultAsync();
        }
        public async Job < bool > AddProductAsync(ProductDetails productDetails) {
            await dbContextClass.Merchandise.AddAsync(productDetails);
            var outcome = await dbContextClass.SaveChangesAsync();
            if (outcome > 0) {
                return true;
            } else {
                return false;
            }
        }
        public async Job < bool > UpdateProductAsync(ProductDetails productDetails) {
            var isProduct = ProductDetailsExists(productDetails.Id);
            if (isProduct) {
                dbContextClass.Merchandise.Replace(productDetails);
                var outcome = await dbContextClass.SaveChangesAsync();
                if (outcome > 0) {
                    return true;
                } else {
                    return false;
                }
            }
            return false;
        }
        public async Job < bool > DeleteProductAsync(int productId) {
            var findProductData = dbContextClass.Merchandise.The place(_ => _.Id == productId).FirstOrDefault();
            if (findProductData != null) {
                dbContextClass.Merchandise.Take away(findProductData);
                var outcome = await dbContextClass.SaveChangesAsync();
                if (outcome > 0) {
                    return true;
                } else {
                    return false;
                }
            }
            return false;
        }
        non-public bool ProductDetailsExists(int productId) {
            return dbContextClass.Merchandise.Any(e => e.Id == productId);
        }
    }
}
Step 12
Create an IRedisCache interface.
namespace AzureRedisCacheDemo.Repositories.AzureRedisCache {
    public interface IRedisCache {
        T GetCacheData < T > (string key);
        bool SetCacheData < T > (string key, T worth, DateTimeOffset expirationTime);
        object RemoveData(string key);
    }
}
Step 13
After that, create a RedisCache class and implement the interface technique inside that which we created earlier.
utilizing AzureRedisCacheDemo.Helper;
utilizing Newtonsoft.Json;
utilizing StackExchange.Redis;

namespace AzureRedisCacheDemo.Repositories.AzureRedisCache
{
    public class RedisCache : IRedisCache
    {
        non-public IDatabase _db;
        public RedisCache()
        {
            ConfigureRedis();
        }

        non-public void ConfigureRedis()
        {
            _db = ConnectionHelper.Connection.GetDatabase();
        }

        public T GetCacheData<T>(string key)
        {
            var worth = _db.StringGet(key);
            if (!string.IsNullOrEmpty(worth))
            {
                return JsonConvert.DeserializeObject<T>(worth);
            }
            return default;
        }

        public object RemoveData(string key)
        {
            bool _isKeyExist = _db.KeyExists(key);
            if (_isKeyExist == true)
            {
                return _db.KeyDelete(key);
            }
            return false;
        }

        public bool SetCacheData<T>(string key, T worth, DateTimeOffset expirationTime)
        {
            TimeSpan expiryTime = expirationTime.DateTime.Subtract(DateTime.Now);
            var isSet = _db.StringSet(key, JsonConvert.SerializeObject(worth), expiryTime);
            return isSet;
        }
    }
}
Step 14
Create a brand new Merchandise Controller.
utilizing AzureRedisCacheDemo.Fashions;
utilizing AzureRedisCacheDemo.Repositories;
utilizing AzureRedisCacheDemo.Repositories.AzureRedisCache;
utilizing Microsoft.AspNetCore.Mvc;
utilizing System.Collections.Generic;

namespace AzureRedisCacheDemo.Controllers
{
    [Route("api/[controller]")]
    [ApiController]
    public class ProductsController : ControllerBase
    {
        non-public readonly IProductService _productService;
        non-public readonly IRedisCache _redisCache;

        public ProductsController(IProductService productService, IRedisCache redisCache)
        {
            _productService = productService;
            _redisCache = redisCache;
        }

        /// <abstract>
        /// Product Checklist
        /// </abstract>
        /// <returns></returns>
        [HttpGet]
        public async Job<ActionResult<Checklist<ProductDetails>>> ProductListAsync()
        {
            var cacheData = _redisCache.GetCacheData<Checklist<ProductDetails>>("product");
            if (cacheData != null)
            {
                return new Checklist<ProductDetails>(cacheData);
            }

            var productList = await _productService.ProductListAsync();
            if(productList != null)
            {
                var expirationTime = DateTimeOffset.Now.AddMinutes(5.0);
                _redisCache.SetCacheData<Checklist<ProductDetails>>("product", productList, expirationTime);
                return Okay(productList);
            }
            else
            {
                return NoContent();
            }
        }

        /// <abstract>
        /// Get Product By Id
        /// </abstract>
        /// <param title="productId"></param>
        /// <returns></returns>
        [HttpGet("{productId}")]
        public async Job<ActionResult<ProductDetails>> GetProductDetailsByIdAsync(int productId)
        {
            var cacheData = _redisCache.GetCacheData<Checklist<ProductDetails>>("product");
            if (cacheData != null)
            {
                ProductDetails filteredData = cacheData.The place(x => x.Id == productId).FirstOrDefault();
                return new ActionResult<ProductDetails>(filteredData);
            }

            var productDetails = await _productService.GetProductDetailByIdAsync(productId);
            if(productDetails != null)
            {
                return Okay(productDetails);
            }
            else
            {
                return NotFound();
            }
        }

        /// <abstract>
        /// Add a brand new product
        /// </abstract>
        /// <param title="productDetails"></param>
        /// <returns></returns>
        [HttpPost]
        public async Job<IActionResult> AddProductAsync(ProductDetails productDetails)
        {
            var isProductInserted = await _productService.AddProductAsync(productDetails);
            _redisCache.RemoveData("product");
            if (isProductInserted)
            {
                return Okay(isProductInserted);
            }
            else
            {
                return BadRequest();
            }
        }

        /// <abstract>
        /// Replace product particulars
        /// </abstract>
        /// <param title="productDetails"></param>
        /// <returns></returns>
        [HttpPut]
        public async Job<IActionResult> UpdateProductAsync(ProductDetails productDetails)
        {
            var isProductUpdated = await _productService.UpdateProductAsync(productDetails);
            _redisCache.RemoveData("product");
            if (isProductUpdated)
            {
                return Okay(isProductUpdated);
            }
            else
            {
                return BadRequest();
            }
        }

        /// <abstract>
        /// Delete product by id
        /// </abstract>
        /// <param title="productId"></param>
        /// <returns></returns>
        [HttpDelete]
        public async Job<IActionResult> DeleteProductAsync(int productId)
        {
            var isProductDeleted = await _productService.DeleteProductAsync(productId);
            _redisCache.RemoveData("product");
            if (isProductDeleted)
            {
                return Okay(isProductDeleted);
            }
            else
            {
                return BadRequest();
            }
        }
    }
}
Step 15
Register a couple of companies contained in the Program class.
utilizing AzureRedisCacheDemo.Information;
utilizing AzureRedisCacheDemo.Fashions;
utilizing AzureRedisCacheDemo.Repositories;
utilizing AzureRedisCacheDemo.Repositories.AzureRedisCache;
utilizing Microsoft.EntityFrameworkCore;
utilizing Microsoft.Extensions.Internet hosting;
utilizing System;
var builder = WebApplication.CreateBuilder(args);
// Add companies to the container.
builder.Companies.AddScoped < IProductService, ProductService > ();
builder.Companies.AddDbContext < DbContextClass > (o => o.UseInMemoryDatabase("RedisCacheDemo"));
builder.Companies.AddScoped < IRedisCache, RedisCache > ();
builder.Companies.AddControllers();
// Be taught extra about configuring Swagger/OpenAPI at https://aka.ms/aspnetcore/swashbuckle
builder.Companies.AddEndpointsApiExplorer();
builder.Companies.AddSwaggerGen();
var app = builder.Construct();
utilizing(var scope = app.Companies.CreateScope()) {
    var companies = scope.ServiceProvider;
    var context = companies.GetRequiredService < DbContextClass > ();
    SeedData.Initialize(companies);
}
// Configure the HTTP request pipeline.
if (app.Surroundings.IsDevelopment()) {
    app.UseSwagger();
    app.UseSwaggerUI();
}
app.UseHttpsRedirection();
app.UseAuthorization();
app.MapControllers();
app.Run();
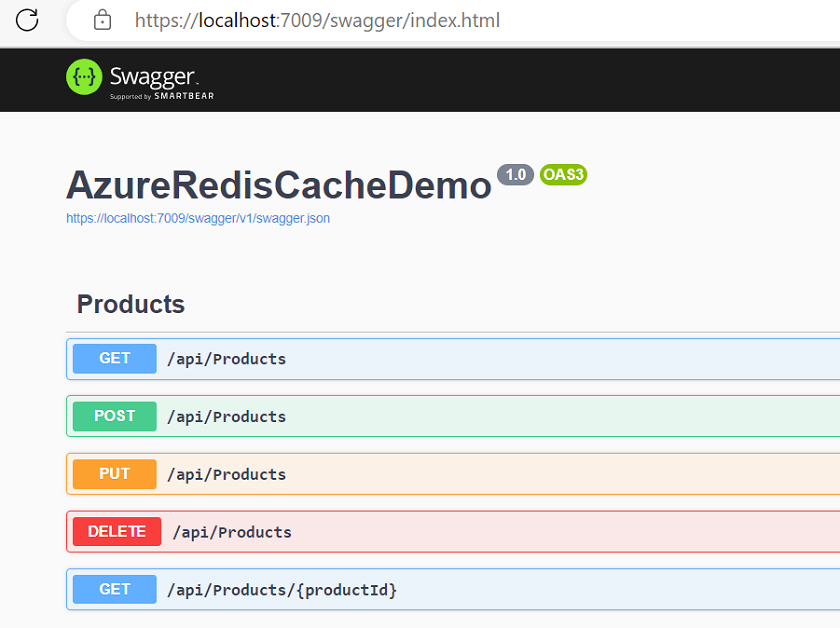
Step 16
Lastly, run the applying and we will see the swagger UI with our API’s endpoints.
Step 17
Hit the get the product endpoint and open the Redis CLI inside Azure Portal and there you possibly can see the product listing will get saved after we hit the endpoint the primary time.
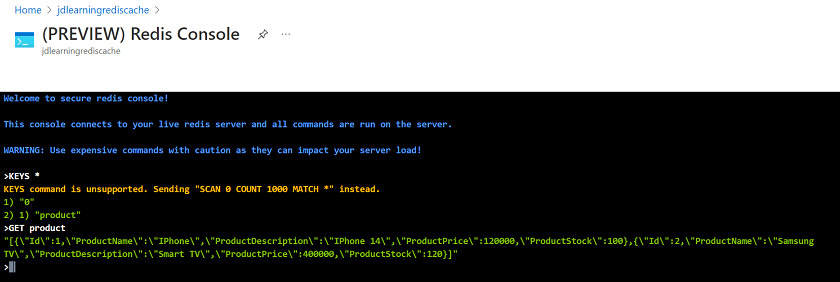
On this case, first, we examine whether or not the information is current in a cache or not. If not then we get the information from the database and likewise reserve it into the cache. We already write the code associated to that contained in the controller. So, subsequent time we get the information from the cache. Should you put a debugger contained in the controller then you possibly can perceive simply like how issues are going to work.
GitHub URL
https://github.com/Jaydeep-007/AzureRedisCacheDemo/tree/grasp/AzureRedisCacheDemo
Conclusion
Right here we regarded into the cache introduction and their configuration on azure. Additionally, the step-by-step implementation utilizing .NET Core Net API.