Serverless structure is without doubt one of the finest approaches for any web-based utility. It reduces many complications associated to the server’s infrastructure and the price. Utilizing Azure Sturdy Features, we will construct a stateful utility with the assistance of the stateless structure within the cloud surroundings. Within the case of Azure features, we don’t want to fret about deploying the functions and sustaining companies as a result of the cloud infrastructure supplies us with all of the assets required to run the appliance. As we speak, on this article, we’ll focus on the workflow means of the Azure Sturdy operate and show the best way to implement the Azure Sturdy Operate with the assistance of the Azure Portal. If anyone desires to know the overview of the Azure Sturdy Features together with its utility sample, then learn the beneath articles,
Design a Sturdy Operate Work associated to Worker Go away Approval Course of
We will use the Azure Sturdy Features to implement a long-running workflow as a mixture of actions. Through the workflow implementation, we have to map every course of step as a operate sort and every job as an exercise operate. Because the Azure Sturdy operate is all the time an automatic course of, we don’t want to fret in regards to the monitoring or escalating associated to a job that has not been accomplished.
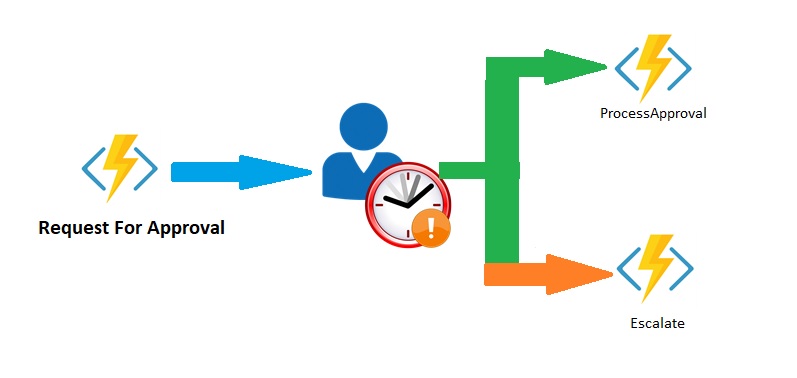
As per the instance, we’ll focus on how we will implement the Worker Go away Approval course of with the assistance of the Azure Sturdy Operate workflow. So, within the course of, we additionally want to contemplate these steps that will not be accomplished in time, and the method must be escalated. For instance, what’s going to occur if the Reporting Supervisor just isn’t authorised the appliance inside the time? On this case, the method will robotically detect this step and escalate as talked about within the workflow. In any enterprise, escalation steps are all the time useful as they assist us outline each job with a selected deadline to finish. This ensures the method that each one the duties are accomplished, not forgotten. As well as, within the escalation job, we will ship reminders to the duty’s assignee or reassign the job to somebody greater individual per the group hierarchy.
On this part, we’ll design the Worker Go away Approval course of workflow with the assistance of Sturdy Features. Within the course of, our workflow will start when an worker submits the depart utility for approval. Then the appliance might be assigned as an approval job to the reporting supervisor. The reporting supervisor will both approve or reject the proposal. In the true surroundings, this occasion can also generate and ship a notification (by way of e-mail or SMS, or app-based message) to the worker to tell the end result of the appliance. We are going to change the duty’s standing to both authorised or rejected within the demonstration. This workflow will comprise the beneath steps,
- The worker submits a Go away Software.
- The approval job is assigned to the Reporting Supervisor in order that they’ll evaluation the Go away Software of the Worker.
- The Go away Software is both authorised or rejected.
- An Escalation job can also be allotted if the approval job just isn’t accomplished inside the pre-defined time restrict.
The beneath Picture show the visible illustration of the workflow course of,
The beneath tables checklist the workflow stepwise operate sorts that we are going to use within the Sturdy Features workflow,
| Workflow Operate | Sturdy Operate Kind |
| Submitting a Go away Software for Approval | Shopper Software Operate |
| Assign the Approval Job to the related Reporting Supervisor | Orchestration Operate |
| Approval Job | Exercise Operate |
| Escalation Job | Exercise Operate |
The Orchestration operate will preserve the workflow rule that begins the escalation exercise if the approval doesn’t approve the appliance inside the specified time. So, now as we finalize the workflow construction, we’ll write the code associated to it within the subsequent part.
Develop the Workflow-based Length Features
This part will show the best way to develop the workflow course of to implement the situation talked about above utilizing Azure Portal.
Step 1 – Create Operate App
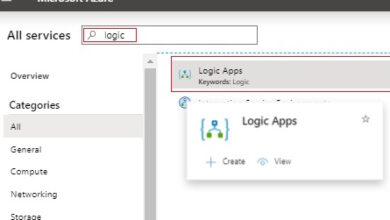
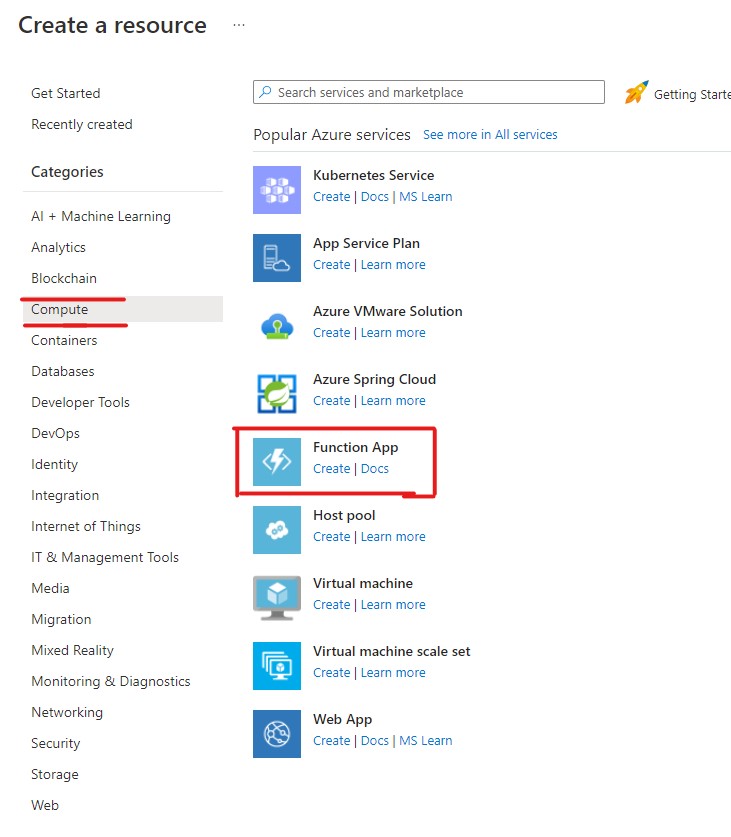
01. Check in to the Azure Portal first after which click on on Create a Useful resource choice
02. Within the left pane, choose Compute, and choose Operate App underneath the Fashionable Product Record. Then Create Operate App Pane will open.
03. Within the Fundamental Tab, present the required subject values like Useful resource Title, Operate App Title, Run Time, Model, And many others.
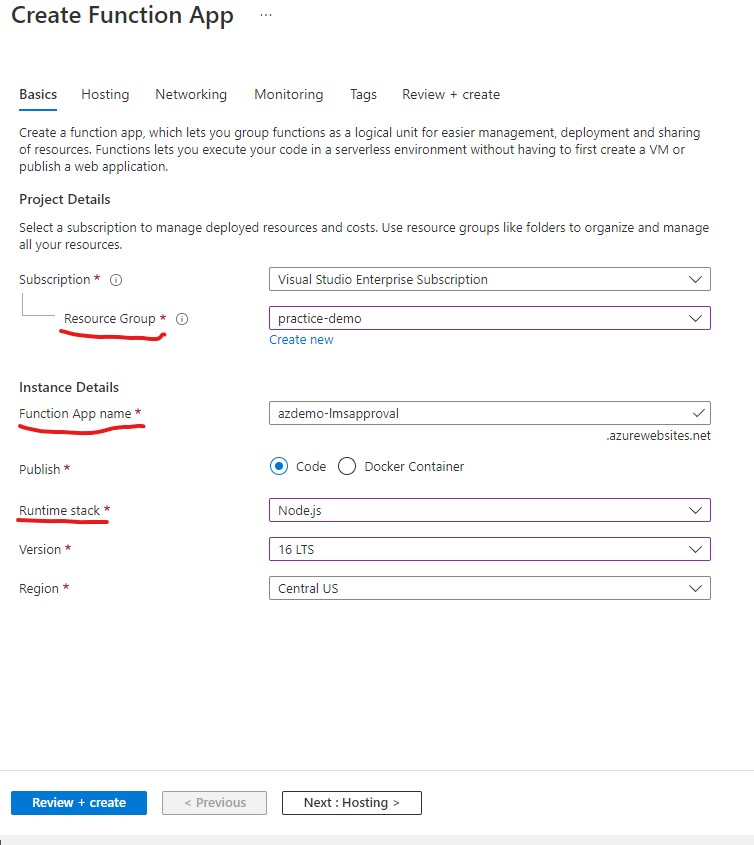
04. Now click on on the Evaluation + Create Button and click on on the Create button to create the Operate App. As soon as we click on on the create button, deployment of the Operate is begun. It’d take a couple of minutes to finish.
Step 2 – Set up the required NPM Package deal
01. Utilizing the JavaScript Sturdy Features, we have to set up some npm packages associated to the sturdy features. As soon as the Operate App is created, navigate to the operate app useful resource and App Service Editor underneath Improvement Instruments and click on on the Go Button.
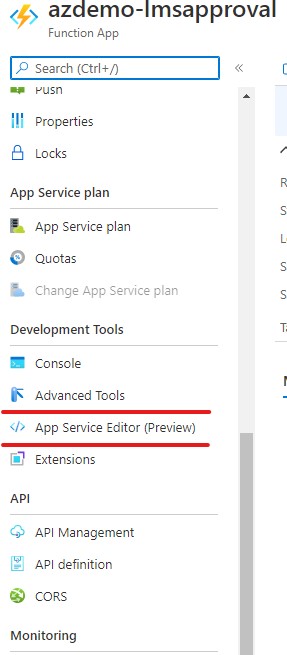
02. Within the left menu, choose the WWWROOT folder after which click on on the Open Console. We will use this console to entry the webserver that hosts our features and write the code for our features.
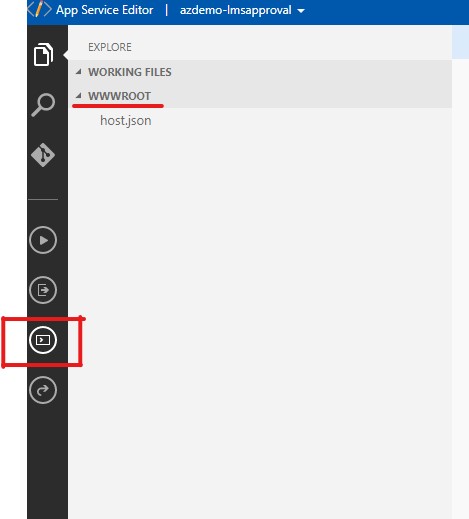
03. Now create a brand new file known as package deal.json after which open the file.
contact package deal.json
open package deal.json
04. Add the below-mentioned code inside the file.
{
  "identify": "azdemo-lmsapproval",
  "model": "1.0.0"
}
05. Return to the Azure Portal and choose the Console choice underneath the Improvement Instruments. As soon as the console pane opens, run the beneath command –
npm set up durable-functions
06. As soon as the npm package deal set up is full, click on on the Overview choice and restart the operate app so that it’s going to take the impact of the put in packages.
Step 3 – Create Shopper Operate to submit the Worker Go away Software
01. Now within the left pane of the Operate App, click on on the Features underneath the Features Part.
02. Now, click on on the Create choices.
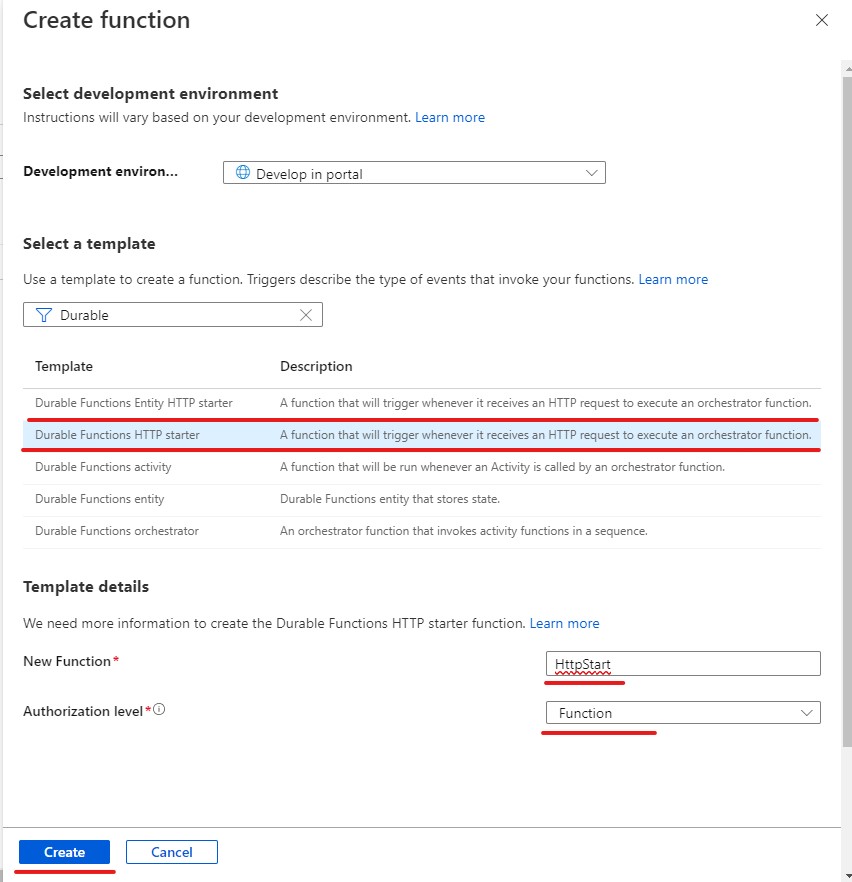
03. Within the Choose Template checklist, discover and choose Sturdy Features Http Starter. This template creates a sturdy operate that runs in response to an HTTP Request.
04. Within the Template Particulars, Present the correct operate identify and within the Authorization degree, select the “Operate” choice after which click on on the Create button. It is going to create the operate.
05. Now, underneath the Developer half, choose Code + Take a look at choice for this operate.
06. The code for the index.json file will seem within the editor as beneath –
const df = require("durable-functions");
module.exports = async operate (context, req) {
    const consumer = df.getClient(context);
    const instanceId = await consumer.startNew(req.params.functionName, undefined, req.physique);
    context.log(`Began orchestration with ID = '${instanceId}'.`);
    return consumer.createCheckStatusResponse(context.bindingData.req, instanceId);
};
Step 4 – Create Orchestrator Operate
01. Now, once more click on the Features part, and click on on Create button to create the Orchestrator Operate.
02. Choose the Sturdy Features Orchestrator template from the checklist within the Create Operate part.
03. Present the operate identify as OrchtrstFunction and click on on the create button.
04. Now open the newly created operate within the code editor utilizing the “Code + Take a look at” choice.
05. Change the present code with the below-mentioned code block and click on on the Save button.
const df = require("durable-functions");
module.exports = df.orchestrator(operate* (context) {
    const outputs = [];
    /*
    * We are going to name the approval exercise with a reject and an authorised to simulate each
    */
    outputs.push(yield context.df.callActivity("LeaveApproval", "Permitted"));
    outputs.push(yield context.df.callActivity("LeaveApproval", "Rejected"));
    return outputs;
});
06. The code, as talked about earlier known as an Exercise Operate named LeaveApproval which we’ll create within the following steps. The orchestrator operate will invoke the LeaveApproval operate twice. The primary time, it executes for accepting the proposal, and the second time exams for the appliance rejection logic.
Step 5 – Create the Exercise Operate
01. Now, once more click on the Features part, and click on on Create button to create the Exercise Operate.
02. Choose the Sturdy Features Exercise template from the checklist within the Create Operate part.
03. Present the operate identify as LeaveApproval and click on on the create button.
04. Now open the newly created operate within the code editor utilizing the Code + Take a look at choice.
05. Change the present code with the below-mentioned code block and click on on the Save button.
module.exports = async operate (context) {
    return `Your Go away Software has been -  ${context.bindings.identify}!`;
};
06. So, as per the method design, we have now already developed the primary three features. Now, we have to take a look at it.
07. For this, choose the HttpStart Operate from the Operate Record, and it’ll navigate to the operate pane.
08. Click on on the Get Operate Url choice within the high bar and duplicate the URL. The Url will identify like this –
https://azdemo-lmsapproval.azurewebsites.web/api/orchestrators/{functionName}?code=vPkV3NANoBkGvAOEXPbe8VoXGejFWqf2e1XLCLvjfk3e74jy5IzyAw==
09. We have to exchange the key phrase {functionName} with the Orchestrator operate identify. In our case, the orchestrator operate identify is OrchtrstFunction. So the ultimate URL after modification might be as below-
https://azdemo-lmsapproval.azurewebsites.web/api/orchestrators/OrchtrstFunction?code=vPkV3NANoBkGvAOEXPbe8VoXGejFWqf2e1XLCLvjfk3e74jy5IzyAw==
10. Open a brand new tab within the browser and paste the URL.
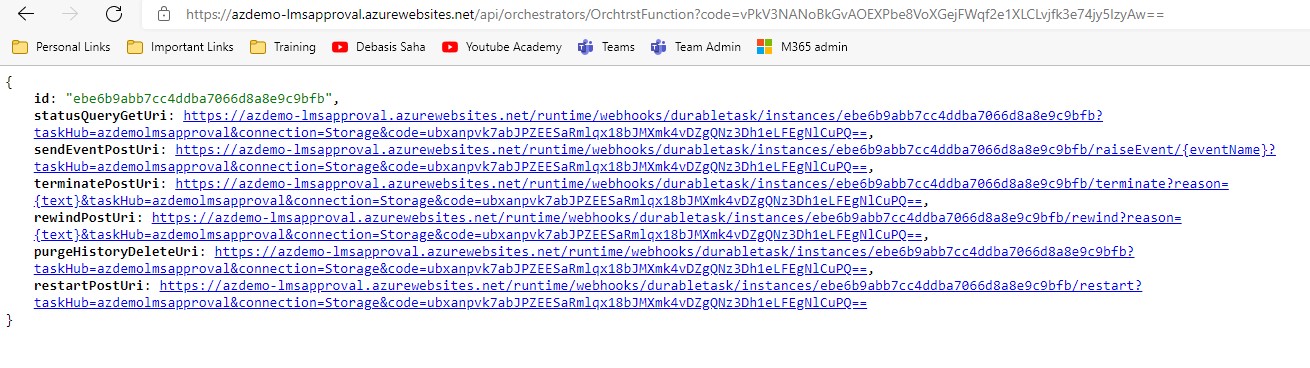
11. The response of the URL might be as beneath. However, first, we have to copy the statusQueryGetUri and paste it into the brand new browser tab.
12. The output of the statusQueryGetUri might be as beneath,
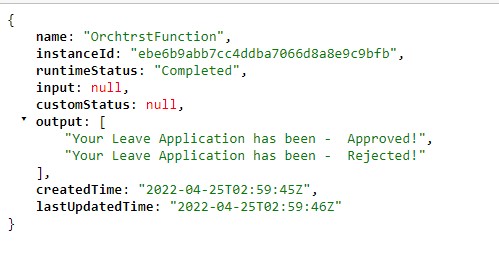
13. As per the construction of the orchestrator operate, it calls two occasions and combines the outcome and outcome as output.
Implement Timers in Sturdy Features
When making an attempt to implement a long-running workflow, we all the time want to contemplate totally different situations like what’s going to occur if any explicit job just isn’t accomplished inside the talked about time length? On this scenario, we will tackle this subject with the assistance of timeout and escalation paths. We will use the time inside the Azure Sturdy Operate with the assistance of orchestrator features. We will implement delay or specify the timeout length for any asynchronous actions. We will use the sturdy timers within the orchestrator operate as a substitute of utilizing setTimeout() and setInterval() features.
Suppose, within the above workflow, we have to incorporate an escalation step to take motion if a Go away Software doesn’t approve inside a specified length. So, on this train, we’ll add a timer to manage timeout throughout the workflow execution. For this, we have to carry out the beneath steps,
Step 1 – Want to put in the second npm package deal
01. So earlier than going to vary into the workflow, we first set up the required packages into the Operate App.
02. We click on on the App Service Editor underneath the Improvement Instruments choice.
03. Then choose WWWROOT Folder after which click on on the Open Console Choices.
04. Run the beneath command into the console window.
npm set up typescript
npm set up second
05. As soon as the package deal set up is accomplished, return to the Operate App.
Step 2 – Create an Escalation Exercise Operate
01. Now, click on on the Create Button underneath the Features choice.
02. Choose the Sturdy Features Exercise template from the checklist within the Create Operate part.
03. Present the operate identify as Escalation and click on on the create button.
04. Now open the newly created operate within the code editor utilizing the Code + Take a look at choice.
05. Change the present code with the below-mentioned code block
module.exports = async operate (context) {
    return `ESCALATION: You haven't authorised the Pending Go away Purposes - reassigning them to your Reporting Supervisor!  ${context.bindings.identify}!`;
};
06. Click on on the Save button.
Step 3 – Replace Orchestration Operate to implement escalation course of
01. Now, click on on the Features choice.
02. From the Operate Record, choose the OrchtrstFunction which we created within the earlier part.
03. Now click on on the Code + Take a look at choice underneath the Developer menu.
04. Make the adjustments within the operate as beneath,
const second = require("second");
const df = require("durable-functions");
module.exports = df.orchestrator(operate* (context) {
    const outputs = [];
    const deadline = second.utc(context.df.currentUtcDateTime).add(20, "s");
    const activityTask = context.df.waitForExternalEvent("Approval");
    const timeoutTask = context.df.createTimer(deadline.toDate());

    const winner = yield context.df.Job.any([activityTask, timeoutTask]);
    if (winner === activityTask) {
        outputs.push(yield context.df.callActivity("LeaveApproval", "Permitted"));
    }
    else
    {
        outputs.push(yield context.df.callActivity("Escalation", "Departmental HODs"));
    }
    if (!timeoutTask.isCompleted) {
        // All pending timers should be full or canceled earlier than the operate exits.
        timeoutTask.cancel();
    }
    return outputs;
});
05. If the approval operate doesn’t reply inside 20 seconds, the Escalation operate might be executed.
06. Click on on the Save Button.
07. Now, we have to take a look at it.
08. For this, choose the HttpStart Operate from the Operate Record, and it’ll navigate to the operate pane.
09. Click on on the Get Operate Url choice within the high bar and duplicate the URL. The Url will identify like this –
https://azdemo-lmsapproval.azurewebsites.web/api/orchestrators/{functionName}?code=vPkV3NANoBkGvAOEXPbe8VoXGejFWqf2e1XLCLvjfk3e74jy5IzyAw==
10. We have to exchange the key phrase {functionName} with the Orchestrator operate identify. In our case, the orchestrator operate identify is OrchtrstFunction. So the ultimate URL after modification might be as beneath–
https://azdemo-lmsapproval.azurewebsites.web/api/orchestrators/OrchtrstFunction?code=vPkV3NANoBkGvAOEXPbe8VoXGejFWqf2e1XLCLvjfk3e74jy5IzyAw==
11. Open a brand new tab within the browser and paste the URL.
12. The response of the URL might be as beneath. However, first, we have to copy the statusQueryGetUri and paste it into the brand new browser tab.
13. The output of the statusQueryGetUri might be as beneath –
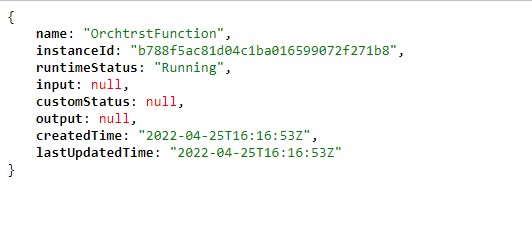
14. Within the manufacturing, we will see that the standing is proven as RUNNING as it’s ready for the timer countdown to 20 seconds.
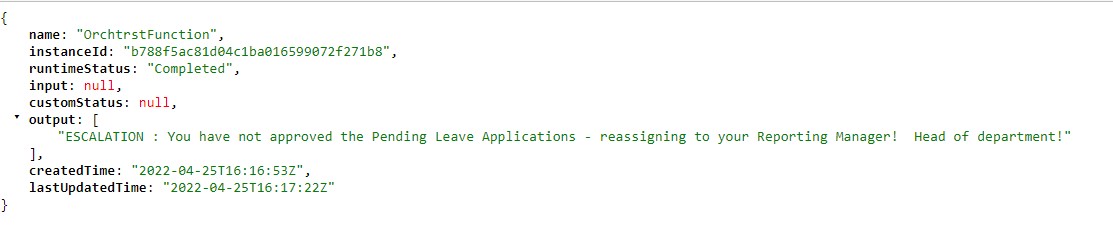
15. So, anticipate 20 seconds and refresh the browser. Now, we will discover that because the Approval operate is known as, the method robotically calls the Escalation operate as per the workflow outlined.
Conclusion
This text discusses points associated to the workflow design of Azure Sturdy Features. Additionally, we show how we will develop an approval course of with the assistance of the Azure Sturdy Operate Workflow. Any queries, solutions, or suggestions associated to this text are all the time welcome.