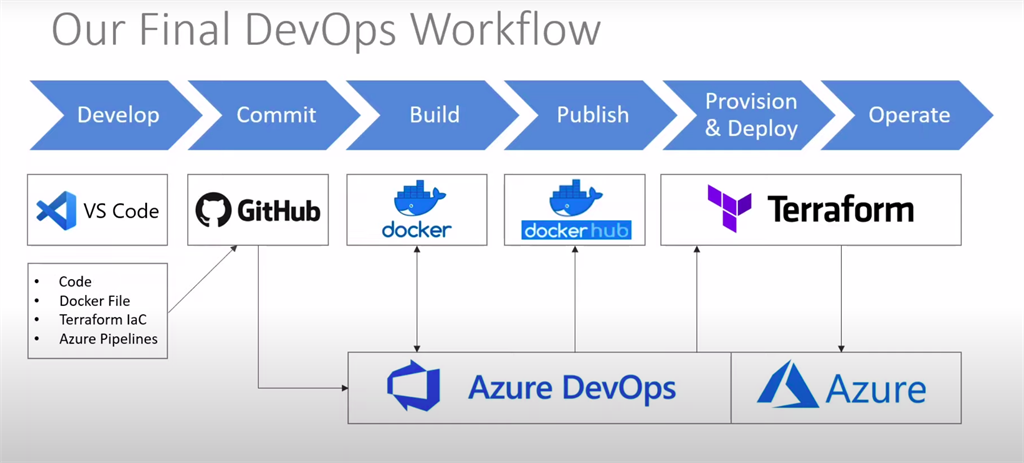
Automate Code Deployment And Infrastructure Provisioning On Azure Utilizing Terraform And Azure DevOps
I’ve began working with Azure just lately and I’ve to create many sources on Azure and modify them as per my want. So as to take action, I want to go to the Azure portal and consider it takes effort and time to create them manually. However what if I mentioned there’s a solution to automate every little thing? You simply must push the modifications to Github and it’ll mechanically carry out every little thing.
Earlier than doing something, first, you have to have Azure CLI put in in your machine and you will need to authenticate your self as a way to create sources on Azure mechanically.
Set up the Azure CLI
Use the next instructions in the event you’re utilizing Ubuntu.
- sudo apt-get replace
- sudo apt-get set up azure-cli
Run the login command.
So that is what we’re going to do. Let’s divide it into easy steps.
- Step 1: We’re going to create a easy ‘Howdy World’ in Node.js and push it to GitHub and write DockerFile
- Step 2: Setup a pipeline in Azure DevOps
- Step 3: Mechanically create a docker picture and push it to docker hub
- Step 4: Arrange Terraform for mechanically creating sources in Azure and deploying docker picture.
So allow us to begin with our first step.
Step 1 – Create a easy ‘Howdy World’ in Node.js and push it to GitHub
What’s Node.js?
Putting in node js
Making a Node Venture
Create a brand new listing and initialize the node with the command.
What’s NPM?
Npm is a package deal supervisor the place all of the javascript packages reside. We use NPM to obtain all of the javascript packages by npm.
- mkdir nodeexample
- cd nodeexample/
- npm init -y
After executing the command, a package deal.json file is generated within the venture and this holds all the main points related to the venture.
Configure Categorical
Categorical is used to create a server. The under command is used to create our server.
- npm set up categorical –save
We’re creating a brand new server that will probably be working on port 3000. I’m making a route that returns howdy world. Right here is the whole code.
- const categorical = require(‘categorical’)
- const app = categorical()
- const port = 3000
- app.get(‘/’, (req, res) => {
- res.ship(‘Howdy World!’)
- })
- app.pay attention(port, () => {
- console.log(`Instance app listening at http:
- })
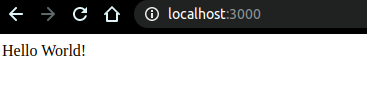
Now begin the server utilizing the under command.
Open your browser and navigate to http://localhost:3000/. You must see Howdy world getting displayed.
Dockerize the venture
What’s docker?
Docker is a set of the platform as a service merchandise that use OS-level virtualization to ship software program in packages known as containers. Containers are remoted from each other and bundle their very own software program, libraries, and configuration recordsdata.
Create an empty file named Dockerfile within the root listing and paste the next code
- # Create app listing
- WORKDIR /usr/src/app
- # Set up app dependencies
- # A wildcard is used to guarantee each package deal.json AND package-lock.json are copied
- # the place obtainable (npm@5+)
- COPY package deal*.json ./
- RUN npm set up
- # If you are constructing your code for manufacturing
- # RUN npm ci –only=manufacturing
- # Bundle app supply
- COPY . .
- EXPOSE 80
- CMD [ “node”, “index.js” ]
Construct the docker picture
- docker construct -t <your username>/nodeexample
Run the docker picture
- docker run -p 49160:3000 -d <your username>/nodeexample
Step 2 – Setup a pipeline in Azure DevOps
Present your venture title and outline and select visibility.
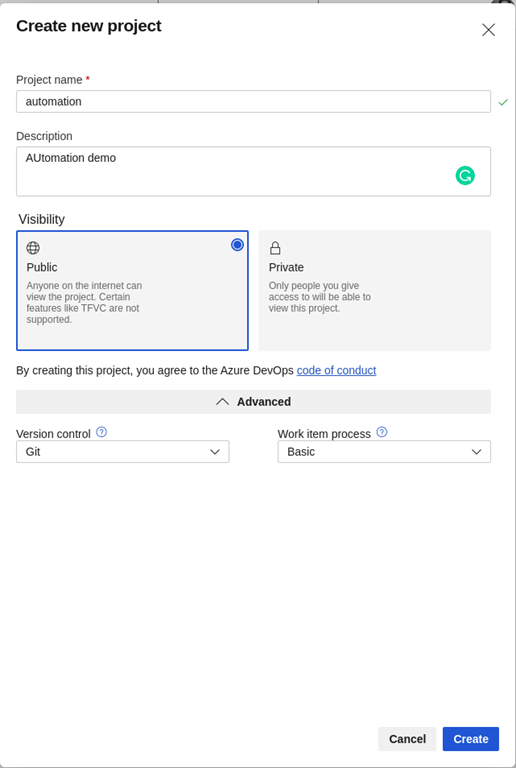
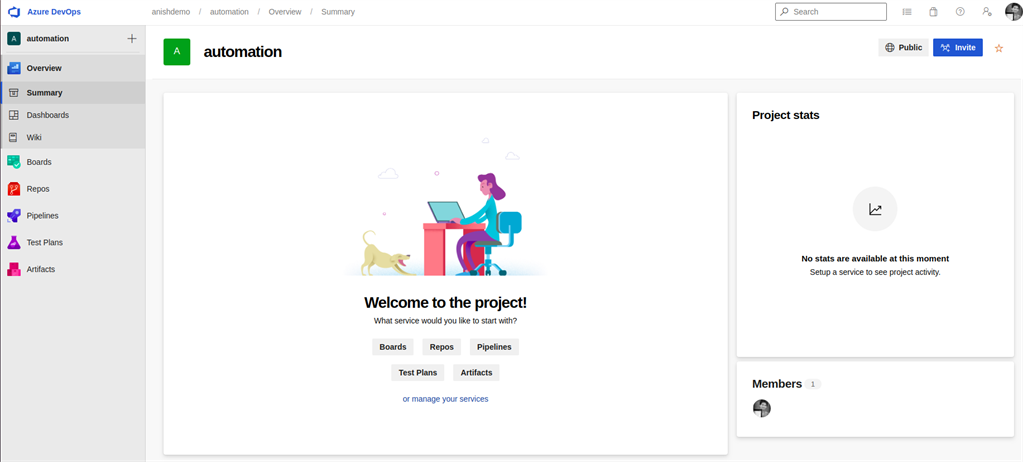
I’m selecting Git as model management since I’ve my code on GitHub. After efficiently creating the venture you will note the under display screen.
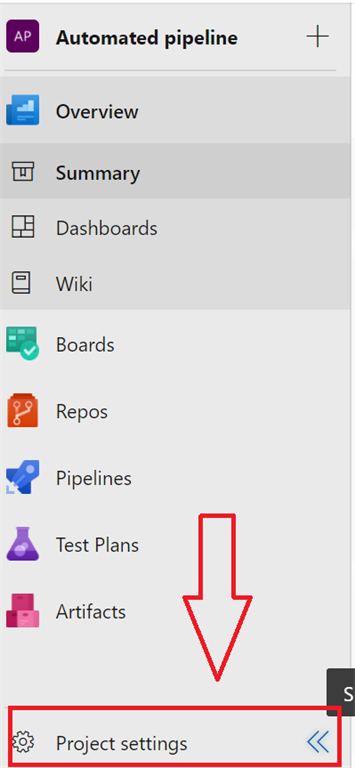
Now go to venture settings.
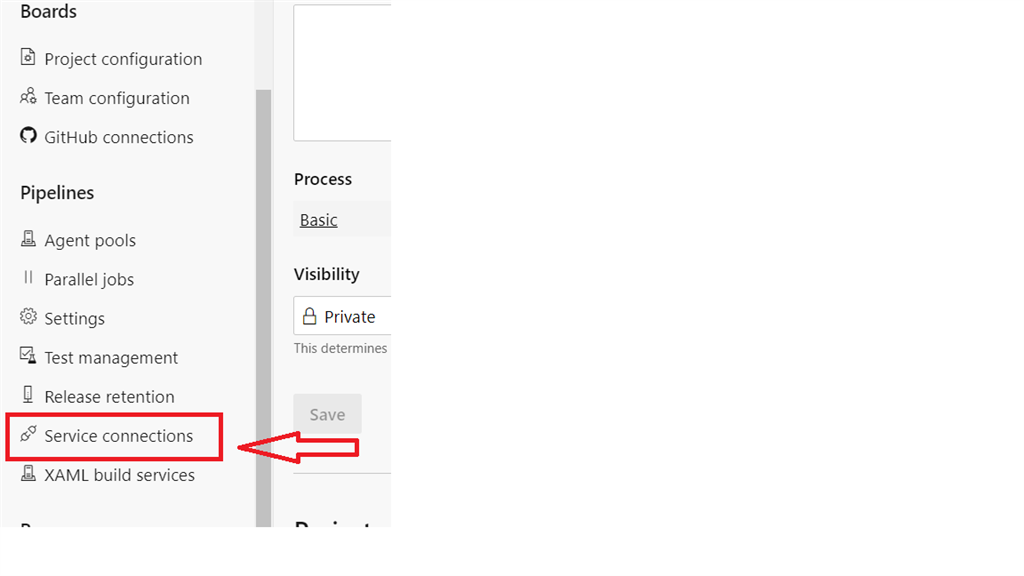
Select a service connection.
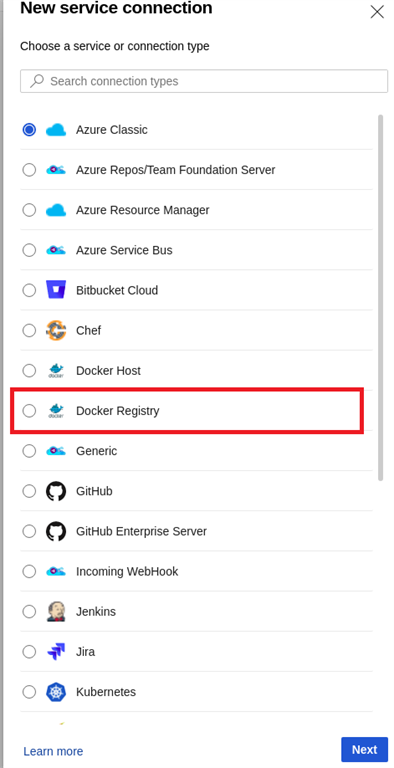
You could ask why are we doing this. So what we’re going to do is create a docker picture and push that picture to docker hub so we have to join Azure DevOps to docker hub. Now select the Docker registry.
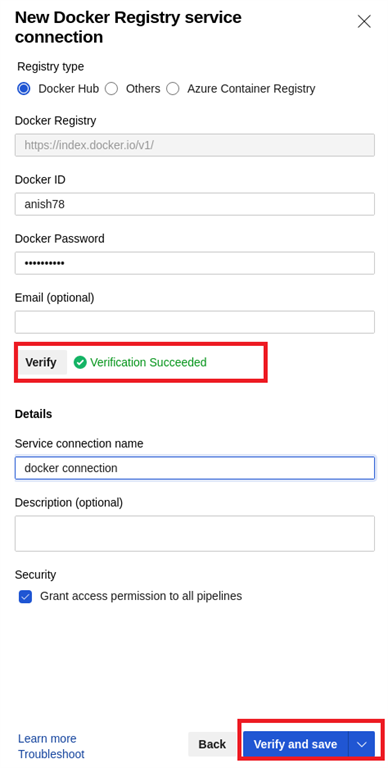
Present your credentials and after that click on on confirm; if verified then enter the service title and click on on it.
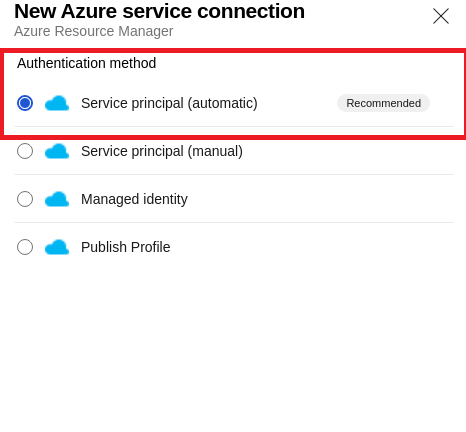
Once more click on on New service connection and click on on Azure Useful resource Supervisor and click on Subsequent.

Select service principal automated.
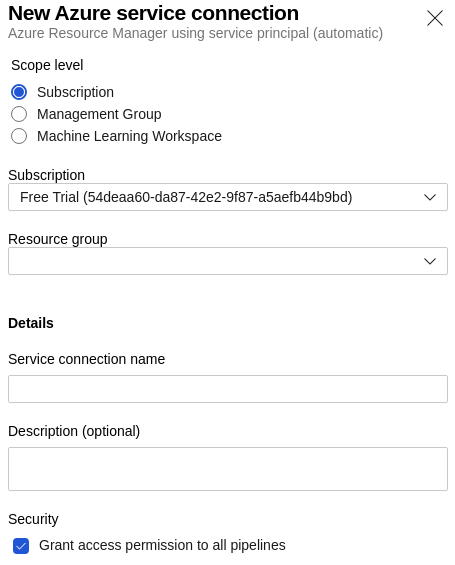
Select your subscription and supply your service connection title after which click on on subsequent.
Return to Pipeline and click on on Create Pipeline. Now select Git and sign up to GitHub if wanted. After signing in you will note a listing of your repository and you have to select the repository which comprises your node js code. You could want to supply permission to Azure Pipeline to entry your code.
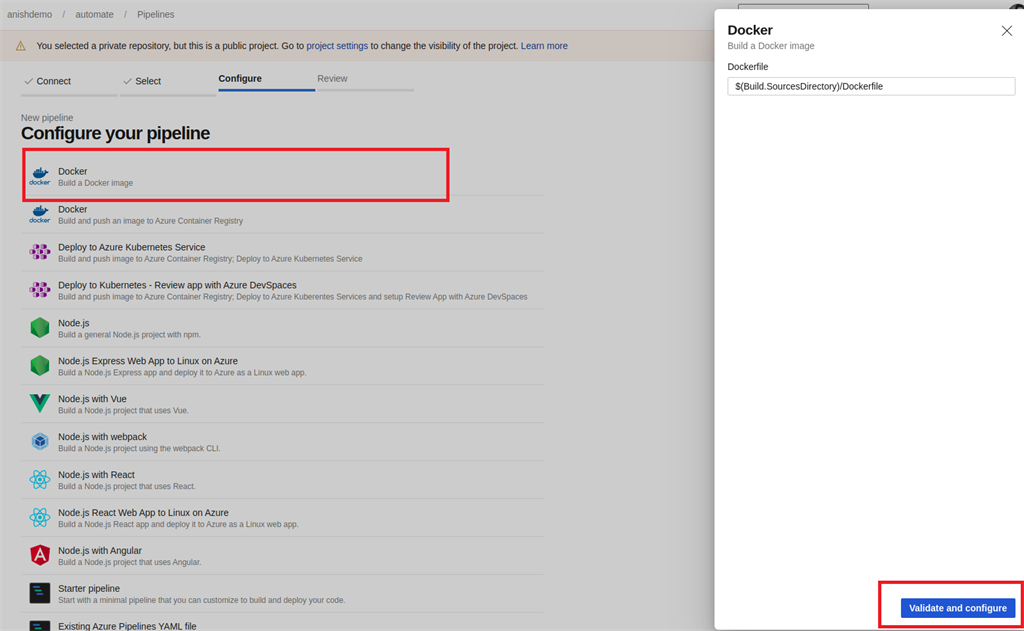
Primarily based on the code and file within the venture, it’s going to mechanically recommend many choices to configure our pipeline with. We’re going to select Docker on this case. Click on on validate and configure.
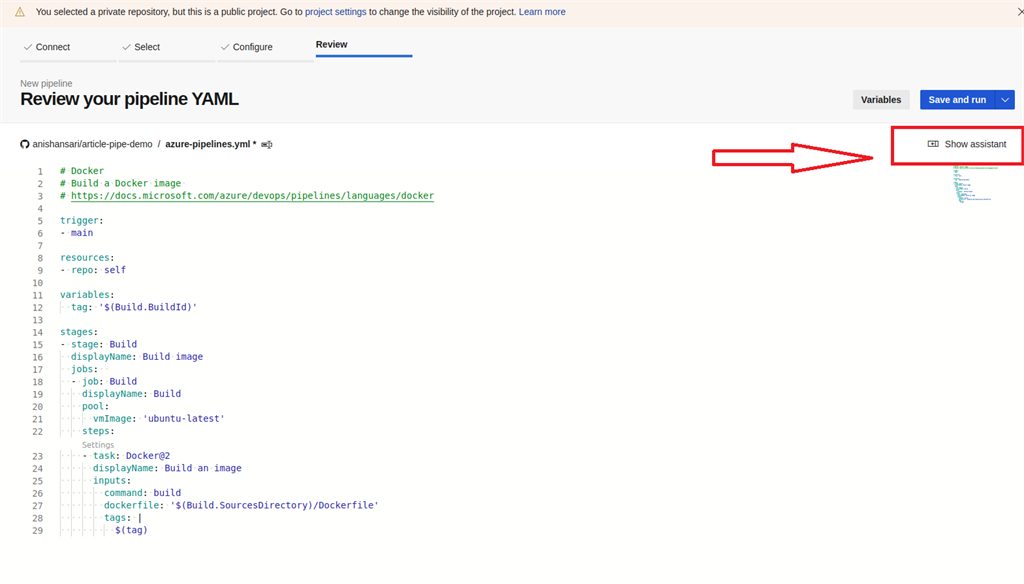
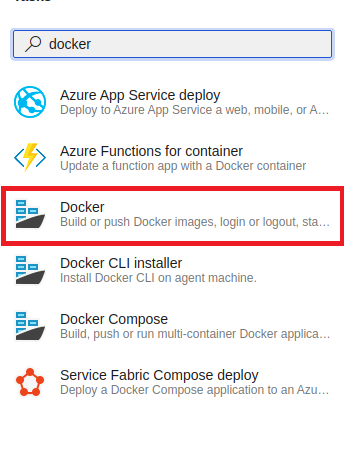
You’ll be offered with an azure-pipeline.yml file to evaluation. This file comprises just about what we have to do however we’re going to add one thing extra to this file. wW are going so as to add a unique activity to this file and for that click on on Present Assistant and seek for Docker and select docker.
Step 3 – Mechanically create a docker picture and push it to docker hub
Seek for Docker and select docker.
Select your docker registry. Now we have already arrange our service connection to docker then you will need to see the connection title so select the connection and provides Container repository a reputation. Depart every little thing default and click on on Add. It’s going to add one other activity.

Our earlier activity solely builds the docker picture nevertheless it would not push to the docker hub so we’re going to take away or substitute the duty with the duty we’ve simply created. Your YAML file ought to look one thing like this.
- # Docker
- # Construct a Docker picture
- # https://docs.microsoft.com/azure/devops/pipelines/languages/docker
- set off:
- – most important
- sources:
- – repo: self
- variables:
- tag: ‘$(Construct.BuildId)’
- phases:
- – stage: Construct
- displayName: Construct picture
- jobs:
- – job: Construct
- displayName: Construct
- pool:
- vmImage: ‘ubuntu-latest’
- steps:
- – activity: Docker@2
- inputs:
- containerRegistry: ‘docker connection’
- repository: ‘anish78/demodckreg’
- command: ‘buildAndPush’
- Dockerfile: ‘**/Dockerfile’
- tags: |
- $(tag)
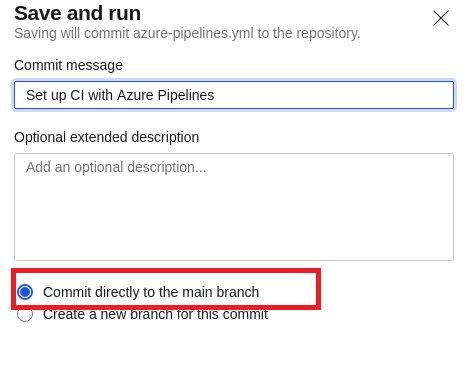
Now click on on Save and Run. Commit on to the primary department.
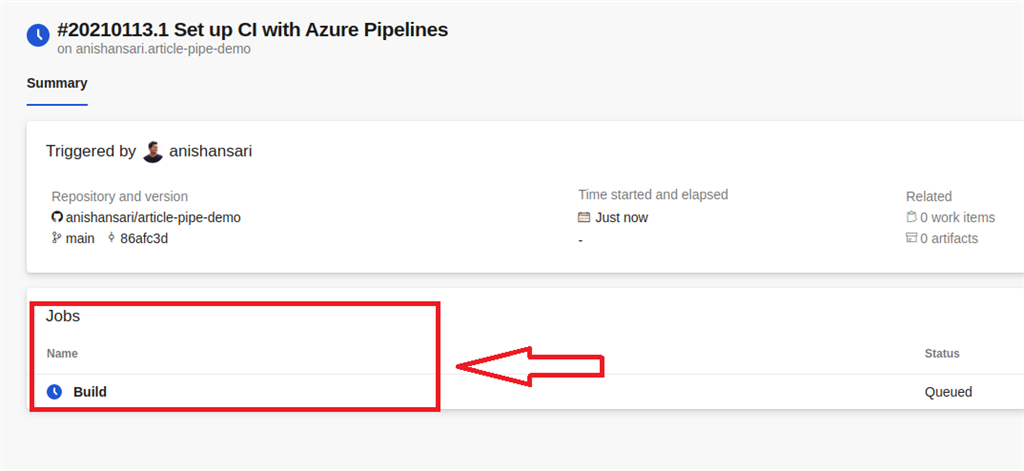
You’ll be offered with the under display screen and you will note the construct working.
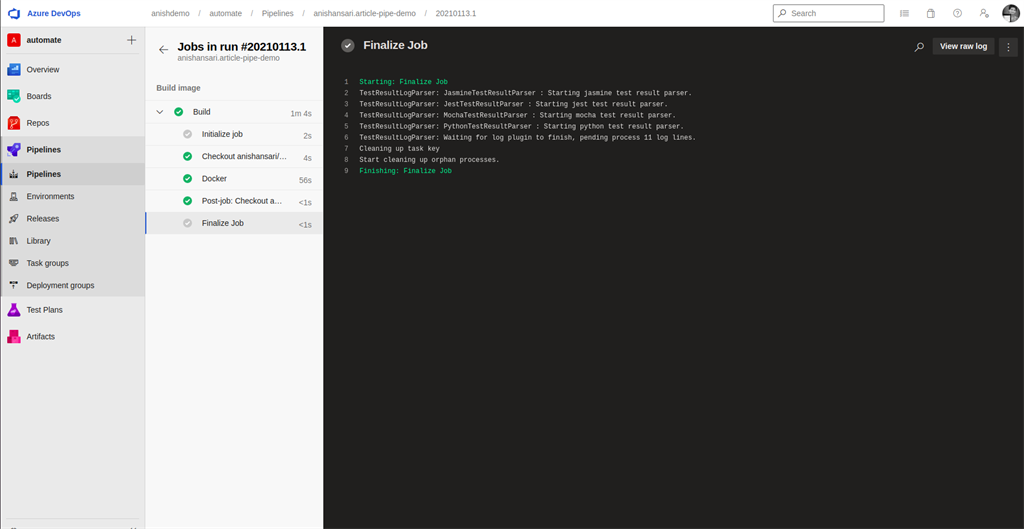
When you click on on the construct then you possibly can see the complete log of the construct.
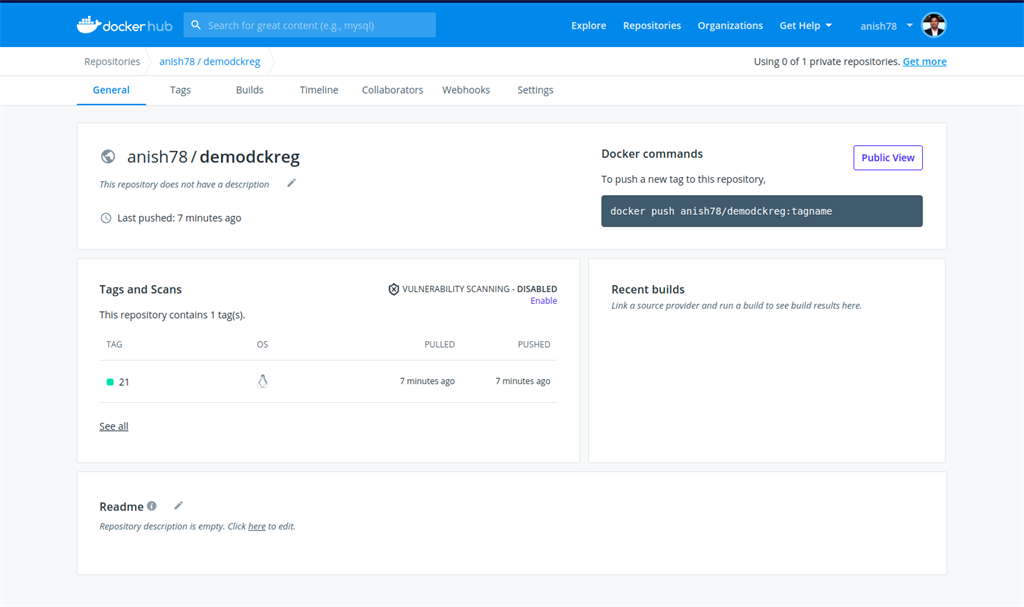
If the construct is profitable and in the event you go to Dockerhub and login then you will note one new picture being pushed to your repository.
Step 4 – Arrange Terraform for mechanically creating sources in Azure and deploying docker picture.
So what’s Terraform?
What’s Infrastructure as Code?
Infrastructure as code (IaC) is the method of managing and provisioning sources on the Cloud reasonably than logging in to your cloud supplier and doing it manually. You’ll be able to write codes which is able to work together along with your cloud supplier and may create, modify, and delete useful resource mechanically with out visiting the portal.
Create a file named most important.tf within the root listing of the venture. This file holds the terraform configuration code. Add the next code.
- supplier “azurerm” {
- model = “2.5.0”
- options {}
- }
The above code tells Terraform that we need to work with Azure as a result of terraform is offered for a lot of suppliers so we have to outline with which supplier we need to work with.
- useful resource “azurerm_resource_group” “anish_terraform_test” {
- title = “ans-tes-grp”
- location = “westus2”
- }
As we’d like a useful resource group in azure for our sources the above code will create a useful resource group named ans-test-grp in west us. Allow us to check if every little thing is ok and to take action we have to initialize terraform. Use the next command for that.
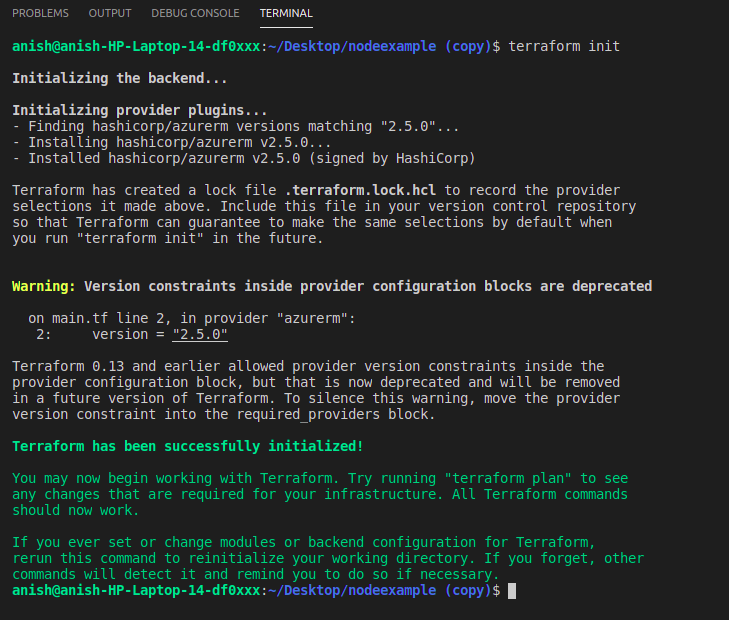
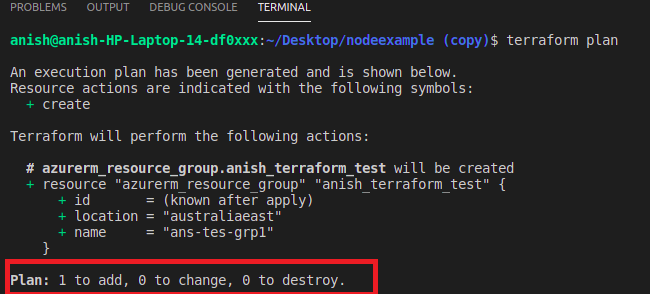
It’s going to initialize the terraform. The most effective issues about Terraform that I personally like is you possibly can see the plan of Terraform earlier than it creates any useful resource within the cloud. Allow us to see what’s the plan of Terraform. Use the next command for that.
You will note the next output.
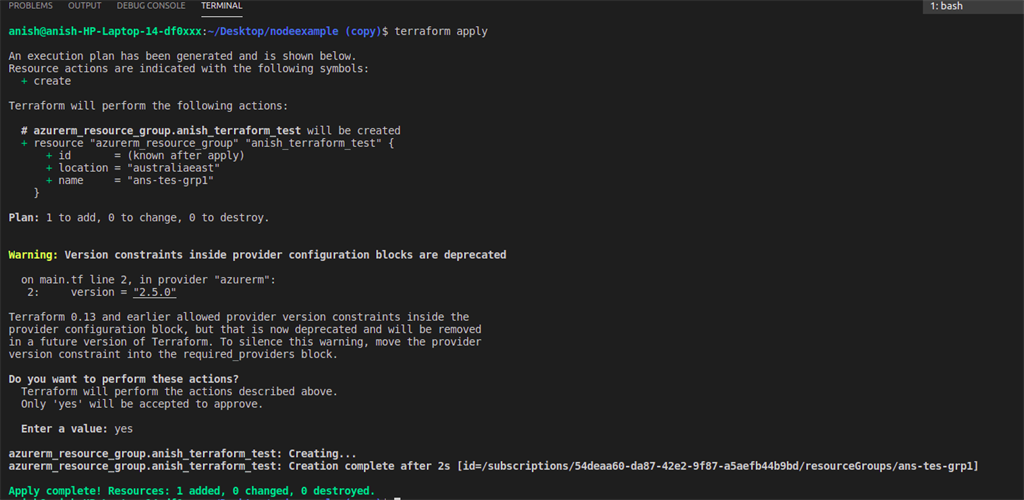
Now in the event you’re okay with the plan you possibly can create it. To take action use the next command.
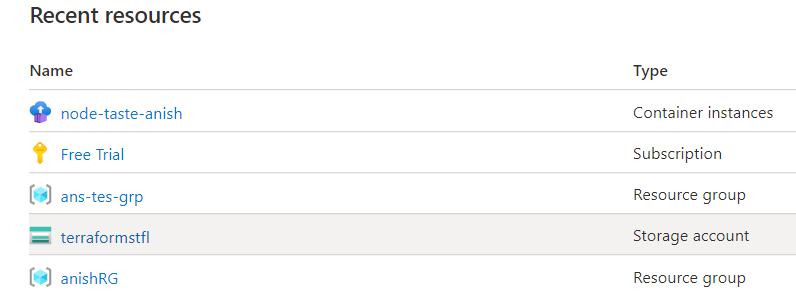
Enter sure and look forward to some seconds and you will note the abstract and you may go to azure and test it out whether it is created.
Terraform additionally creates a file named terraform.tfstate which comprises the state of the IDs and properties of the sources Terraform created in order that it will probably handle or destroy these sources going ahead. Your state file comprises the entire information in your configuration and will additionally comprise delicate values in plaintext, so don’t share it or verify it into supply management. Every time terraform performs apply it refers back to the state file to verify the state. So we’re going to retailer remotely someplace.
Allow us to add this piece of code to most important.tf
- terraform {
- backend “azurerm” {
- resource_group_name = “anishRG”
- storage_account_name = “terraformstfl”
- container_name = “tfstate”
- key = “terraform.tfstate”
- }
- }
Now terraform will go to a useful resource group named anishRG and it’ll search for the storage account title “terraformstfl”. Then it’s going to retailer the file in a tfstate container.
Every time we push the modifications to Github it’s going to run our pipeline and create a docker picture and we have to hold observe of the tag of the picture, so for that permit us add a variable.
- variable “imagebuild” {
- kind = string
- description = “Newest Picture Construct”
- }
Now allow us to create a container occasion in Azure that may run our docker container in Azure.
- useful resource “azurerm_container_group” “tfcg_test” {
- title = “node-taste-anish1”
- location = azurerm_resource_group.anish_terraform_test.location
- resource_group_name = azurerm_resource_group.anish_terraform_test.title
- ip_address_type = “public”
- dns_name_label = “anish78”
- os_type = “Linux”
- container {
- title = “node-tes-anish”
- picture = “anish78/nodetest:${var.imagebuild}”
- cpu = “1”
- reminiscence = “1”
- ports {
- port = 80
- protocol = “TCP”
- }
- }
- }
So my ultimate most important.tf seems like this.
- supplier “azurerm” {
- model = “2.5.0”
- options {}
- }
- terraform {
- backend “azurerm” {
- resource_group_name = “anishRG”
- storage_account_name = “terraformstfl”
- container_name = “tfstate”
- key = “terraform.tfstate”
- }
- }
- variable “imagebuild” {
- kind = string
- description = “Newest Picture Construct”
- }
- useful resource “azurerm_resource_group” “anish_terraform_test” {
- title = “ans-tes-grp”
- location = “Australia East”
- }
- useful resource “azurerm_container_group” “tfcg_test” {
- title = “node-taste-anish”
- location = azurerm_resource_group.anish_terraform_test.location
- resource_group_name = azurerm_resource_group.anish_terraform_test.title
- ip_address_type = “public”
- dns_name_label = “anish78”
- os_type = “Linux”
- container {
- title = “node-tes-anish”
- picture = “anish78/nodetest:${var.imagebuild}”
- cpu = “1”
- reminiscence = “1”
- ports {
- port = 80
- protocol = “TCP”
- }
- }
- }
We have to present entry to terraform as a way to work remotely — I imply from pipeline not from our native machine — and to take action head over to Azure and seek for Azure Lively listing. Click on on App registration and click on on new registration.

Give it a reputation and select Accounts on this organizational listing solely (Default Listing solely – Single-tenant).Click on on the register and as soon as it’s full copy the next.
- Consumer ID
- Tenant ID
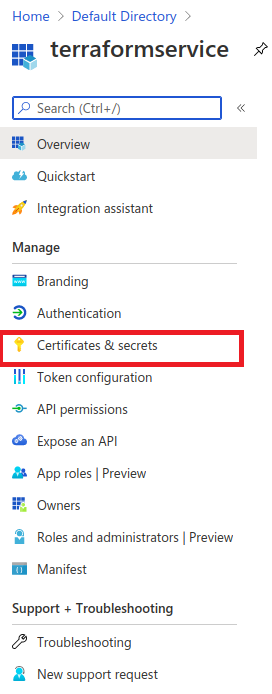
Head over to certificates and secrets and techniques and click on on New consumer secret. Give it a reputation and replica the worth.
Now return to your subscription and replica the subscription ID. Go to your pipeline and click on on Library for including these 4 values for terraform to speak with Azure. Add all 4 values right here like under.

When you’re carried out go to your azure-pipeline.yml file and add one other stage.
- – stage: Provision
- displayName: ‘Terraforming on Azure…’
- dependsOn: Construct
- jobs:
- – job: Provision
- displayName: ‘Provisioning Container Occasion’
- pool:
- vmImage: ‘ubuntu-latest’
- variables:
- – group: terraformvars // Library title in your pipeline
- steps:
- – script: |
- set -e
- terraform init -input=false
- terraform apply -input=false -auto-approve
- title: ‘RunTerraform’
- displayName: ‘Run Terraform’
- env:
- ARM_CLIENT_ID: $(ARM_CLIENT_ID)
- ARM_CLIENT_SECRET: $(ARM_CLIENT_SECRET)
- ARM_TENANT_ID: $(ARM_TENANT_ID)
- ARM_SUBSCRIPTION_ID: $(ARM_SUBSCRIPTION_ID)
- TF_VAR_imagebuild: $(tag)
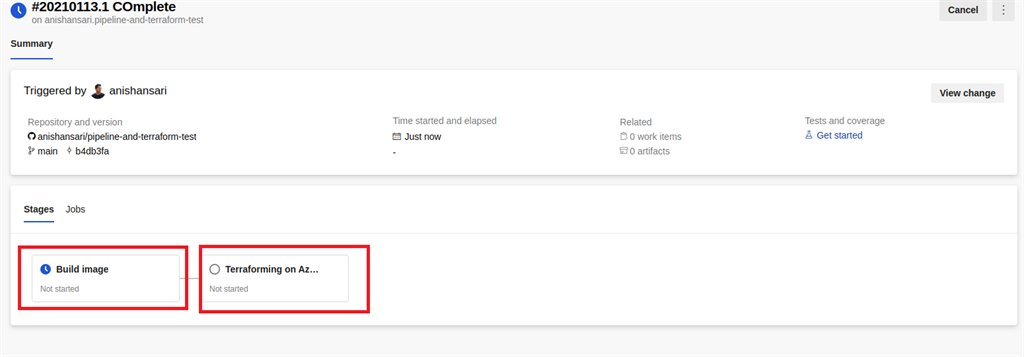
Now we’re prepared to check the workflow. Now go to the code and make any modifications and push it to GitHub. As soon as carried out head again to DevOps. Now go to the code and make any modifications and push it to GitHub. Head again to DevOps and you will note one construct working with two states one thing like under and naturally you possibly can see the whole log while you click on on it. As soon as it’s carried out you possibly can return to azure and verify if every little thing is accomplished.
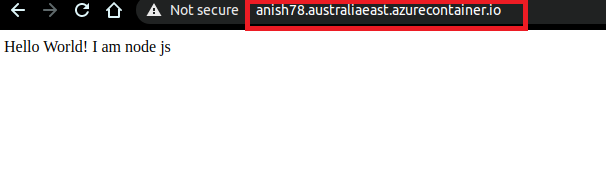
So now you need not construct your docker picture and push it to the docker hub. You need not create sources manually. You simply must focus in your code and everytime you push any modifications it’s going to do the remainder for you. Now if every little thing is full you possibly can go to Azure and verify if the Azure container occasion is working.
I hope that is useful. Suggestions and solutions are welcome and in the event you want any assist be at liberty to contact me. Thanks for studying.


