You’ll use the Connect button within the Azure portal to begin a foreign Desktop (RDP) session from a Windows desktop. 1st you connect with the virtual machine, so you check in.
To connect to a Windows VM from a mackintosh, you’ll ought to install associate RDP consumer for mackintosh like Microsoft Remote Desktop.
Connect to the virtual machine
- If you haven’t already done therefore, sign on to the Azure portal.
- On the left menu, choose Virtual Machines.
- Select the virtual machine from the list.
- On the highest of the page for the virtual machine, choose Connect.
- On the connect with virtual machine page, choose the suitable bioinformatics address and port. In most cases, the default bioinformatics address and port ought to be used. choose transfer RDP file. If the VM encompasses a just-in-time policy set, you initially ought to choose the Request access button to request access before you’ll be able to transfer the RDP file. For additional data concerning the just-in-time policy, see Manage virtual machine access exploitation the simply in time policy.
- Open the downloaded RDP file and choose Connect once prompted.
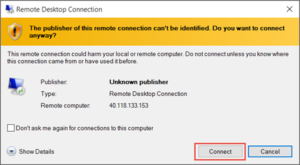
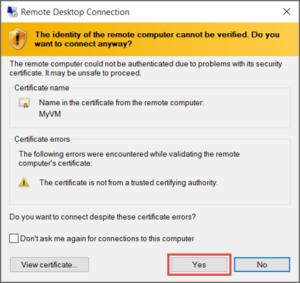
- You will get a warning that the .rdp file is from associate unknown publisher. this can be expected. within the Remote Desktop association window, choose connect with continue.
 8. In the Windows Security window, choose additional decisions so Use a unique account. Enter the credentials for associate account on the virtual machine so choose OK.
Local account: this can be sometimes the native account user name and watchword that you simply specific after you created the virtual machine. during this case, the domain is that the name of the virtual machine and it’s entered as vmname\username.
Domain joined VM: If the VM belongs to a website, enter the user name within the format Domain\Username. The account conjointly must either be within the directors cluster or are granted remote access privileges to the VM.
Domain controller: If the VM may be a domain controller, enter the user name and watchword of a website administrator account for that domain.
9. Select affirmative to verify the identity of the virtual machine and end work on.
Tip:
If the Connect button within the portal is grayed-out associated you’re not connected to Azure via an categorical Route or Site-to-Site VPN association, you’ll ought to produce and assign your VM a public bioinformatics address before you’ll be able to use RDP. For additional data, see Public bioinformatics addresses in Azure.
Connect to the virtual machine exploitation Power Shell
Note:
This article has been updated to use the new Azure Power Shell Az module. you’ll be able to still use the Azure RM module, which can still receive bug fixes till a minimum of Dec 2020. to find out additional concerning the new Az module and Azure RM compatibility, see Introducing the new Azure Power Shell Az module. For Az module installation directions, see Install Azure PowerShell.
If you’re exploitation Power Shell and have the Aure Power Shell module put in you’ll conjointly connect exploitation the Get-Az Remote Desktop File cmdlet, as shown below.
This example can directly launch the RDP association, taking you thru similar prompts as on top of.
PowerShell
Copy
Get-AzRemoteDesktopFile -ResourceGroupName “RgName” -Name “VmName” -Launch
You may conjointly save the RDP file for future use.
PowerShell
Copy
Get-AzRemoteDesktopFile -ResourceGroupName “RgName” -Name “VmName” -LocalPath “C:\Path\to\fo